Search
Shift Synchronization
Setup - Social Messaging
Queues
Shift Synchronization
Read more
Example PowerShell script
Setup - General
CRM
Example PowerShell script
Read more
Statistics
How to use
Contact Center
Statistics
Read more
Supervisor
How to use
Contact Center
Supervisor
Read more
Agent
How to use
Contact Center
Agent
Read more
SocialConversationParticipant Export
API
Social Messaging
SocialConversationParticipant Export
Read more
SocialConversationInfo Export
API
Social Messaging
SocialConversationInfo Export
Read more
SocialQueue Export
API
Social Messaging
SocialQueue Export
Read more
Virtual Call Info
API
Contact Center
Virtual Call Info
Read more
Quality Assurance
API
AI Flow
Quality Assurance
Read more
Sentiment
API
AI Flow
Sentiment
Read more
Summary
API
AI Flow
Summary
Read more
Transcript
API
AI Flow
Transcript
Read more
MCP Server Setup
API
General
MCP Server Setup
Read more
Customer data
API
General
Customer data
Read more
General
How to use
Contact Center
General
Read more
Create App Registration for Email TouchPoint
Setup - Social Messaging
Email Touchpoint
Create App Registration for Email TouchPoint
Read more
Module settings
Setup - General
Insights & Analytics
Module settings
Read more
Examples
Setup - General
Permissions
Examples
Read more
Setup Access
Setup - General
Permissions
Setup Access
Read more
Configure Teams client to enable Toastar
Setup - General
CRM Calling Integration (Toastar)
Configure Teams client to enable Toastar
Read more
Enable users
Setup - General
CRM Calling Integration (Toastar)
Enable users
Read more
Webhook & Postback URL
Setup - General
CRM Calling Integration (Toastar)
Webhook & Postback URL
Read more
Add TOASTAR App to Teams
Setup - General
CRM Calling Integration (Toastar)
Add TOASTAR App to Teams
Read more
Create Teams Virtual User
Setup - General
CRM Calling Integration (Toastar)
Create Teams Virtual User
Read more
Register Azure BOT Channel
Setup - General
CRM Calling Integration (Toastar)
Register Azure BOT Channel
Read more
Example PowerShell script
Setup - General
Custom CRM Connector
Example PowerShell script
Read more
Phonebook
Setup - General
CRM Replicator
Phonebook
Read more
Webchat to Teams
Setup - Social Messaging
Examples
Webchat to Teams
Read more
WhatsApp to Teams
Setup - Social Messaging
Examples
WhatsApp to Teams
Read more
Recognize customer by email
Setup - Social Messaging
Examples
Recognize customer by email
Read more
Use webchat form to recognize customer
Setup - Social Messaging
Examples
Use webchat form to recognize customer
Read more
Start voice call (Beta)
Setup - Social Messaging
Graphical Designer
Start voice call (Beta)
Read more
CRM
Setup - Social Messaging
Graphical Designer
CRM
Read more
AddTranscript
Setup - Social Messaging
Graphical Designer
AddTranscript
Read more
Translate
Setup - Social Messaging
Graphical Designer
Translate
Read more
OpenAI
Setup - Social Messaging
Graphical Designer
OpenAI
Read more
GetFormInput
Setup - Social Messaging
Graphical Designer
GetFormInput
Read more
HttpAction
Setup - Social Messaging
Graphical Designer
HttpAction
Read more
Go to
Setup - Social Messaging
Graphical Designer
Go to
Read more
Convert Image
Setup - Social Messaging
Graphical Designer
Convert Image
Read more
SetAction
Setup - Social Messaging
Graphical Designer
SetAction
Read more
GetPageVisits
Setup - Social Messaging
Graphical Designer
GetPageVisits
Read more
Sentiment
Setup - Social Messaging
Graphical Designer
Sentiment
Read more
Powerhook
Setup - Social Messaging
Graphical Designer
Powerhook
Read more
SendEmailAction
Setup - Social Messaging
Graphical Designer
SendEmailAction
Read more
Chatbot
Setup - Social Messaging
Graphical Designer
Chatbot
Read more
Get Transcript
Setup - Social Messaging
Graphical Designer
Get Transcript
Read more
Set Participant
Setup - Social Messaging
Graphical Designer
Set Participant
Read more
Schedule
Setup - Social Messaging
Graphical Designer
Schedule
Read more
Merge
Setup - Social Messaging
Graphical Designer
Merge
Read more
Choice
Setup - Social Messaging
Graphical Designer
Choice
Read more
IF
Setup - Social Messaging
Graphical Designer
IF
Read more
WaitInput
Setup - Social Messaging
Graphical Designer
WaitInput
Read more
SendMessageTo
Setup - Social Messaging
Graphical Designer
SendMessageTo
Read more
The basics
Setup - Social Messaging
Graphical Designer
The basics
Read more
Webhooks for SMS Provider
Setup - Social Messaging
SMS TouchPoint
Webhooks for SMS Provider
Read more
Sandbox cm.com
Setup - Social Messaging
WhatsApp for Business TouchPoint
Sandbox cm.com
Read more
WhatsApp OUT
Setup - Social Messaging
WhatsApp for Business TouchPoint
WhatsApp OUT
Read more
Adding templates
Setup - Social Messaging
WhatsApp for Business TouchPoint
Adding templates
Read more
Webhooks for WhatsApp Providers
Setup - Social Messaging
WhatsApp for Business TouchPoint
Webhooks for WhatsApp Providers
Read more
Customize Layout
Setup - Social Messaging
Webchat TouchPoint
Customize Layout
Read more
Add status message
Setup - Social Messaging
Webchat TouchPoint
Add status message
Read more
Webchat Parameters
Setup - Social Messaging
Webchat TouchPoint
Webchat Parameters
Read more
Create adaptive card
Setup - Social Messaging
Microsoft Teams
Create adaptive card
Read more
Connect Teams Channel
Setup - Social Messaging
Microsoft Teams
Connect Teams Channel
Read more
Add ROGER365 app to Teams
Setup - Social Messaging
Microsoft Teams
Add ROGER365 app to Teams
Read more
AI Endpoints
Setup - Contact Center
AI Flow (Beta)
AI Endpoints
Read more
Classification Action Configurations
Setup - Contact Center
AI Flow (Beta)
Classification Action Configurations
Read more
Quality Assurance Forms
Setup - Contact Center
AI Flow (Beta)
Quality Assurance Forms
Read more
Audio Providers
Setup - Contact Center
AI Flow (Beta)
Audio Providers
Read more
Flows
Setup - Contact Center
AI Flow (Beta)
Flows
Read more
Last Conversation Data
Setup - Contact Center
Graphical Designer
Last Conversation Data
Read more
Call to SMS (Beta)
Setup - Contact Center
Graphical Designer
Call to SMS (Beta)
Read more
Store feedback
Setup - Contact Center
Graphical Designer
Store feedback
Read more
Call to WhatsApp (Beta)
Setup - Contact Center
Graphical Designer
Call to WhatsApp (Beta)
Read more
Cancel Virtual Call
Setup - Contact Center
Graphical Designer
Cancel Virtual Call
Read more
Get Virtual Call Info
Setup - Contact Center
Graphical Designer
Get Virtual Call Info
Read more
Make Call Virtual
Setup - Contact Center
Graphical Designer
Make Call Virtual
Read more
OpenAI
Setup - Contact Center
Graphical Designer
OpenAI
Read more
Last agent
Setup - Contact Center
Graphical Designer
Last agent
Read more
Text to Speech
Setup - Contact Center
Graphical Designer
Text to Speech
Read more
Speech to Text
Setup - Contact Center
Graphical Designer
Speech to Text
Read more
VoiceRecording
Setup - Contact Center
Graphical Designer
VoiceRecording
Read more
Switch
Setup - Contact Center
Graphical Designer
Switch
Read more
Subflow
Setup - Contact Center
Graphical Designer
Subflow
Read more
Set Variable
Setup - Contact Center
Graphical Designer
Set Variable
Read more
Send Webhook
Setup - Contact Center
Graphical Designer
Send Webhook
Read more
IF
Setup - Contact Center
Graphical Designer
IF
Read more
HTTPAction
Setup - Contact Center
Graphical Designer
HTTPAction
Read more
Wait Timer
Setup - Contact Center
Graphical Designer
Wait Timer
Read more
CRM
Setup - Contact Center
Graphical Designer
CRM
Read more
Cancel Task
Setup - Contact Center
Graphical Designer
Cancel Task
Read more
Cancel all Tasks
Setup - Contact Center
Graphical Designer
Cancel all Tasks
Read more
Queue
Setup - Contact Center
Graphical Designer
Queue
Read more
Get Queue Info
Setup - Contact Center
Graphical Designer
Get Queue Info
Read more
WaitForEnd
Setup - Contact Center
Graphical Designer
WaitForEnd
Read more
Set language
Setup - Contact Center
Graphical Designer
Set language
Read more
Safe Transfer
Setup - Contact Center
Graphical Designer
Safe Transfer
Read more
Schedule
Setup - Contact Center
Graphical Designer
Schedule
Read more
Contact Center
How to use
Contact Center
Read more
Setup Access & Security
Setup - General
Setup Access & Security
Read more
Schedules
Setup - Contact Center
Schedules
Read more
Resource Accounts
Setup - Contact Center
Resource Accounts
Read more
Queues
Setup - Contact Center
Queues
Read more
Callflows
Setup - Contact Center
Callflows
Read more
Audio Files
Setup - Contact Center
Audio Files
Read more
Agents
Setup - Contact Center
Agents
Read more
Logging
How to use
Logging
Read more
Audit
Setup - General
Audit
Read more
CRM
Setup - General
CRM
Read more
Languages
Setup - General
Languages
Read more
Create Tenant App
Setup - General
Create Tenant App
Read more
Getting started
Getting started
Getting started
Read more
Subscriptions
How to use
Subscriptions
Read more
Call Flows
Setup - Contact Center
Call Flows
Read more
AI Flow
API
AI Flow
Read more
Copilot Touchpoint
Setup - Social Messaging
Copilot Touchpoint
Read more
Insights & Analytics
Setup - General
Insights & Analytics
Read more
Wallboard
Setup - General
Wallboard
Read more
Permissions
Setup - General
Permissions
Read more
Logging
Setup - General
Logging
Read more
CRM Calling Integration (Toastar)
Setup - General
CRM Calling Integration (Toastar)
Read more
Custom CRM Connector
Setup - General
Custom CRM Connector
Read more
Default CRM Connectors
Setup - General
Default CRM Connectors
Read more
CRM Replicator
Setup - General
CRM Replicator
Read more
Email Configuration
Setup - General
Email Configuration
Read more
Schedules
Setup - General
Schedules
Read more
Agent Assist
Setup - General
Agent Assist
Read more
Setup Access & Security
Setup - General
Setup Access & Security
Read more
Malicious File Blocking
Setup - Social Messaging
Malicious File Blocking
Read more
Wallboard
Setup - Social Messaging
Wallboard
Read more
Reporting
Setup - Social Messaging
Reporting
Read more
Messages
Setup - Social Messaging
Messages
Read more
Examples
Setup - Social Messaging
Examples
Read more
Graphical Designer
Setup - Social Messaging
Graphical Designer
Read more
Using the library
Setup - Social Messaging
Using the library
Read more
Email Touchpoint
Setup - Social Messaging
Email Touchpoint
Read more
API TouchPoint
Setup - Social Messaging
API TouchPoint
Read more
Facebook TouchPoint
Setup - Social Messaging
Facebook TouchPoint
Read more
SMS TouchPoint
Setup - Social Messaging
SMS TouchPoint
Read more
WhatsApp for Business TouchPoint
Setup - Social Messaging
WhatsApp for Business TouchPoint
Read more
Webchat TouchPoint
Setup - Social Messaging
Webchat TouchPoint
Read more
Microsoft Teams
Setup - Social Messaging
Microsoft Teams
Read more
Queues
Setup - Social Messaging
Queues
Read more
AI Flow (Beta)
Setup - Contact Center
AI Flow (Beta)
Read more
Classification
Setup - Contact Center
Classification
Read more
Skill Based Routing
Setup - Contact Center
Skill Based Routing
Read more
Reason Codes
Setup - Contact Center
Reason Codes
Read more
Audio Prompts
Setup - Contact Center
Audio Prompts
Read more
Agent Profiles
Setup - Contact Center
Agent Profiles
Read more
Agents
Setup - Contact Center
Agents
Read more
Call Park
Setup - General
Call Park
Read more
Resource Accounts
Setup - Contact Center
Resource Accounts
Read more
Graphical Designer
Setup - Contact Center
Graphical Designer
Read more
Form Based callflow
Setup - Contact Center
Form Based callflow
Read more
Using the library
Setup - Contact Center
Using the library
Read more
Queues
Setup - Contact Center
Queues
Read more
General
Setup - Contact Center
General
Read more
Agent page functionalities
How to use
Agent page functionalities
Read more
Social Messaging
How to use
Social Messaging
Read more
Contact Center
How to use
Contact Center
Read more
Support & Assistance
Getting Started
Support & Assistance
Read more
Compliance by design
Getting Started
Compliance by design
Read more
Social Messaging
API
Social Messaging
Read more
Contact Center
API
Contact Center
Read more
Getting Started
Getting Started
Getting Started
Read more
General
API
General
Read more
No results
Try a different search query
Menu
What are you looking for?
Thank you! Your submission has been received!
Oops! Something went wrong while submitting the form.
Setup - General
Agent Assist

Agent Assist

The Agent Assist of ROGER365.io enables agents to see crucial information regarding their customer such as CRM data (if configured), historical interactions with customer, and Classification of current interaction.
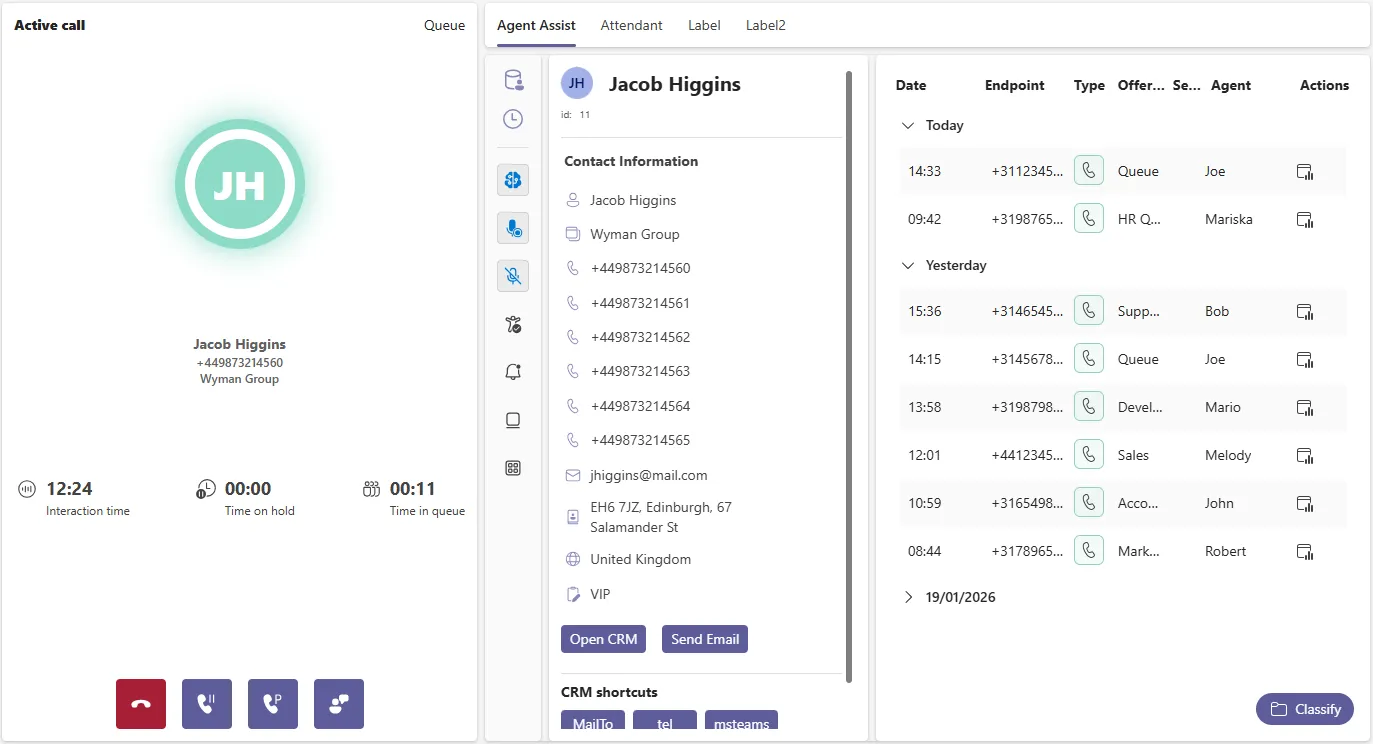
When the call invite is offered to the available in the Queue agent, the Agent Assist tab populates three main sections – “User”, “History” and “Classification” (as a icon). The Agent Assist stays open until the completed Wrap-up item. In case of Social Messaging interactions, Agent Assist will become visible after picking up conversation from the Queue.

You can also open Agent Assist without an active call or conversation. To do this, navigate to the History tab (under the search field), select one of the voice/social records.

Each sections of the Agent Assist can be hidden/shown or maximized using the small icons in the top right corner of specific section –

Or by pressing purple section’s icon on the left side of Agent Assist –


Custom view will be saved during the agent’s session.

The Users section presents most important details of resolved by CRM Replicator contact. Additionally it does have two available buttons:

  • “Open CRM” will redirect an agent to the URL configured at “ContactUrl” field of CRM contact.
  • “Send Email” will open the “Mailto Link” with the email address of resolved contact which redirects an agent to the Email service of choice.

“CRM shortcuts” section shows configured earlier CRM’s Action Buttons based on assigned CRM Replicator to this Queue – CRM’s Action Buttons reference.

The History section presents the last 10 historical interactions with the present customer. You can see both voice and social interactions.

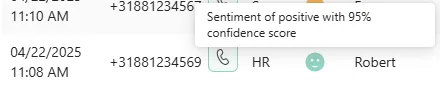
In case of not being able to read the entire content, an agent can hover their mouse cursor over specific piece of data to see the tooltip with full description. Agent can also maximize the History tab, which will hide the other 2 sections to ensure a clear overview of interactions with the customer.

Sentiment score will be shown for Social conversation when the messageflow does contain Sentiment action.
Seniment score will be shown for Voice calls based on Sentiment Action result of AI Flow.

There’re 3 levels for Sentiment’s confidence score:

  • Negative
  • Neutral
  • Positive

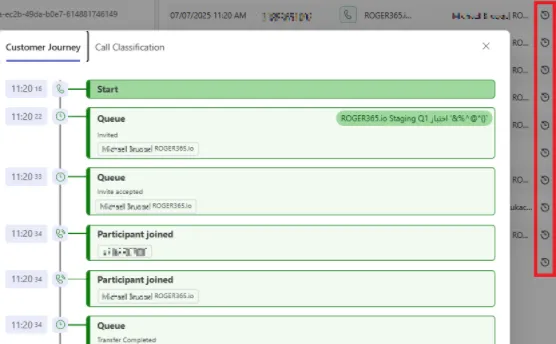
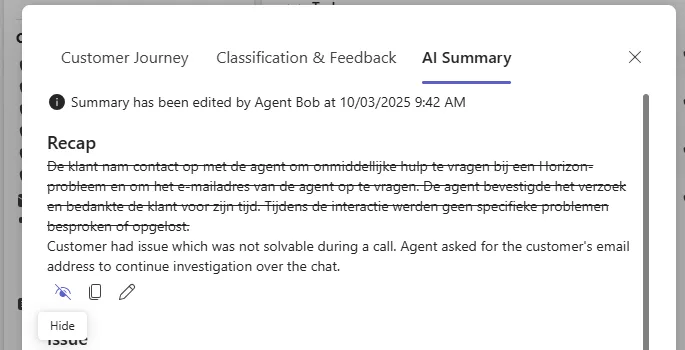
If the agent has the appropriate permissions, a Customer Timeline button is displayed. Clicking this button opens a popup with a detailed timeline for the selected interaction. Agents can also view the interaction classification, which is assigned either manually by a previous agent or automatically by the Classification action (which is part of powerful AI Flow feature). The popup also includes an AI-generated summary that consolidates the key details of the interaction, allowing agents to review and/or edit it if any information is inaccurate. The feature of AI-generated summary of social conversations is available to configure in the End node.
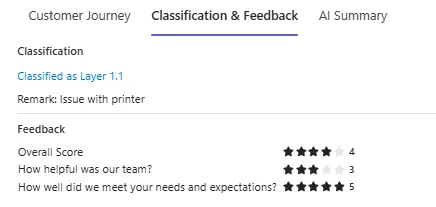
If the caller gave his feedback thanks to configured earlier “Store feedback” action, the “Classification & Feedback” tab allows to check this information:
The Classification section (icon) by default won’t contain any of the Classification. This must be first configured, check Classification documentation.

The created Classification will be available during the next interaction with the customer (refresh the application if it’s not visible). When assigning a Classification for the interaction, there is an option to add an optional Remark. This is a useful feature for leaving internal notes for specific customer interactions, either for yourself or other agents.

Reference to Classification documentation in order to retrieve configuration of created Classification, as well as the Classification assigned during the conversation.

Note: Remarks have a hard limit of 2048 characters.

Show Agent Assist for Selected Contact

As an agent, you can open Agent Assist as a separate tab for a selected CRM contact. This allows you to view all relevant contact details without needing to answer a conversation or locate the corresponding history record, saving significant time and effort.

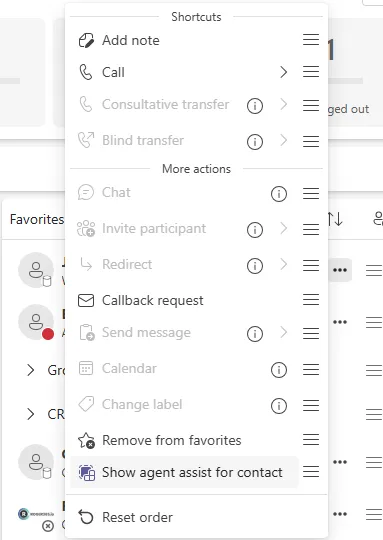
Open the More Actions menu next to the selected contact record and click the “Show agent assist for contact” button:
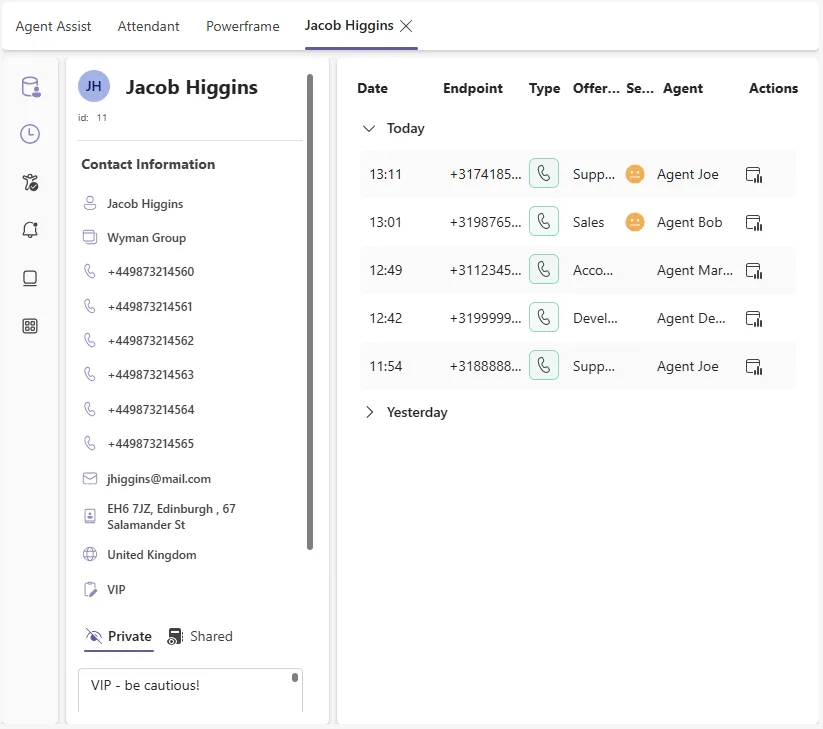
Note: Accepting a new call or social conversation does not automatically close this tab or shift focus away from it. This tab must be closed or switched to manually. Classification and call/conversation-related variables are not supported, as there is no corresponding call or conversation record associated with this action.

Beyond the default sections, ROGER365.io portal admins can create custom Action Buttons for Agent Assist.
This feature allows admins to assign specific URLs, labels, and icons to each button, which will appear as shortcut buttons for agents. The main benefit of this functionality is that it enables agents to quickly navigate to pre-configured pages with a single click, eliminating the need to switch between multiple pages during customer conversations.

To enable Agent Assist for an agents, the Agent Assist Profile needs to be created.

Navigate to “Agent Assist Profile” admin page, and press “+Add Agent Assist Profile”. Enter the name and description for Agent Assist Profile.
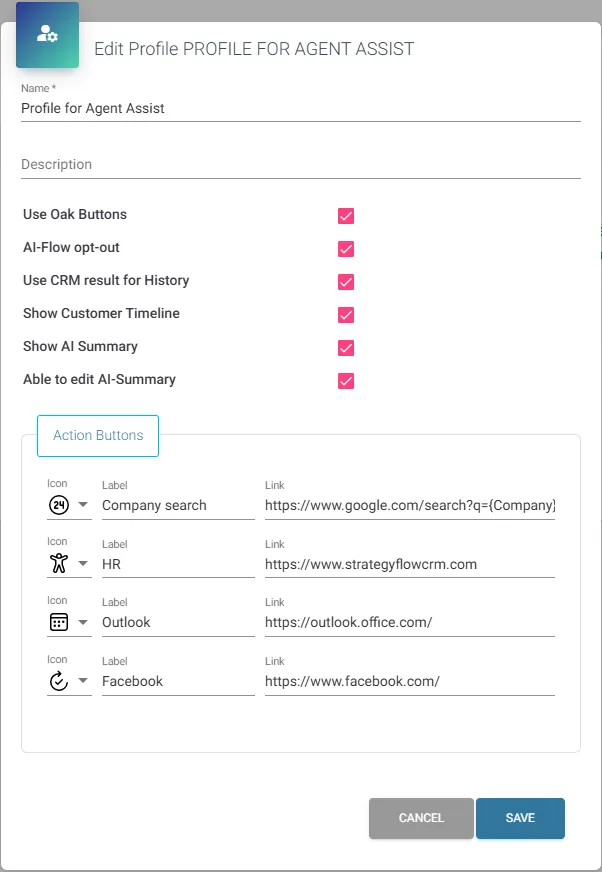
In case of using OAK Clarify Voice Recording Integraion, you can make use of option “Use Oak Buttons” (blue microphone icons underneath section’s purple icons). This feature allows the agents to either Pause or Resume recording of the current call, useful option for various cases.

Notes: In order to use Pasue/Resume recording feature, at the ClarifyGo Automation rules you have to configure a rule set with certain values, for instance:

  • PauseRecording action with DTMF Value
    *#0
  • ResumeRecording action with DTMF Value
    *#1

See the ClarifyGo documentation pages for instructions.
Depending on mobile provider, a caller may hear DTMF tone upon pressing Pause/Resume buttons.

  • “AI-Flow opt-out” – will show the button in Agent Assist which allow agents to opt-out AI Flow from the current call. This option may be useful when certain conversation (often private) should not be processed by various AI actions. This setting is presented as a blue button (first blue icon underneath section’s purple icons) labeled as “Opt out of AI assistance”.
  • Optional “Use CRM result for History” setting will make Webchat conversation visible in Last interaction section (only when user has been resolved in CRM Replicator by the phone number). This option is useful in case of the same user deciding to call a Queue.
  • “Show Customer Timeline” – will show the button in the Agent assist so that an agent is able to see the customer timeline.
  • “Show AI Summary” – will show the AI summary tab
    • For calls –  if AI Flow was enabled on the agent who was present in the call.
    • For social conversations – if summarization of the conversation transcript succeeded.
  • “Able to edit AI Summary” – will allow agents to edit the AI Summary

Action Buttons

  • Icon – select icon which will be presented in Agent Assist to an agent (under purple section’s icons)
  • Label – tooltip label after hovering mouse cursor over configured Action Button in Agent Assist
  • Link – URL address for the Action Button – Link supports usage of variables

Created Agent Assist Profile needs to be assigned. This can be done in two ways:

  1. Assign “Agent Assist Profile” to created earlier Agent Profile. This will enable an Agent Assist for every agent of the Agent Profile.
  2. Assign “Agent Assist Profile” to specific agent via Agents admin page.
On this page