

Search
Example PowerShell script
Setup - General
CRM
Example PowerShell script
Text Link
Statistics
How to use
Contact Center
Statistics
Text Link
Supervisor
How to use
Contact Center
Supervisor
Text Link
Agent
How to use
Contact Center
Agent
Text Link
Contact Center
How to use
Contact Center
Text Link
Setup Access & Security
Setup - General
Setup Access & Security
Text Link
Schedules
Setup - Contact Center
Schedules
Text Link
Resource Accounts
Setup - Contact Center
Resource Accounts
Text Link
Queues
Setup - Contact Center
Queues
Text Link
Callflows
Setup - Contact Center
Callflows
Text Link
Audio Files
Setup - Contact Center
Audio Files
Text Link
Agents
Setup - Contact Center
Agents
Text Link
Logging
How to use
Logging
Text Link
Audit
Setup - General
Audit
Text Link
CRM
Setup - General
CRM
Text Link
Languages
Setup - General
Languages
Text Link
Create Tenant App
Setup - General
Create Tenant App
Text Link
Getting started
Getting started
Getting started
Text Link
Subscriptions
How to use
Subscriptions
Text Link
Call Flows
Setup - Contact Center
Call Flows
Text Link
AI Flow
API
AI Flow
Text Link
Copilot Touchpoint
Setup - Social Messaging
Copilot Touchpoint
Text Link
Insights & Analytics
Setup - General
Insights & Analytics
Text Link
Wallboard
Setup - General
Wallboard
Text Link
Permissions
Setup - General
Permissions
Text Link
Logging
Setup - General
Logging
Text Link
CRM Calling Integration (Toastar)
Setup - General
CRM Calling Integration (Toastar)
Text Link
Custom CRM Connector
Setup - General
Custom CRM Connector
Text Link
Default CRM Connectors
Setup - General
Default CRM Connectors
Text Link
CRM Replicator
Setup - General
CRM Replicator
Text Link
Email Configuration
Setup - General
Email Configuration
Text Link
Schedules
Setup - General
Schedules
Text Link
Agent Assist
Setup - General
Agent Assist
Text Link
Setup Access & Security
Setup - General
Setup Access & Security
Text Link
Malicious File Blocking
Setup - Social Messaging
Malicious File Blocking
Text Link
Wallboard
Setup - Social Messaging
Wallboard
Text Link
Reporting
Setup - Social Messaging
Reporting
Text Link
Messages
Setup - Social Messaging
Messages
Text Link
Examples
Setup - Social Messaging
Examples
Text Link
Graphical Designer
Setup - Social Messaging
Graphical Designer
Text Link
Using the library
Setup - Social Messaging
Using the library
Text Link
Email Touchpoint
Setup - Social Messaging
Email Touchpoint
Text Link
API TouchPoint
Setup - Social Messaging
API TouchPoint
Text Link
Facebook TouchPoint
Setup - Social Messaging
Facebook TouchPoint
Text Link
SMS TouchPoint
Setup - Social Messaging
SMS TouchPoint
Text Link
WhatsApp for Business TouchPoint
Setup - Social Messaging
WhatsApp for Business TouchPoint
Text Link
Webchat TouchPoint
Setup - Social Messaging
Webchat TouchPoint
Text Link
Microsoft Teams
Setup - Social Messaging
Microsoft Teams
Text Link
Queues
Setup - Social Messaging
Queues
Text Link
AI Flow (Beta)
Setup - Contact Center
AI Flow (Beta)
Text Link
Classification
Setup - Contact Center
Classification
Text Link
Skill Based Routing
Setup - Contact Center
Skill Based Routing
Text Link
Reason Codes
Setup - Contact Center
Reason Codes
Text Link
Audio Prompts
Setup - Contact Center
Audio Prompts
Text Link
Agent Profiles
Setup - Contact Center
Agent Profiles
Text Link
Agents
Setup - Contact Center
Agents
Text Link
Call Park
Setup - General
Call Park
Text Link
Resource Accounts
Setup - Contact Center
Resource Accounts
Text Link
Graphical Designer
Setup - Contact Center
Graphical Designer
Text Link
Form Based callflow
Setup - Contact Center
Form Based callflow
Text Link
Using the library
Setup - Contact Center
Using the library
Text Link
Queues
Setup - Contact Center
Queues
Text Link
General
Setup - Contact Center
General
Text Link
Agent page functionalities
How to use
Agent page functionalities
Text Link
Social Messaging
How to use
Social Messaging
Text Link
Contact Center
How to use
Contact Center
Text Link
Support & Assistance
Getting Started
Support & Assistance
Text Link
Compliance by design
Getting Started
Compliance by design
Text Link
Social Messaging
API
Social Messaging
Text Link
Contact Center
API
Contact Center
Text Link
Getting Started
Getting Started
Getting Started
Text Link
General
API
General
Text Link
No results
Try a different search query
Menu
Thank you! Your submission has been received!
Oops! Something went wrong while submitting the form.
What are you looking for?
Getting started
How to use
Setup - General
Setup - Contact Center

Example PowerShell script

for custom replicator

We have created a Powershell example which uploads a CSV file to a custom replicator. In the example you have to fill in your connection URL and Authorization key in the Powershell script. In the attached CSV file you can add your own CRM data. Make sure you keep the correct columns in the example.

Click here to download the example ZIP

Step 1: Get connection URL and Authorization key

First you have to create a Custom CRM Replicator. How to do this, you can find here. In the configuration of the custom CRM replicator you can find the [connection url] and the [authorization key]. Copy these two values, you’ll need this in the next step.

Step 2: Change Powershell script

After you’ve downloaded the ZIP file above, extract in a directory (for example c:\temp\)  you’ll get two files:

  • UnifAI-SampleUploadCSV.ps1, this is the PowerShell script
  • SampleUploadCSV.csv, this contains a few example contacts

Open the file UnifAI-SampleUploadCSV.ps1 in Notepad or another script editor. Paste the Connection Url at:

$Url = "<paste your url here>"

and paste the Authorization Key at:

$AuthorizationKey = "<paste your key here>"

Save the file

Step 3: Fill the CSV file

In the file SampleUploadCSV.csv we have added a few dummy contacts. You can replace this list with an export of your own contacts, make sure to keep the columns and columns names. Keep in mind to define labels in the ROGER365.io admin portal for the CRM action buttons, in case ActionLink0-3 properties has been configured.

Step 4: Run the PowerShell script

Follow these steps to run the script and upload the contacts:

  • Open a command box
  • Go to the directory where you’ve extraced the files
  • Type: “Powershell” and press [Enter]
  • Type: “.\SampleUploadCSV.ps1” and press [Enter]
.\UnifAI-SampleUploadCSV.ps1

If the command was executed successfull you’ll see this:
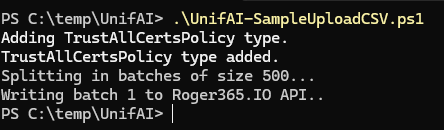
-> If you get this errormessage after executing the powershell script:

.\UnifAI-SampleUploadCSV.ps1 : File C:\temp\UnifAI-SampleUploadCSV\UnifAI-SampleUploadCSV.ps1 cannot be loaded. The file
C:\temp\UnifAI-SampleUploadCSV\UnifAI-SampleUploadCSV.ps1 is not digitally signed. You cannot run this script on the current system.
For more information about running scripts and setting execution policy, see about_Execution_Policies at
https:/go.microsoft.com/fwlink/?LinkID=135170.
At line:1 char:1
+ .\SampleUploadCSV.ps1
+ ~~~~~~~~~~~~~~~~~~~~~
+ CategoryInfo : SecurityError: (:) [], PSSecurityException
+ FullyQualifiedErrorId : UnauthorizedAccess

then you can first execute this command:

Set-ExecutionPolicy -Scope Process -ExecutionPolicy Bypass

and answer [Y] to allow the script to run.

If then the script has ran succesfully you’ll see that the contacts are uploaded to the platform:

On this page