We have created a Powershell example which uploads a CSV file to a custom replicator. In the example you have to fill in your connection URL and Authorization key in the Powershell script. In the attached CSV file you can add your own CRM data. Make sure you keep the correct columns in the example.
Click here to download the example ZIP
Step 1: Get connection URL and Authorization key
First you have to create a Custom CRM Replicator. How to do this, you can find here. In the configuration of the custom CRM replicator you can find the [connection url] and the [authorization key]. Copy these two values, you’ll need this in the next step.
Step 2: Change Powershell script
After you’ve downloaded the ZIP file above, extract in a directory (for example c:\temp\) you’ll get two files:
- UnifAI-SampleUploadCSV.ps1, this is the PowerShell script
- SampleUploadCSV.csv, this contains a few example contacts
Open the file UnifAI-SampleUploadCSV.ps1 in Notepad or another script editor. Paste the Connection Url at:
$Url = "<paste your url here>"and paste the Authorization Key at:
$AuthorizationKey = "<paste your key here>"Save the file
Step 3: Fill the CSV file
In the file SampleUploadCSV.csv we have added a few dummy contacts. You can replace this list with an export of your own contacts, make sure to keep the columns and columns names. Keep in mind to define labels in the ROGER365.io admin portal for the CRM action buttons, in case ActionLink0-3 properties has been configured.
Step 4: Run the PowerShell script
Follow these steps to run the script and upload the contacts:
- Open a command box
- Go to the directory where you’ve extraced the files
- Type: “Powershell” and press [Enter]
- Type: “.\UnifAI-SampleUploadCSV.ps1” and press [Enter]
.\UnifAI-SampleUploadCSV.ps1If the command was executed successfull you’ll see this:
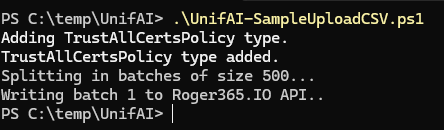
-> If you get this errormessage after executing the powershell script:
.\UnifAI-SampleUploadCSV.ps1 : File C:\temp\UnifAI\UnifAI-SampleUploadCSV.ps1 cannot be loaded. The file
C:\temp\UnifAI\UnifAI-SampleUploadCSV.ps1 is not digitally signed. You cannot run this script on the current system.
For more information about running scripts and setting execution policy, see about_Execution_Policies at
https:/go.microsoft.com/fwlink/?LinkID=135170.
At line:1 char:1
+ .\SampleUploadCSV.ps1
+ ~~~~~~~~~~~~~~~~~~~~~
+ CategoryInfo : SecurityError: (:) [], PSSecurityException
+ FullyQualifiedErrorId : UnauthorizedAccess
then you can first execute this command:
Set-ExecutionPolicy -Scope Process -ExecutionPolicy Bypassand answer [Y] to allow the script to run.
If then the script has ran succesfully you’ll see that the contacts are uploaded to the platform.
The Statistics screen gives an overview of call activity and agent availability for the queue, helping you understand how calls are being handled and how your team is distributed across different states. You can access it by clicking Statistics in the top navigation bar.
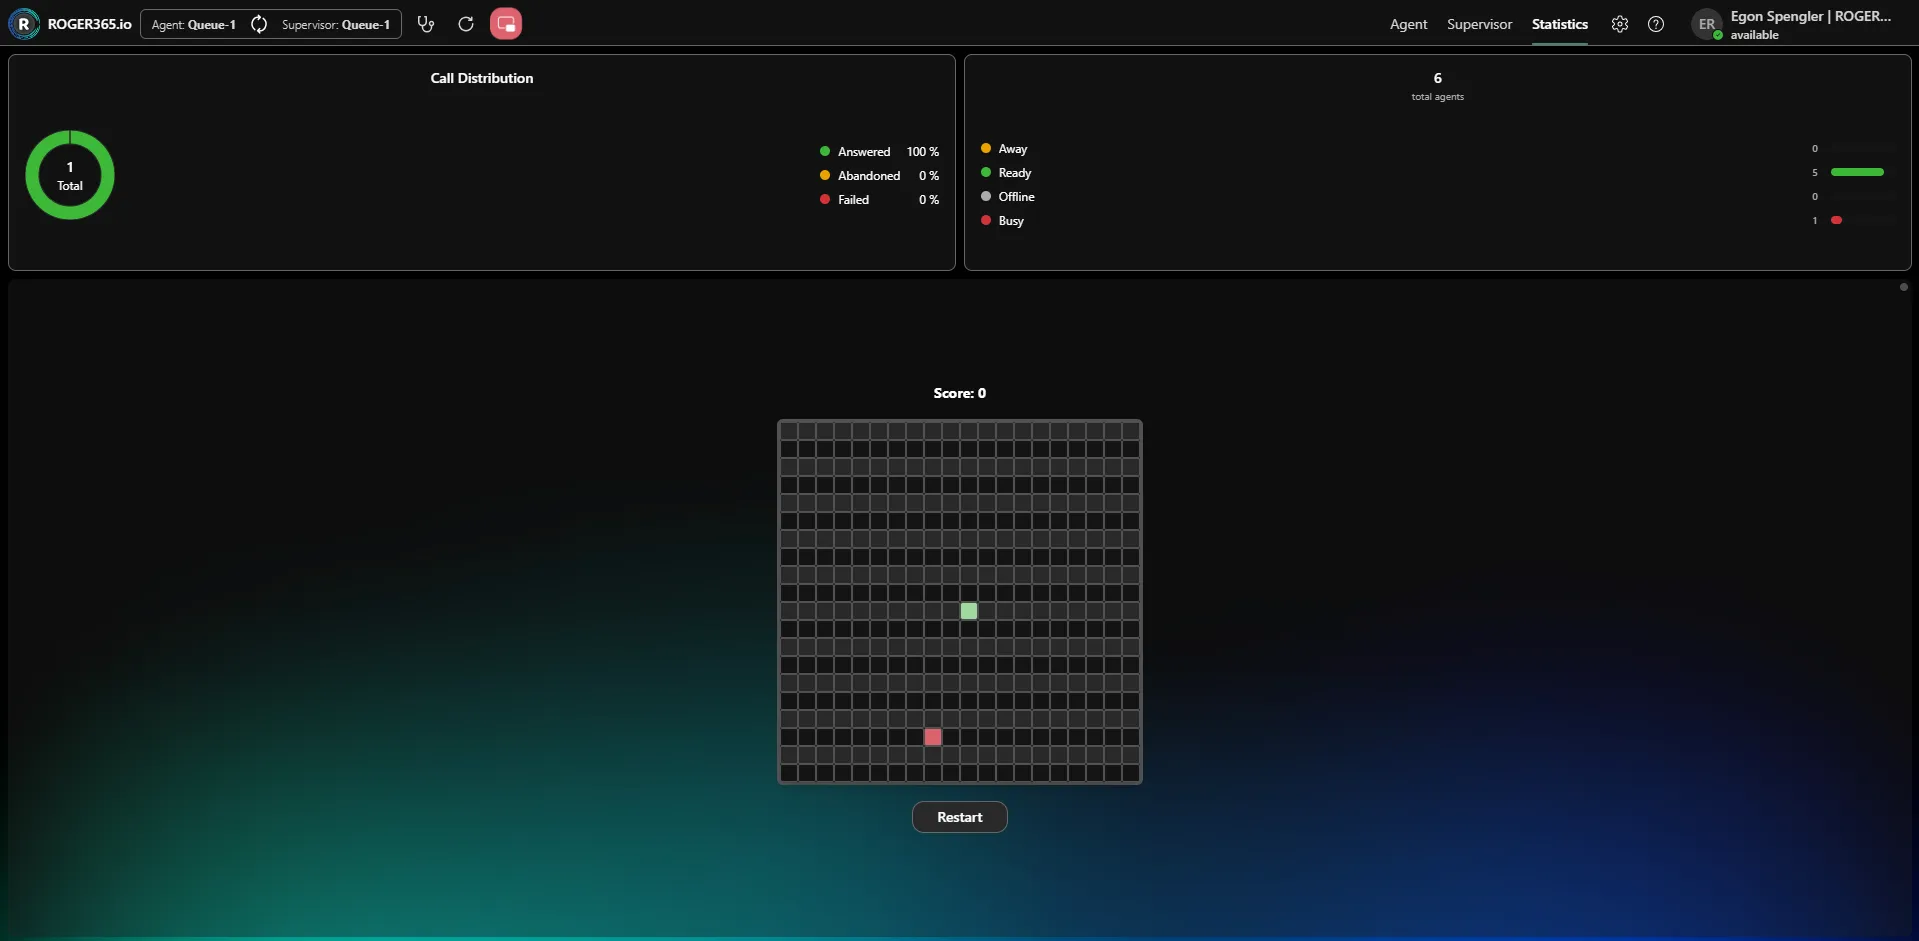
Call Distribution
This panel shows how calls have been handled, displayed as a donut chart with the total number of calls in the center (in this example, 1). The breakdown shows the percentage of calls in each category:
- Answered – Calls that were answered by an agent.
- Abandoned – Calls where the caller hung up before being answered.
- Failed – Calls that did not connect successfully.
Agent States
This panel shows the total number of agents (in this example, 6) and how they are currently distributed across the available states, with a count for each:
- Away – Agents who are temporarily away.
- Ready – Agents who are available to take calls.
- Offline – Agents who are not signed in.
- Busy – Agents who are currently on a call or otherwise occupied.
This gives you an at-a-glance view of how many agents are available and how many are occupied.
The Supervisor screen gives supervisors a real-time overview of their team's activity and the calls flowing through the queue. It allows supervisors to monitor agent availability, review performance, and keep track of both queued and active calls. You can access it by clicking Supervisor in the top navigation bar.
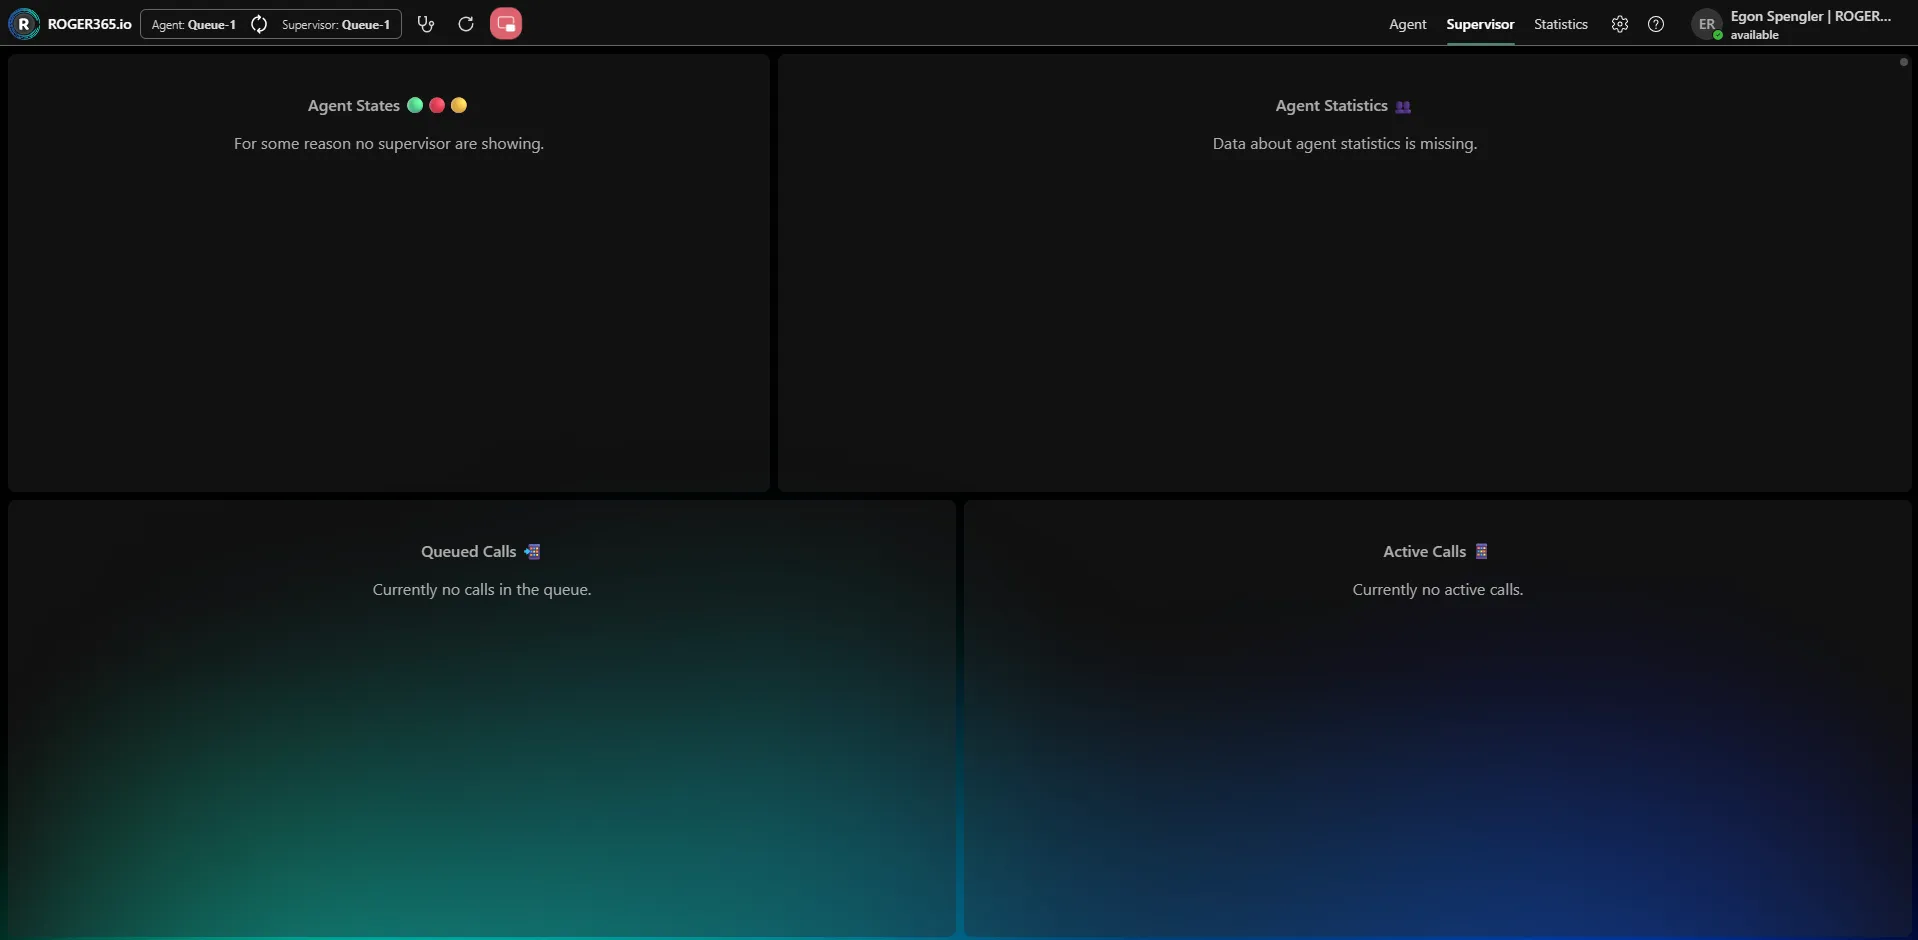
Visible only if you have supervisor rights.
Agent States
This panel shows the current status of each agent in the queue, indicated by colored markers—for example, green for available, red for busy or unavailable, and yellow for away. This gives supervisors an at-a-glance view of who is ready to take calls. When no agent states are available, a message indicates that none are showing. Supervisors can force-change the status of an agent, when they are not on a call.
Agent Statistics
This panel displays performance statistics for each agent, helping supervisors track how their team is handling calls. When no data is available, a message indicates that agent statistics are missing.
Queued Calls
This panel lists the calls currently waiting in the queue, so supervisors can see how many callers are waiting and for how long. When there are no waiting calls, a message indicates that there are currently no calls in the queue.
Active Calls
This panel lists the calls currently being handled by agents, giving supervisors visibility into ongoing conversations. When there are no calls in progress, a message indicates that there are currently no active calls. The supervisor can use the Join call button to silently join and listen/participate (your mic starts muted so you don't interrupt).
The Agent screen is the main workspace agents use to handle calls, monitor queue activity, and access their contacts. It provides a real-time overview of incoming and active calls, along with tools to manage them. You can access the ROGER365.io UnifAI agent app at app.roger365.io.
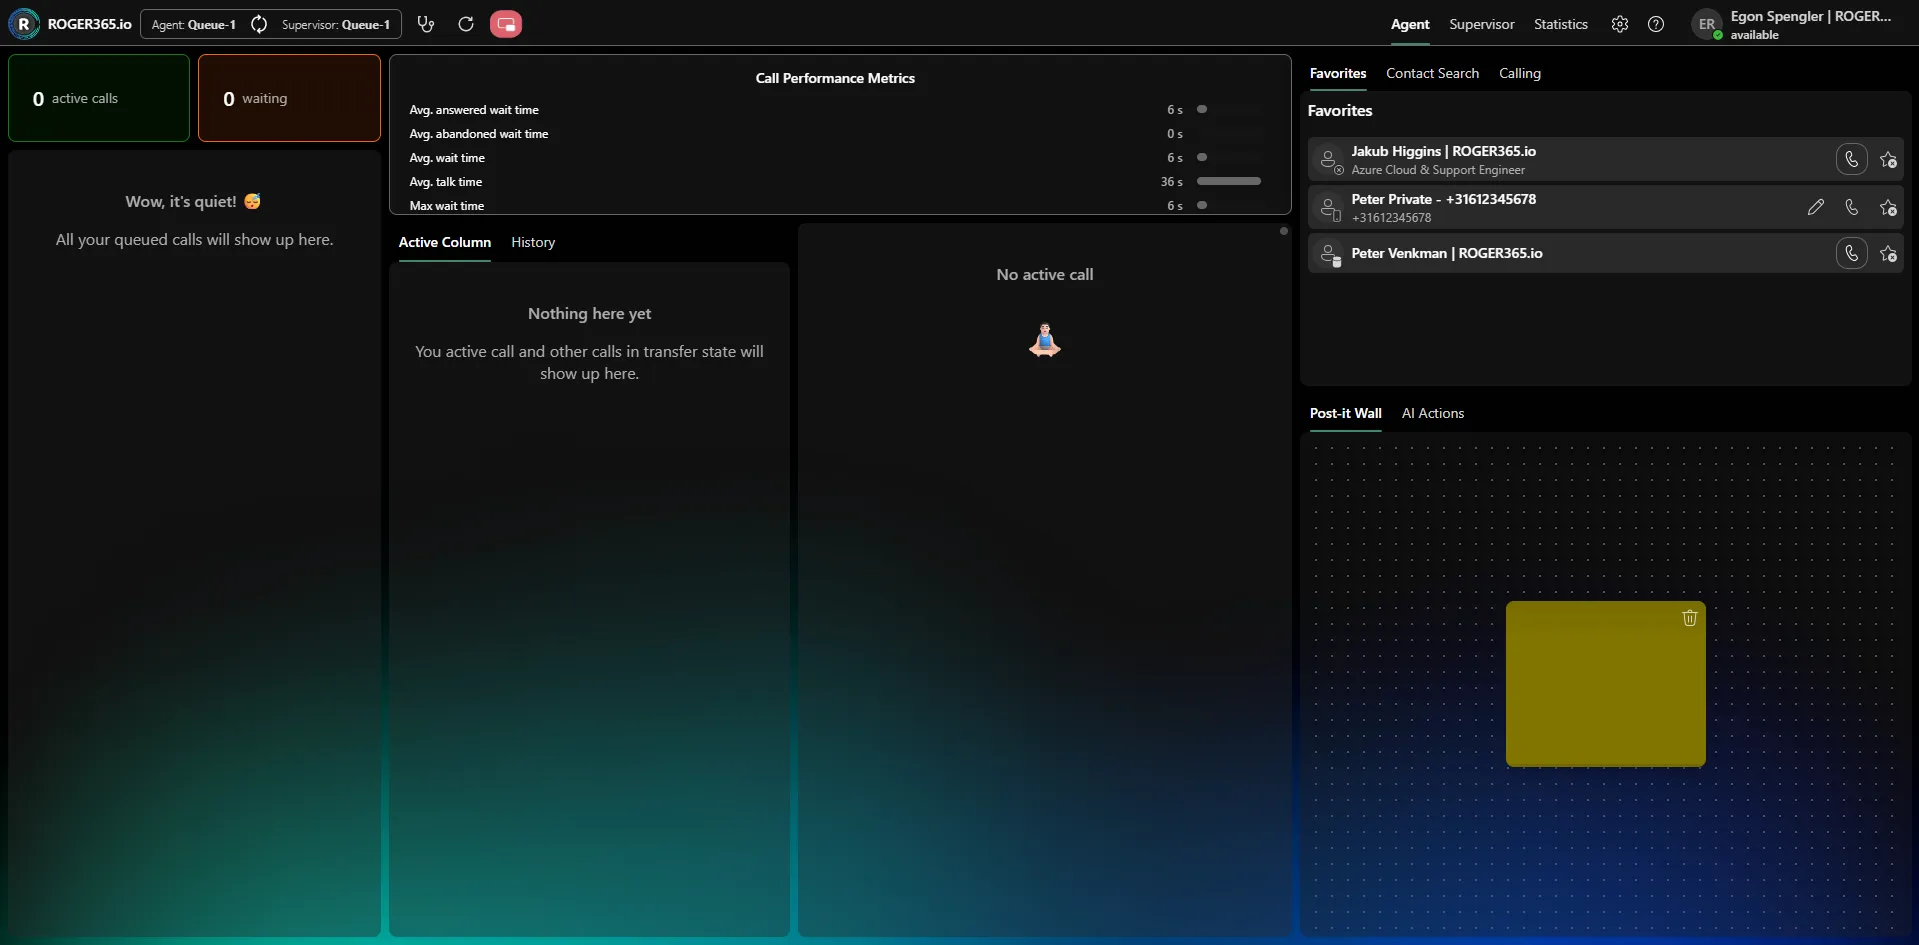
Overview of the agent screen
Top navigation bar
Along the top of the screen you'll find:
- The queue selectors, showing the queues the agent and supervisor are currently assigned to (for example, Agent: Queue-1 and Supervisor: Queue-1).
- Call controls and a refresh button for managing the workspace.
- The main views—Agent, Supervisor, and Statistics—which switch between the different areas of the application.
- A settings icon and a help icon.
- Your user profile in the top-right corner, showing your name and current presence status (for example, "available"). You can use this to set your availability.
Queue overview
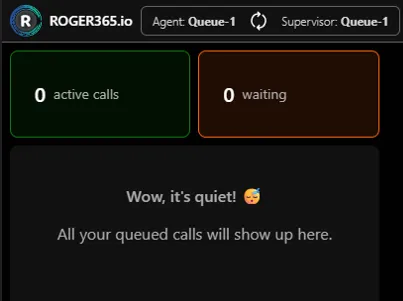
The left panel gives an at-a-glance view of queue activity:
- Active calls – The number of calls currently being handled.
- Waiting – The number of callers currently waiting in the queue.
When there are no calls, a message indicates that any queued calls will appear here.
Call Performance Metrics
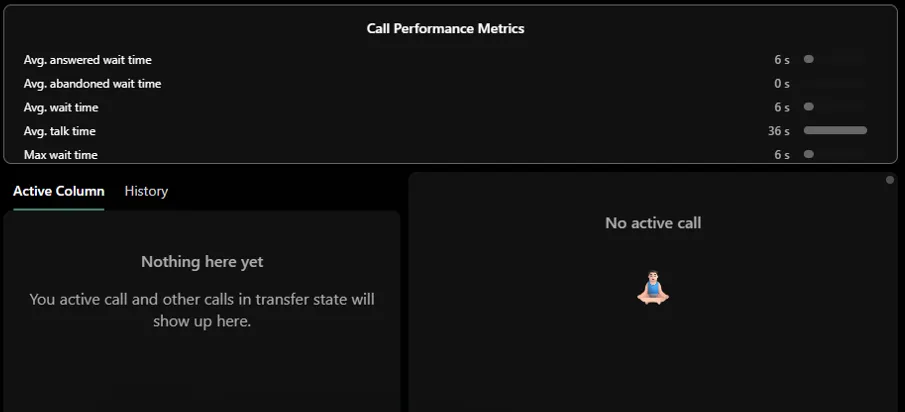
The center panel displays real-time performance metrics for the queue, including average answered wait time, average abandoned wait time, average wait time, average talk time, and maximum wait time. These help agents and supervisors monitor how calls are being handled.
Below the metrics, two tabs are available:
- Active Column – Shows your active call and any calls in a transfer state.
- History – Shows your recent call history.
The area to the right displays details of the current call, or "No active call" when you are not on a call.
Contacts and calling
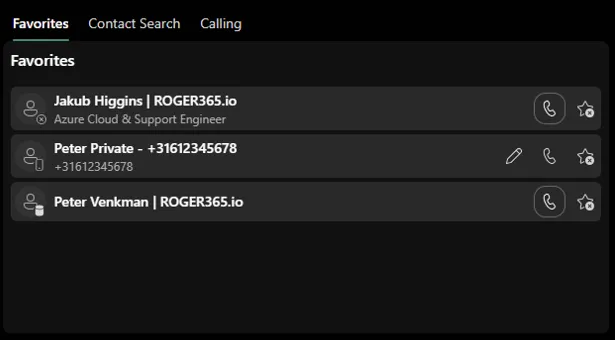
The top of the right panel provides quick access to contacts through three tabs:
- Favorites – Your saved favorite contacts for quick dialing. Each contact shows a call button and controls to edit or remove them.
- Contact Search – Search for contacts across your directory.
- Calling – Place calls directly.
Post-it Wall and AI Actions
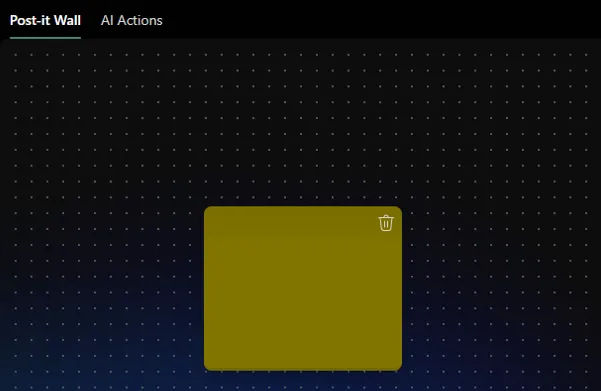
At the bottom of the right panel, two tabs are available:
- Post-it Wall – A space for adding digital sticky notes as quick reminders. You can add colored notes and remove them using the trash icon.
- AI Actions – Access AI-powered actions to assist with your work.
Signing In
- Open the app. You'll see the login page with the ROGER365 logo.
- Click Login. You'll be redirected to your organization's sign-in page (the same login you use for other Microsoft/company apps).
- After signing in, you're taken to the Agent page.
If you see "Agent not configured": your account hasn't been set up as an agent yet. Contact your administrator. You can log out from this screen.
Connecting Microsoft 365: to receive calls and see your contacts/presence, you also need to sign in to Microsoft 365. If this hasn't happened yet, you'll see a "Sign in to receive calls" button in the top bar — click it to complete this second sign-in step.
Connection status: a red "Calling Service Disconnected" chip appears in the top bar if the calling connection drops. Click it to reconnect.
Your Status
Click your agent card (top-right corner) to open a menu where you can set your status:
- Available
- Busy
- Away
- Offline
("In call" is set automatically while you're on a call — you can't select it yourself.)
If you have permission, the same menu also has Reset default layout and Log out.
Answering an Incoming Call
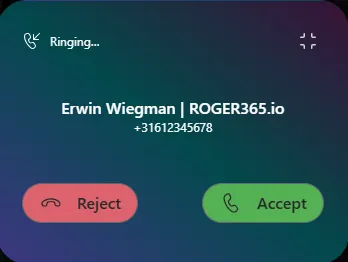
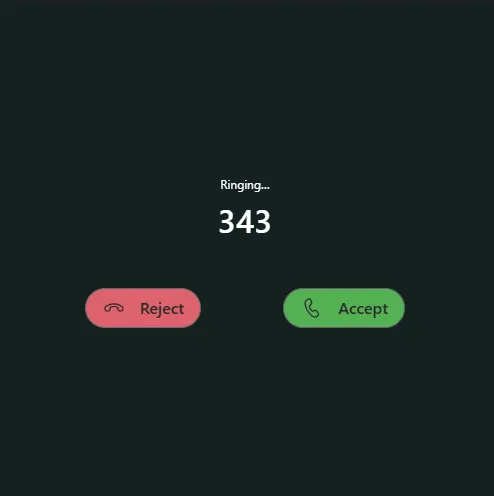
- A ringing pop-up appears showing the caller's name or number, with a red Reject and a green Accept button.
- A ringtone plays. If the browser tab isn't focused, a desktop notification also appears — click it to bring the app to the front.
- You can minimize the ringing pop-up to a small floating card and drag it anywhere on screen, then reopen it.
- Keyboard shortcuts: Ctrl+Shift+A to answer, Ctrl+Shift+D to decline.
If a call you previously transferred comes back to your queue, it shows a "Take back call" button.
During a Call
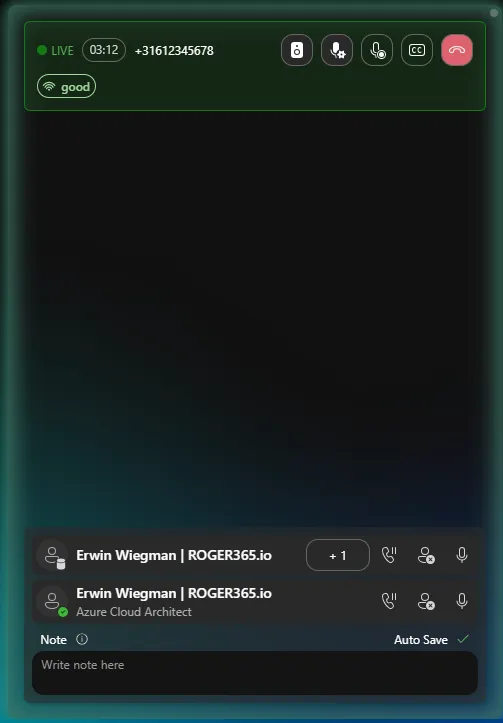
Once accepted, the call appears as your Active Interaction with a green LIVE badge and a running timer.
Call controls:
- Choose microphone / speaker
- Record the call (if enabled for you)
- Live captions/transcript (start/stop)
- Mute / unmute yourself
- Hold / resume
- End call, or during a transfer: Leave call / Cancel transfer
Other indicators you may see: a transfer-in-progress badge, an emergency-call (SOS) icon, and a color-coded call quality badge.
Participants list — everyone on the call, each with:
- Mute/unmute (external phone callers can't be muted remotely — you'll see a warning)
- Hold/resume
- Remove from call
- Select (focus on that person)
Call notes — a text box next to the participants list. It auto-saves as you type, and travels with the call if it's transferred, so the next agent has context.
Transferring or Adding People to a Call
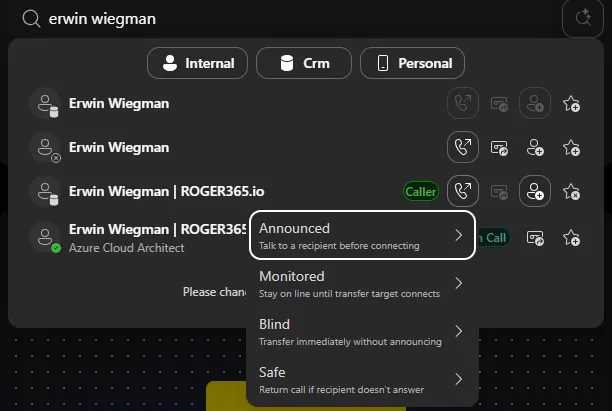
From any contact card (search results, favorites, or the participant list):
- Call — dial them (shown only when you're not already on a call)
- Transfer — choose a style:
- Announced — talk to them first, then connect (default)
- Monitored — stay on the line until they answer
- Blind — transfer immediately, no announcement
- Safe — call returns to you automatically if they don't answer
- Transfer to voicemail — send the caller to that person's Teams voicemail (Microsoft 365 contacts only, only while on a call)
- Invite / Add to call — bring a third person in as a conference, instead of transferring
- Add to favorites / Edit label — manage your personal shortcuts
Making Calls & Finding People
- Dialer — type or dial a number, then Call. If you're already on a call, the same number can instead be added to the call or transferred to.
- Contact search — search your organization's directory (requires Microsoft 365 sign-in). Results appear live as you type.
- Advanced search — click the magnifying glass next to search to filter by Name, Department, Job title, Email, Mobile phone, Business phone, or Office location. Save frequent searches as reusable pills (hold the dismiss button to remove one — this is deliberate, to avoid accidental deletes).
- Favorites — your personal starred contacts, with live presence and quick call/transfer buttons. Rename entries you've saved by phone number.
Every contact shown anywhere in the app has a colored presence dot reflecting their live Microsoft Teams status, refreshed automatically.
Queues & Your Current Calls
- Queue widget — every call currently ringing/waiting in your queue(s), including calls ringing for a colleague. Shows caller, queue, which agent it's ringing for, and wait time.
- Interaction list — your own current calls (live call plus anything mid-transfer), each with a duration and a status badge (Active, Waiting, or a transfer type). Click a card to bring it into the main call view.
- Queue selector (top bar) — pick which queue you're viewing, including an "on behalf of" queue if you're covering for someone. A red sync icon warns you if your view is out of date.
Call History
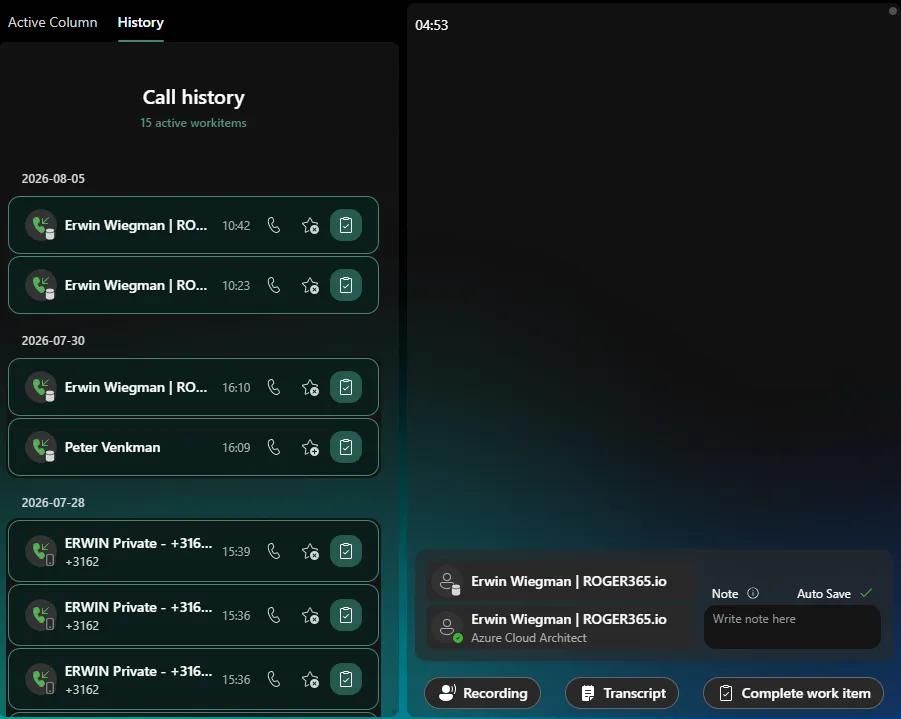
The History widget groups past calls by date (expandable list). Each call can offer:
- Summary — an AI-generated written summary (only if a transcript exists)
- Transcript — the full text transcript
- Recording — downloadable recording link(s), opens in a new tab
- Complete work item — if a call left an open work item, it's highlighted with a button to mark it done (shortcut: Ctrl+Shift+C)
Use Load more at the bottom to fetch older calls.
Settings and Customizing Layout
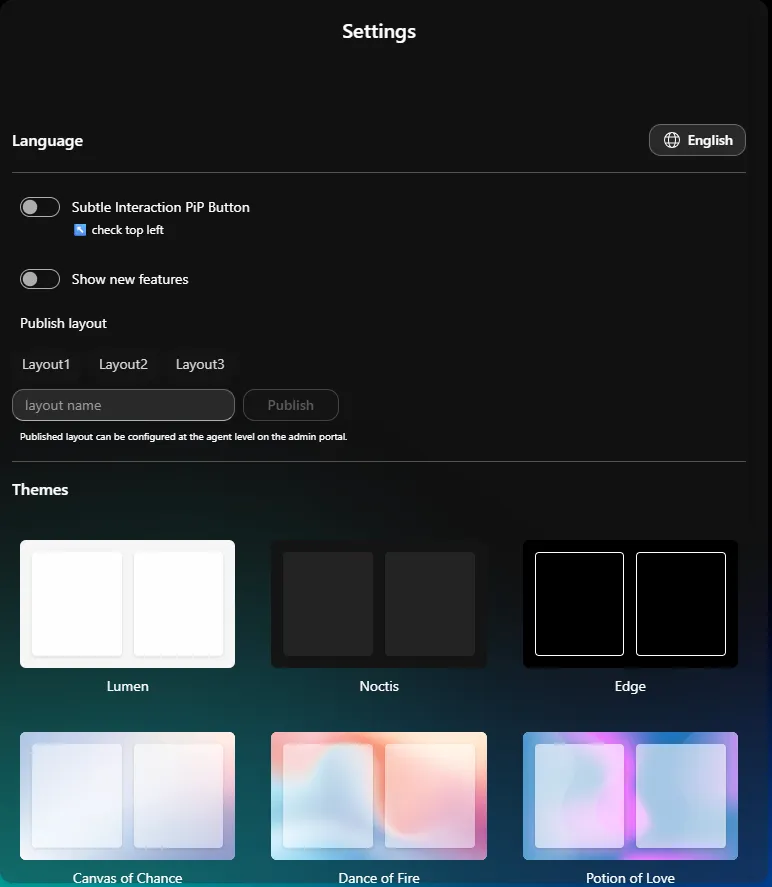
Open via the gear icon in the top bar:
- Language selector
- Whether the pop-out active call button is subtle or prominent
- Whether new-feature announcement badges appear in the top bar
- Publish layout (if you have upload rights)
- Theme — pick a visual theme/background
Customizing Your Layout
If your account allows it, hover over any widget to reveal:
- Style menu — change its appearance
- Pop out — open it in its own floating window (useful for a second monitor)
- Dock to widget bar — minimize it to a small icon on the side; click to bring it back
- Drag handle — click-and-hold to move or resize it
Use Reset default layout in your agent menu to undo your changes.
If you have upload rights, the Settings page also has Publish layout, to save your arrangement as a named layout an administrator can assign to other agents.
Picture-in-Picture
If you navigate away from the Agent page while on a call, a floating pop-out button appears. Click it to open the call in a small window that floats over everything else, so you can keep talking while working elsewhere. The main call widget will show "Check elsewhere! Call is running in Picture-in-Picture mode."
Notifications
- Toasts (small pop-ups) confirm or warn about actions — e.g. a failed transfer, or "Can't change state during call." They dismiss automatically or via a Dismiss link.
- A "Network Disconnected" banner appears if your internet connection drops.
- Desktop notifications for incoming calls appear when the app tab isn't focused.
Checking Your Setup
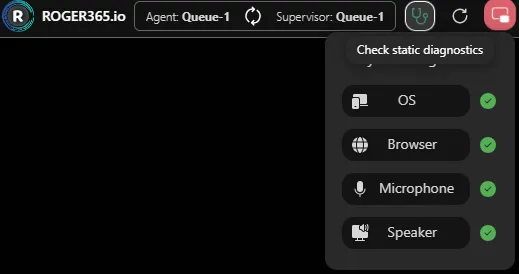
Click the stethoscope icon in the top bar to check whether your Operating System, Browser, Microphone, and Speaker are supported and working — useful to self-check before contacting IT.
Welcome to the Call Center how-to section. This section walks you through the main screens agents and supervisors use day to day to handle calls, monitor activity, and keep track of performance on the ROGER365.io platform.
The Call Center is made up of three main screens, each designed for a specific role and purpose:
Agent – The agent's personal workspace for handling calls. From here, agents can see incoming and active calls, monitor queue activity in real time, access their contacts and favorites, and place calls. It also includes handy tools such as the Post-it Wall and AI Actions to support them throughout the day.
Supervisor – A real-time overview for supervisors to keep an eye on their team. This screen shows agent availability, agent performance, and both queued and active calls, making it easy to see how calls are flowing through the queue and who is available to take them.
Statistics – A high-level view of call activity and agent availability. This screen breaks down how calls have been handled—answered, abandoned, or failed—and shows how agents are distributed across their different states.
Use the guides in this section to get familiar with each screen and make the most of the tools available to you. Pick a page from the left-side menu to learn more.
The ROGER365.io admin portal is the web based portal that is used by ROGER365.io administrators to manage the platform.
Manage access to the admin portal
ROGER365.io only uses Microsoft industry standard technology. The ROGER365.io is an Enterprise application within the Microsoft Azure Entra Id. Via this Enterprise Application you can allow users to sign-in to ROGER365.io admin portal or not. It is strongly recommended to configure the ROGER365.io Enterprise Application within Azure Entra Id according to your own company policy.
- Login into Microsoft Office 365 and choose the Azure Entra Id Admin Center.
- Select the option [Enterprise applications]. TIP: Click search field and type: enterprise, the search will show the option “Enterprise applications”.
- Choose the application “ROGER365.io” or search in the rights search field for this application. Click the application to see the details.
- Choose [Properties] and make sure the following settings are enabled. Make sure the option “User assignment required?” is set to YES. Click [Save] to confirm these changes.
- Select “Users and groups” and add any user or group you would like to give access to the ROGER365.io admin portal. Also change the default access to the Admin role to avoid having issues.
- Assign the correct role to the user.
For example ‘UnifAI-Admin‘ for users who must have access to the ROGER365.io admin portal and should have access to all security options
set ‘UnifAI-Portal User‘ for users should have access to the admin portal but should not have access to the security settings. - Click [Save] to confirm the changes.
Roles can also be assigned to an Active Directory group (recommended); however, this requires a Microsoft Azure AD Premium license (minimum Azure Entra ID P1).
Make sure that all of the required Microsoft 365 URLs and IP address ranges for Microsoft Teams are allowed in your network infrastructure.
The Schedules page is where you manage the schedules used on your platform. A schedule defines the operating hours for a call flow—such as business hours, after-hours, and holidays—determining how calls are handled at different times. You can find this page under the Contact Center section in the left-hand menu.

Understanding the page
The counter at the top shows the total number of schedules currently configured (in this example, 1). Each schedule is listed in a table with the following columns:
- Details – The name of the schedule (for example, "Default Schedule"), shown with its initials in the icon on the left.
- Actions – The controls for managing each schedule.
Working with schedules
To create a new schedule, click the Add New button in the top-right corner.
To edit an existing schedule, click the blue pencil icon in the Actions column for that row. To delete a schedule, click the red trash icon in the same row.
Maintaining a Schedule
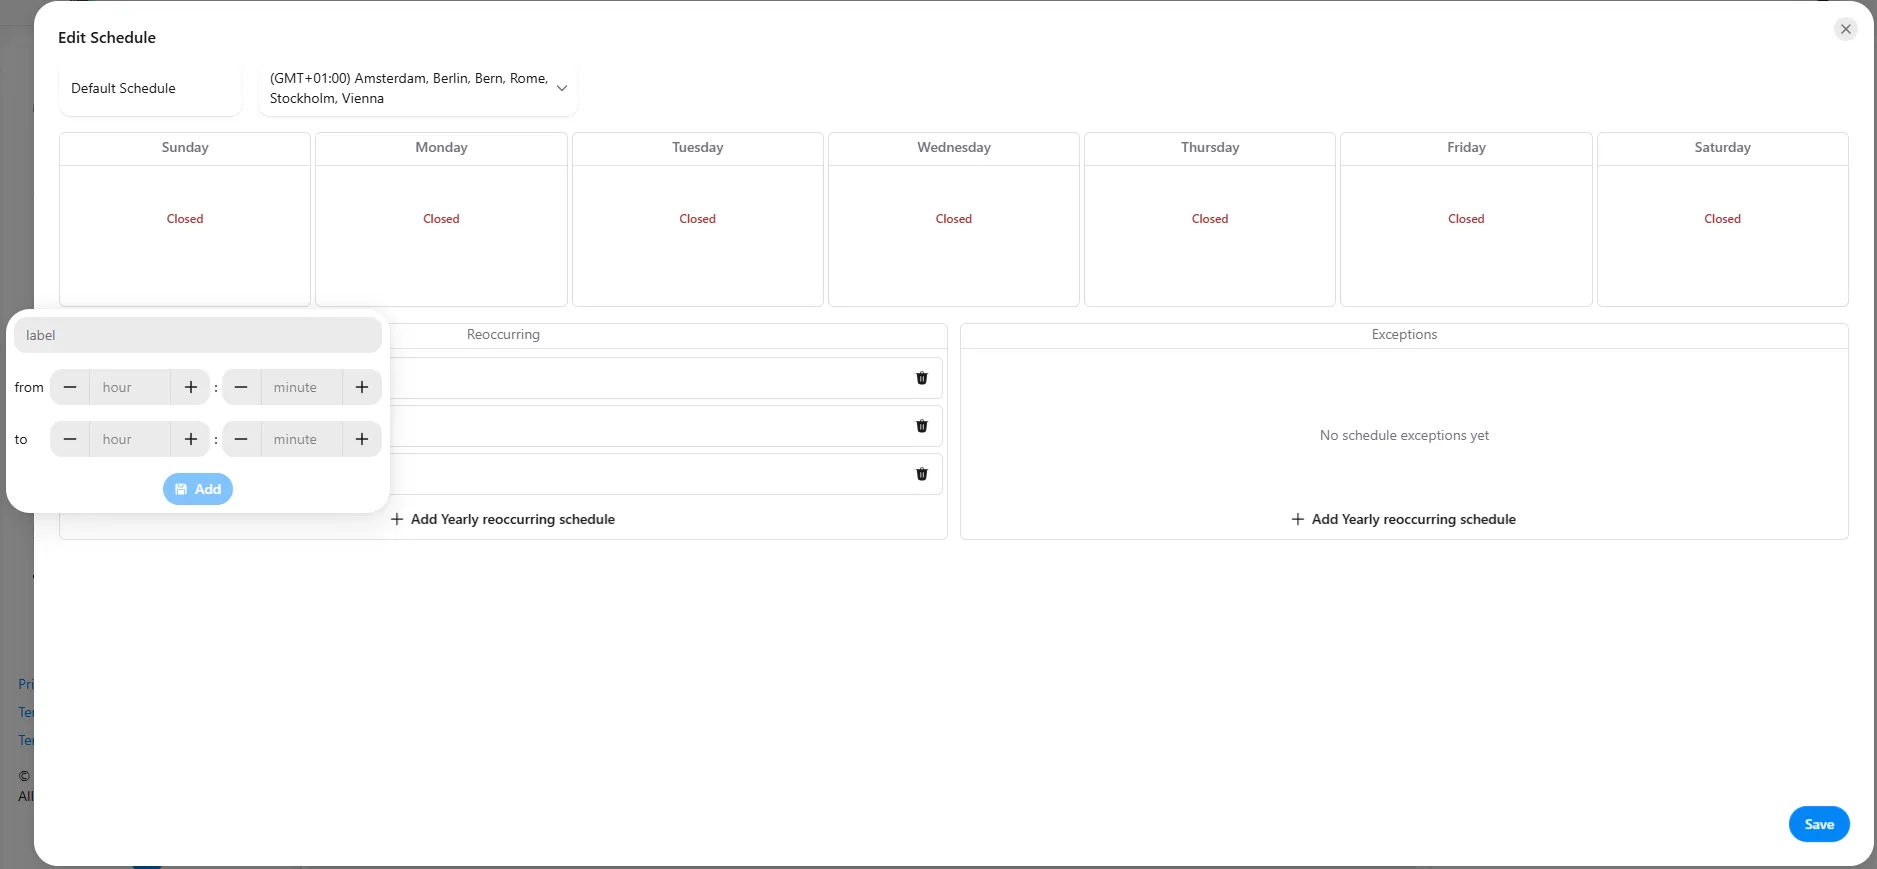
The Edit Schedule dialog lets you define the operating hours for the schedule, including weekly opening times, recurring yearly periods, and exceptions. Click the blue pencil icon next to a schedule on the Schedules page to open this dialog.
Schedule name and time zone
At the top of the dialog, you can edit the schedule's name (for example, "Default Schedule") and select the time zone that the schedule's hours are based on (for example, GMT+01:00 Amsterdam, Berlin, Bern, Rome, Stockholm, Vienna).
Setting weekly opening hours
The seven days of the week are displayed across the top. By default, each day is marked as "Closed." To set opening hours for a day, click on that day to open the time editor, where you can:
- Enter an optional label for the time block.
- Set the "from" time using the hour and minute controls (use the plus and minus buttons to adjust the values).
- Set the "to" time in the same way.
- Click Add to apply the time block to that day.
You can add multiple time blocks to a single day—for example, to account for a lunch break by creating a morning block and an afternoon block.
Once you have added opening hours to a day, the time blocks are displayed within that day's column (for example, "08:00 - 17:00" for Sunday). Each day can have one or more time blocks, and you can manage them using the following controls:
- Copy – Click the copy icon on a time block to duplicate its hours, allowing you to quickly apply the same times to other days.
- Delete – Click the trash icon on a time block to remove it from that day.
- Add Open Time – Click the Add Open Time button to add another time block to the day. This lets you define multiple opening periods for a single day—for example, a morning and an afternoon block separated by a lunch break.
When all time blocks are removed from a day, it is marked as "Closed."
Recurring schedules
In the Reoccurring section, you can define yearly recurring periods—such as regular seasonal hours. Click Add Yearly reoccurring schedule to create one, and use the trash icon next to an entry to remove it.
Exceptions
In the Exceptions section, you can define specific dates that override the normal schedule, such as public holidays. When no exceptions have been set, the message "No schedule exceptions yet" is displayed. Click Add Yearly reoccurring schedule to add an exception.
Saving your changes
When you have finished configuring the schedule, click Save in the bottom-right corner to apply your changes.
Before proceeding make sure that your account has Global Administrator role in Microsoft 365 tenant. Make sure that your SBC setup allows forwarding from Teams to Teams (only Direct Routing).
Prerequisites
In Microsoft Teams, a resource account is required for each call queue. Resource accounts may also be assigned service telephone numbers. This is how you create a resource account and assign a phone number allowing callers from outside Teams to reach the ROGER365.io queue.
If you haven’t installed the Teams PowerShell module on your PC, you can find the relevant information here: https://docs.microsoft.com/en-us/microsoftteams/teams-powershell-install
if you haven't installed the Graph PowerShell SDK on your PC, you can find the relevant information here: https://learn.microsoft.com/en-us/powershell/microsoftgraph/installation?view=graph-powershell-1.0
We advise to use Teams PowerShell module – version 7.8.0, or above
1. Check if Azure Communication Services is enabled for your tenant
The Azure Communication Services is default not available in every tenant. When this is not present, registering resource accounts to the ACS resource will fail. You can test if the service is already provisioned to the target tenant. This command requires at least the Application Administrator or Global Administrator role to create service principals. This has to be done once per tenant.
- Start a PowerShell session from your pc
- Log in the MgGraph powershell module with this command
Connect-MgGraph- Check if Azure communcation services is available for this tenant
Get-MgServicePrincipal -Filter "displayName eq 'Azure Communication Services'"- When Azure Communication Services is not in the tenant, it can be added with these commands
Connect-MgGraph -Scopes AppRoleAssignment.ReadWrite.All,Application.ReadWrite.All -NoWelcome
New-MgServicePrincipal -Appid '1fd5118e-2576-4263-8130-9503064c837a'
2. Create new Resource Account in Teams PowerShell module
- Start a PowerShell session from your pc
- Log in the MicrosoftTeams powershell module with this command
Connect-MicrosoftTeams- Using the Microsoft Teams PowerShell module, create a new resource account. Update the UserPrincipalName and DisplayName values to align with your environment's naming conventions
New-CsOnlineApplicationInstance -UserPrincipalName "user@domain.com" -ApplicationId 'c8db29b6-8184-44fa-a6a1-086b8ae0435e' -DisplayName "DisplayNameOfAccount"
3. Assign “Microsoft Teams Phone Resource Account” license
- Navigate to Office365 Admin portal via: https://admin.microsoft.com
- Select [Users] / [Active users] and select your created resource account from the previous step
- Assign the resource account a “Microsoft Teams Phone Resource Account”. If this license is unavailable, go to [Billing] / [Purchase Services] where you can add this (free) license
4. Connect the resource account to the ROGER365.io ACS resources
To connect your resource account to the ACS resources, use the ACS resource ID from the table. Select the cluster closest to where the PSTN resource account number was provisioned.
- Configure the resource account with the acs resourceId, using the following command. Insert the username of the previously created resource account, along with the acs resource id from the table, into the command.
Set-CsOnlineApplicationInstance -ApplicationId "c8db29b6-8184-44fa-a6a1-086b8ae0435e" -Identity "user@domain.com" -AcsResourceId "ACS resource Id of Cluster"
5. Assign a number to the Resource Account
If the Set-CsPhoneNumberAssignment command returns the error 'The application endpoint was not found in Active Directory,' this generally means Azure AD has not yet fully synced. Wait a few minutes and try again.
Direct routing
- If not yet connected start a PowerShell session from your PC like done in step 1
- Configure the resource account with a phone number, phone type, and reverse number lookup using the following command. Insert the username of the previously created resource account, along with the correct phone number, into the command.
Set-CsPhoneNumberAssignment -Identity "user@domain.com" -PhoneNumber +1222333444 -PhoneNumberType DirectRouting -ReverseNumberLookup 'SkipInternalVoip'Update Contact Information of Resource Account identity in Entra ID (only for Direct Routing)
- Navigate to your Entra ID tenant and locate Resource Account’s DisplayName provided in step 1.
- On the Contact Information tab, enter the phone number used in the PowerShell command in the 'Business phone' field.
Operator Connect
- If not yet connected start a PowerShell session from your PC like done in step 1
- Configure the resource account with a phone number and phone type, using the following command. Insert the username of the previously created resource account, along with the correct phone number, into the command.
Set-CsPhoneNumberAssignment -Identity "user@domain.com" -PhoneNumber +1222333444 -PhoneNumberType OperatorConnect
Calling plan
- If not yet connected start a PowerShell session from your PC like done in step 1
- Configure the resource account with a phone number and phone type, using the following command. Insert the username of the previously created resource account, along with the correct phone number, into the command.
Set-CsPhoneNumberAssignment -Identity "user@domain.com" -PhoneNumber +1222333444 -PhoneNumberType CallingPlan
6. Synchronize changes to Microsoft Teams
To make all changes active, the resource account has to be synced to Microsoft Teams.
- In PowerShell run the following command. Insert the username of the previously created resource account
$Instance = Get-CsOnlineApplicationInstance -Identity "user@domain.com"- Run the command to get the ObjectId of the resource account. Save the ObjectID, it will be used later.
$Instance.ObjectID- Run the command to synchronize the change to MicrosofTeams to make them active
Sync-CsOnlineApplicationInstance -ObjectID $Instance.ApplicationId -ApplicationId "c8db29b6-8184-44fa-a6a1-086b8ae0435e"
To check your configured resource account, use the following command.
Get-CsOnlineApplicationInstance -Identity "user@domain.com" | fl
Resource Accounts page
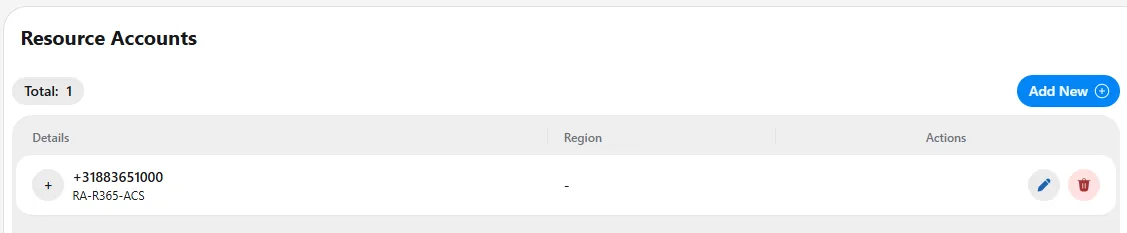
The Resource Accounts page is where you manage the Teams resource accounts used on your platform. A resource account is associated with a phone number and is used for routing calls, including outbound calling from queues. You can find this page under the Contact Center section in the left-hand menu.
Understanding the page
The counter at the top shows the total number of resource accounts currently configured (in this example, 1). Each resource account is listed in a table with the following columns:
- Details – The phone number of the resource account (for example, +31883651000), along with its name shown beneath it (for example, RA-R365-ACS). Click the plus (+) icon on the left to expand the row and view more details.
- Actions – The controls for managing each resource account.
Working with resource accounts
To add a new resource account, click the Add New button in the top-right corner.
To edit an existing resource account, click the blue pencil icon in the Actions column for that row. To delete a resource account, click the red trash icon in the same row.
7. Creating a Resource Account
The Create Resource Account dialog lets you add a new resource account to the platform. Click Add New on the Resource Accounts page to open this dialog, then complete the fields below.
- ACS Resource Account Object Id (required) – Select the ACS resource account object ID to associate with this resource account. This should be the same as the one set on the resource account in the Teams PowerShell module.
- Object Id (required) – Enter the object ID of the resource account which you saved earlier at step 6
- Description (required) – Enter a brief description of the resource account to help identify its purpose—for instance, the display name of the Teams resource account.
- Phone number (required) – Enter the phone number for the resource account in international format (for example, +31883651000). This field is mandatory, as indicated by the red asterisk.
- Default Language (required) – Select the default language for the resource account. This determines the default language used for playing audio prompts and for hinting the transcripts.
When you have completed the fields, click Save in the bottom-right corner to create the resource account.
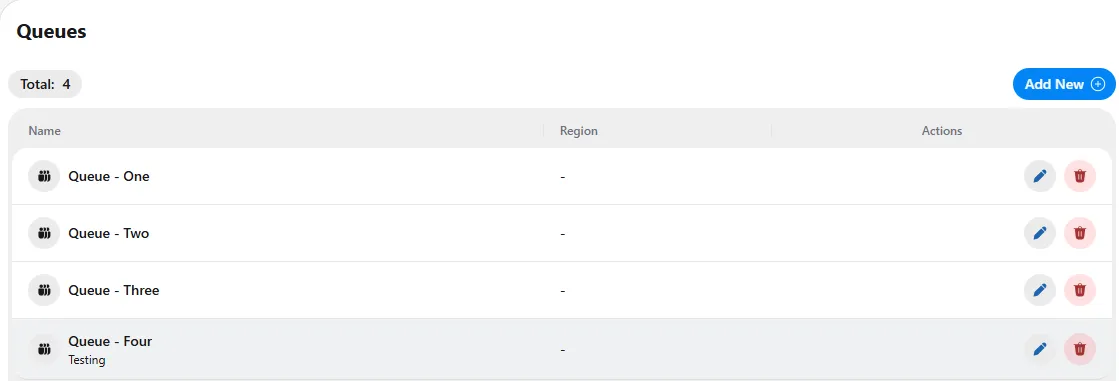
The Queues page is where you manage the call queues used on your platform. A queue holds incoming callers until an available agent can take the call, and it determines how those calls are distributed among agents. You can find this page under the Contact Center section in the left-hand menu.
Understanding the page
The counter at the top shows the total number of queues currently configured (in this example, 4). Each queue is listed in a table with the following columns:
- Name – The name of the queue, along with an optional short description shown beneath it (for example, "Testing").
- Actions – The controls for managing each queue.
Working with queues
To create a new queue, click the Add New button in the top-right corner.
To edit an existing queue, click the blue pencil icon in the Actions column for that row. To delete a queue, click the red trash icon in the same row.
Creating a Voice Queue
The Create Voice Queue dialog lets you define a new queue and how calls are distributed to agents within it. Click Add New on the Queues page to open this dialog, then complete the fields below.
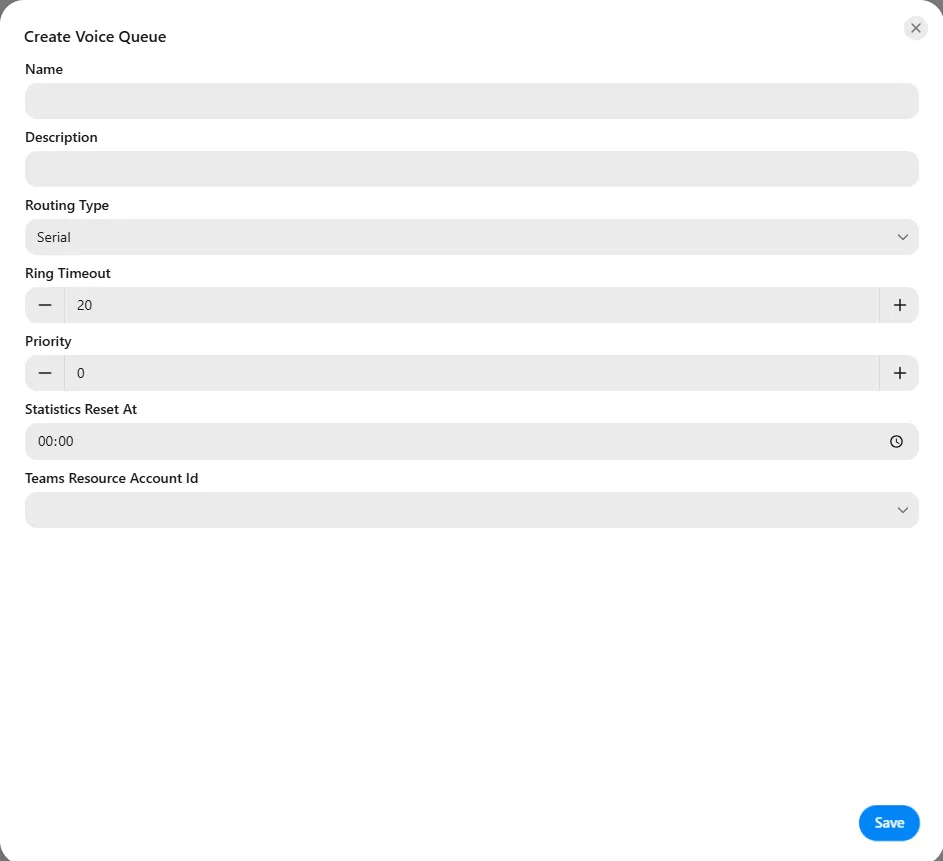
- Name – Enter a name for the queue. This is how the queue will be identified in the queues list.
- Description – Optionally, enter a brief description of the queue to help identify its purpose.
- Routing Type – Select how calls are distributed to agents in the queue. For example, Serial routing offers the call to agents one after another in sequence.
- Ring Timeout – Set how long (in seconds) a call rings with one agent before moving on to the next. Use the plus and minus buttons to adjust the value (the default is 20).
- Priority – Set the priority of the queue. Use the plus and minus buttons to adjust the value (the default is 0). This determines the queue's precedence when calls are being handled across multiple queues.
- Statistics Reset At – Set the time of day at which the queue's statistics are reset (the default is 00:00).
- Teams Resource Account Id – Select the Teams resource account associated with this queue. This resource account is used for outbound calling, and its phone number serves as the caller identification when an outgoing call is placed.
Important: Make sure you have configured and assigned a Teams Voice Policy that allows outbound calling to the resource account, otherwise it will not be able to dial out externally
When you have completed the fields, click Save in the bottom-right corner to create the voice queue.
Routing Type
The Routing Type determines how incoming calls are distributed to the agents in the queue. Click the Routing Type dropdown to choose one of the available options:
- Serial – Calls are offered to agents one at a time, in a fixed order. The call is presented to the first agent, and if they do not answer within the ring timeout, it moves on to the next agent in sequence. This is useful when you want certain agents to be offered calls before others.
- RoundRobin – Calls are distributed evenly among agents by rotating through them in turn. Each new call starts with the next agent in the rotation, helping to balance the workload across the team.
Assigning Agents to a Queue
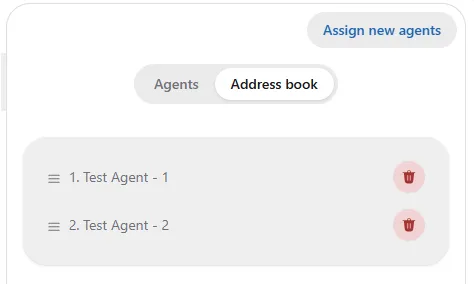
After a queue has been created, you can assign the agents who will handle calls from it. Select the agents tab to manage the agents assigned to the queue.
Working with agents
On the Agents tab, the agents currently assigned to the queue are listed in order (for example, "1. Automated Test User 1"). The number indicates each agent's position, which is relevant for Serial routing, where calls are offered to agents in this sequence.
- To add agents, click Assign new agents in the top-right corner and select the agents you want to add.
- To reorder an agent, use the drag handle (the icon on the left of each row) to move the agent up or down in the list. This changes the order in which calls are offered.
- To remove an agent from the queue, click the red trash icon in that agent's row.
Assigning CRM Replicators to a Queue
On the CRM tab, you can manage the CRM replicators assigned to the queue. CRM replicators enable CRM recognition, allowing caller information to be matched against your connected CRM systems when a call comes in.
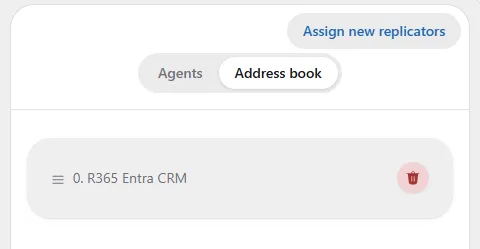
Working with CRM replicators
The CRM replicators currently assigned to the queue are listed here (for example, "R365 Entra CRM"). Here you can manage the CRM configuration for the queue, to be used as a phonebook and for resolving outbound calls.
- To add replicators, click Assign new replicators in the top-right corner and select the replicators you want to add.
- To reorder a replicator, use the drag handle (the icon on the left of each row) to move it up or down in the list. This determines the order in which the replicators are applied.
- To remove a replicator from the queue, click the red trash icon in that replicator's row.
The Callflows page is where you manage the call flows used on your platform. A call flow defines how incoming calls are handled and routed—for example, playing a welcome message, directing callers through an attendant, or placing them in a queue. You can find this page under the Contact Center section in the left-hand menu.

Understanding the page
The counter at the top shows the total number of call flows currently configured (in this example, 3). Each call flow is listed in a table with the following columns:
- Name – The name of the call flow (for example, "Basic Attendant Callflow").
- Actions – The controls for managing each call flow.
Working with call flows
To create a new call flow, click the Add New button in the top-right corner.
To edit an existing call flow, click the blue pencil icon in the Actions column for that row. To delete a call flow, click the red trash icon in the same row.
Form based Callflow
The form-based call flow lets you build a call flow by filling in a set of fields that define how incoming calls are handled. Click Add New on the Callflows page to open the Create Callflow dialog, then complete the fields below.
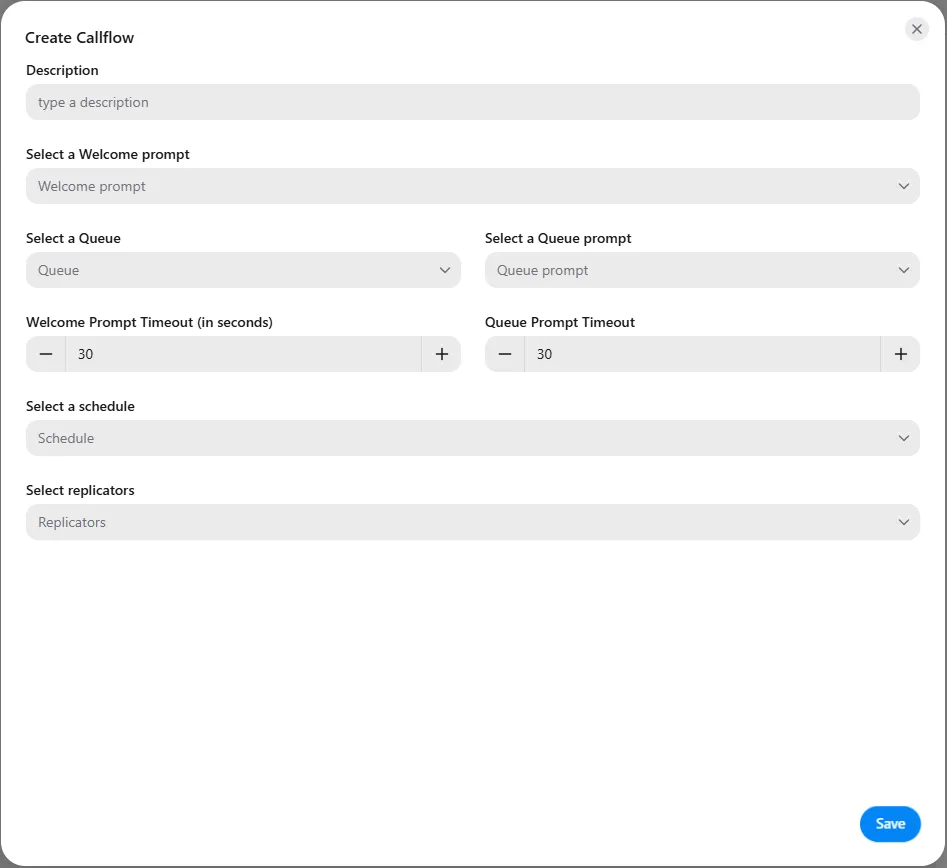
- Description – Enter a description for the call flow to identify its purpose.
- Select a Welcome prompt – Choose the audio prompt that plays to callers when they first reach the call flow.
- Select a Queue – Choose the queue that callers are placed into.
- Select a Queue prompt – Choose the audio prompt that plays to callers while they are waiting in the queue.
- Welcome Prompt Timeout (in seconds) – Set how long the welcome prompt phase lasts before the call proceeds. Use the plus and minus buttons to adjust the value (the default is 30 seconds).
- Queue Prompt Timeout – Set how long the queue prompt phase lasts. Use the plus and minus buttons to adjust the value (the default is 30 seconds).
- Select a schedule – Choose the schedule that determines the call flow's operating hours, such as business hours and holidays.
- Select replicators – Choose the CRM replicators for CRM recognition to apply to this call flow.
When you have completed the fields, click Save in the bottom-right corner to create the call flow.
The Audio Files page is where you manage the audio prompts used across your platform, such as dial tones, welcome messages, and other recorded announcements played to callers. You can find it under the Contact Center section in the left-hand menu.
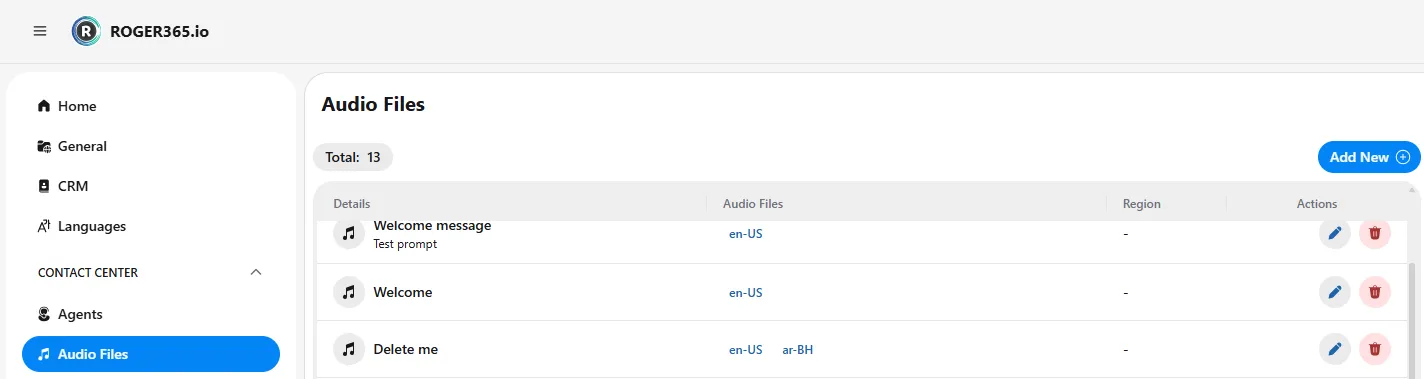
Understanding the page
The counter at the top shows the total number of audio files currently configured. Each audio file is listed in a table with the following columns:
- Details – The name of the audio file, along with an optional short description shown beneath it (for example, "Test prompt").
- Audio Files – The language associated with the file, such as en-US. This indicates the language version of the audio.
- Region – The region assigned to the audio file. A dash (-) indicates that no specific region has been set.
- Actions – The controls for managing each file.
Working with audio files
To add a new audio file, click the Add New button in the top-right corner.
To edit an existing file, click the blue pencil icon in the Actions column for that row. To delete a file, click the red trash icon in the same row.
Creating an Audio Prompt
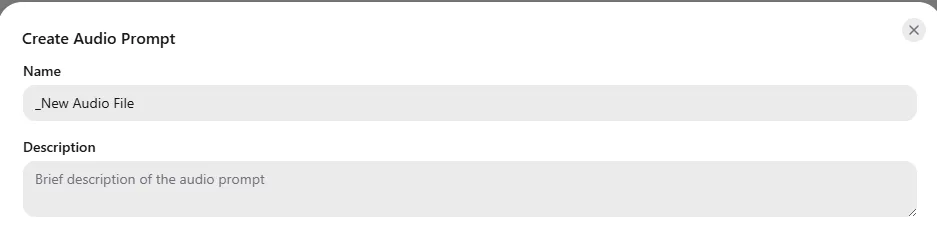
Before an audio prompt can be configured, it must first be created. To do this, click the Add New button on the Audio Files page. This opens the Create Audio Prompt dialog.
- Name – Enter a name for the audio prompt in the Name field. This is how the prompt will be identified in the audio files list.
- Description – Optionally, enter a brief description of the audio prompt in the Description field to help identify its purpose (for example, the message it plays or where it is used).
Once you have entered the details, save the prompt to create it. After it has been created, you can proceed to configure the audio prompt further.
Editing an Audio Prompt
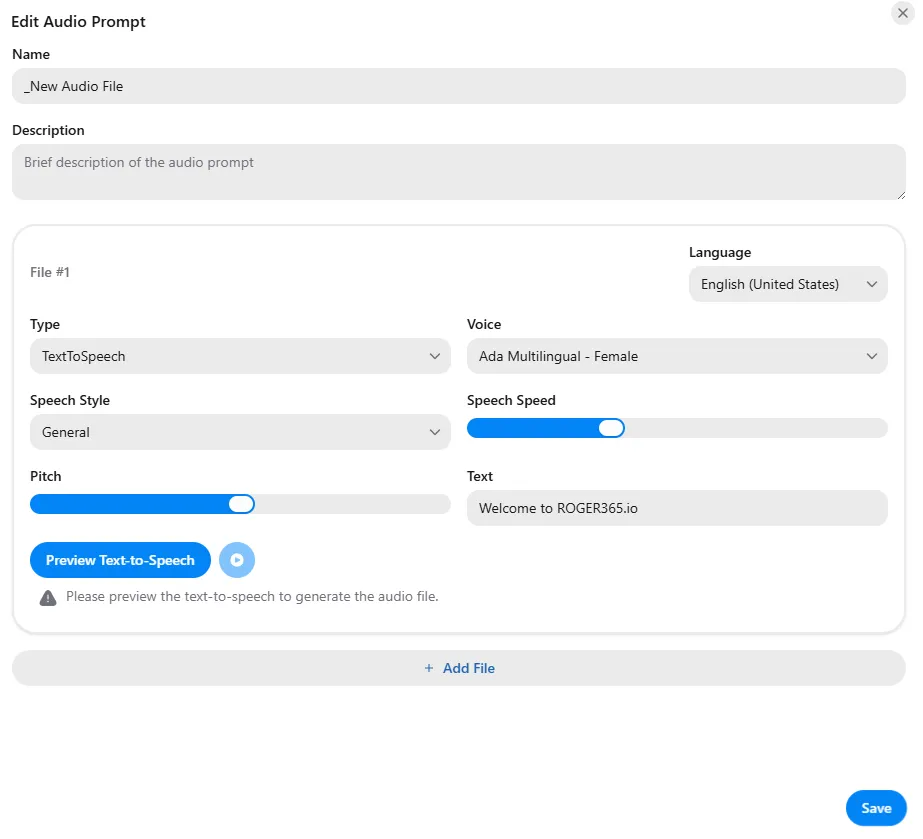
After an audio prompt has been created, you can edit it to update its details and add the actual audio files by uploading wav files or by using text to speach. Click the blue pencil icon next to the prompt on the Audio Files page to open the Edit Audio Prompt dialog.
- Name – Update the name of the audio prompt if needed.
- Description – Update or add a brief description of the audio prompt.
- Audio files – This section shows the audio files associated with the prompt. When no files have been added yet, the message "No audio files added yet" is displayed.
To add an audio file, click the Add File button. You can add a separate file for each language you want to support, allowing the correct audio to be played based on the caller's language.
Adding an Audio File
After clicking Add File, a file configuration panel appears. Here you define the audio content and the language it applies to. Before creating an audio prompt, you must first configure the languages you want to use in the platform here.
- Language – In the top-right corner, select the language for this audio file from the Language dropdown. This determines which language version of the prompt the file provides, so the correct audio is played based on the caller's language. Each file you add can be assigned to a different language.
- Type – Select how the audio will be provided from the Type dropdown. The available options are:
- TextToSpeech – The audio is generated automatically from text you enter.
- SSML – The audio is generated from text using Speech Synthesis Markup Language, which gives you finer control over pronunciation, pauses, and emphasis.
- URL – The audio is sourced from an external web address.
- AudioFile – You upload your own pre-recorded audio file.
Configuring a Text-to-Speech file
When the Type is set to TextToSpeech, the following options are available:
- Voice – Select the voice used to read the text.
- Speech Style – Choose the speaking style for the selected voice, where supported.
- Speech Speed – Use the slider to adjust how fast the text is spoken.
- Pitch – Use the slider to adjust the pitch of the voice.
- Text – Enter the text you want converted into audio.
Once you have entered your text and adjusted the settings, click Preview Text-to-Speech to generate and listen to the audio. As noted in the dialog, you must preview the text-to-speech in order to generate the audio file.
Using Speech Synthesis Markup Language (SSSML)
You can use SSML to customize the Text-To-Speech file. In the SSML field you can add your own SSML code. For more info about SSML check this page.
Uploading an Audio File
When the Type is set to AudioFile, you can upload your own pre-recorded audio file for the prompt.
- Language – In the top-right corner of the file panel, select the language this audio file applies to from the Language dropdown.
- Type – Ensure the Type is set to AudioFile.
- File – Click Choose a file to browse for and select the audio file you want to upload.
The audio file must be in a specific format, otherwise calls will not be routed correctly. WAV files must be in the format riff-16khz-16bit-mono-pcm, with a maximum size of 5 MB.
- To check if you file is in the correct format, you can use this tool: https://mediaarea.net/nl/MediaInfo/Download
- On this website, you can find some royalty free music, don’t forget to convert them into the correct format: https://www.bensound.com/royalty-free-music/
- For Music-on-hold you could upload your own file, or use this file which generates a waiting-tone so you callers will know they are still connected and in the queue.
Using a URL
If the WAV file is hosted on a server, you can insert a URL to the audio file. The same restrictions apply as for the AudioFile option.
Converting an Audio File in a correct format
The best way to convert your audio files to the correct format is to use the free audio tool Audacity: https://www.audacityteam.org/download/windows/.
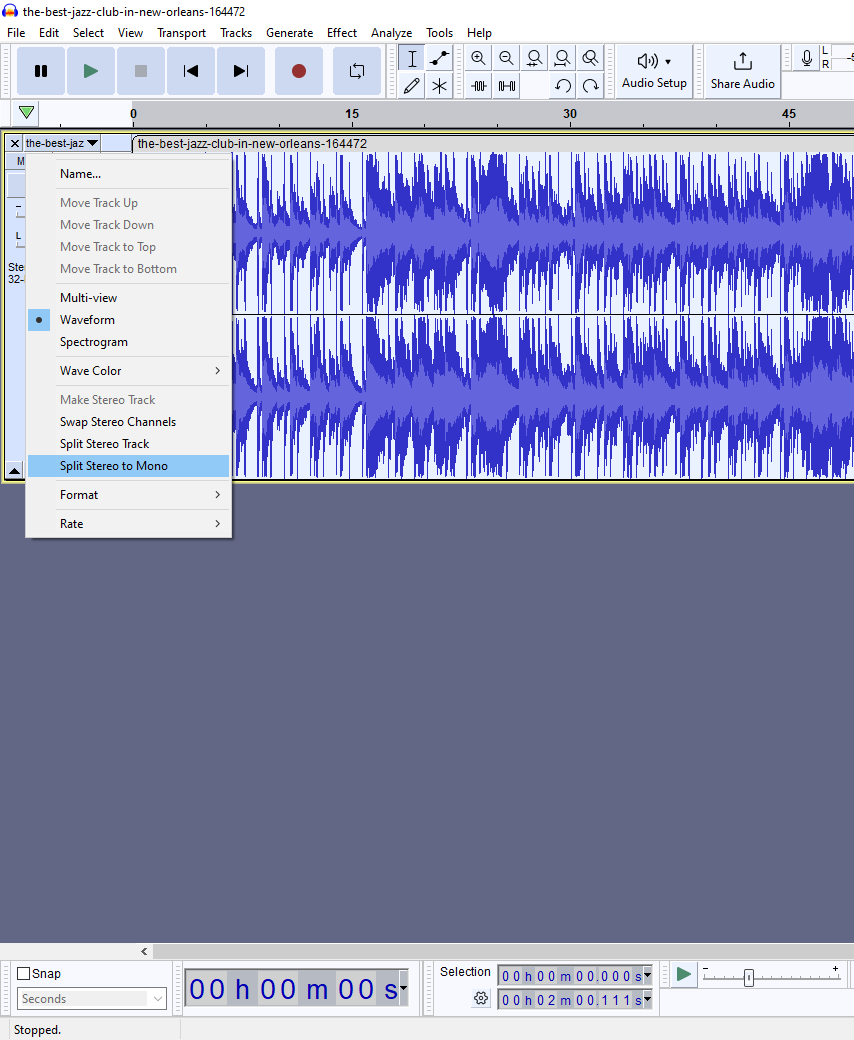
After you have opened the file and can see two tracks (stereo), click the "Select" button at the bottom of the audio file to highlight the entire file. Then right-click on the Track Control Panel and select the "Split Stereo to Mono" option.
Your audio file will now be separated into two identical, independent mono tracks—delete one of them.
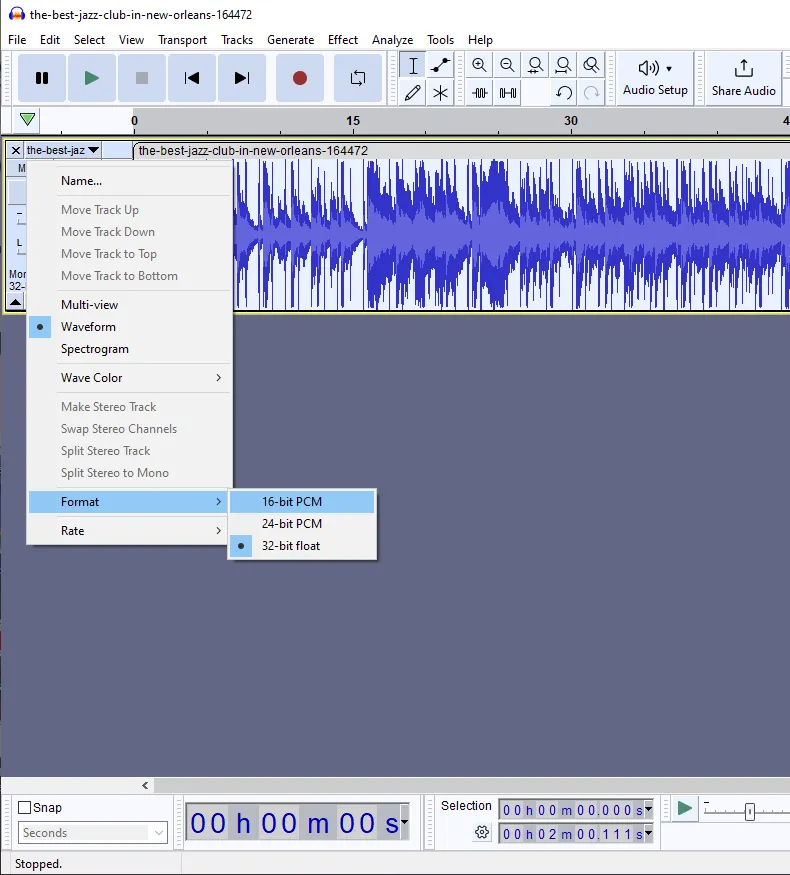
Change the format of audio. Right-click on the Track Control Panel again, but this time, select “Format” -> “16-bit PCM“:
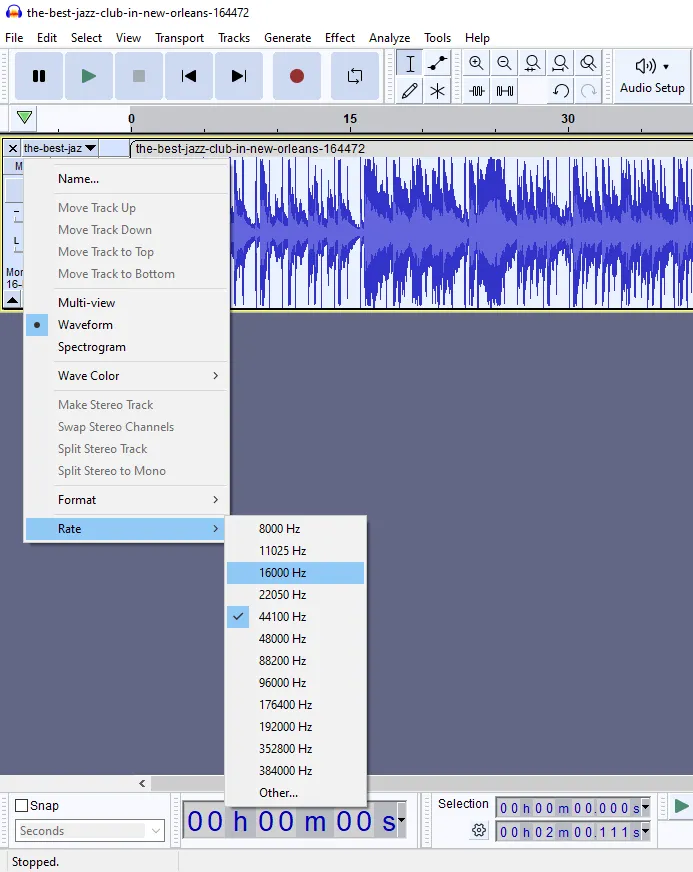
Adjust the sample rate by changing value of “Rate” -> “16000 Hz“:
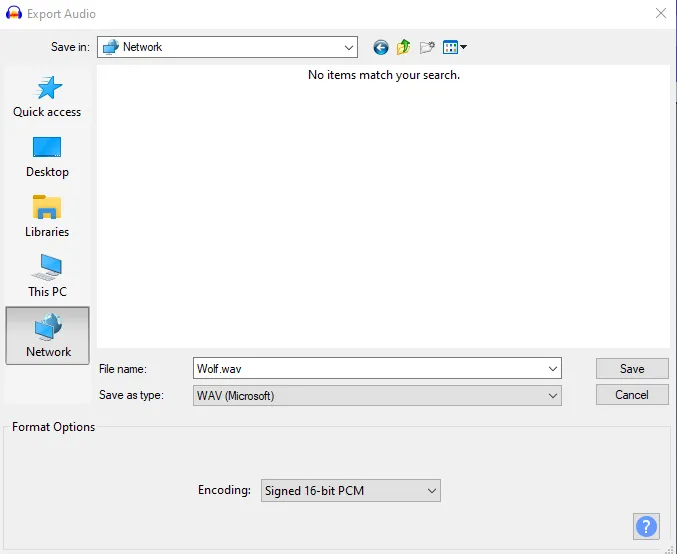
Finally, export your prepared audio file.
Select “File” -> “Export”, save the file as “WAV (Microsoft)“, and set the encoding to “Signed 16-bit PCM“:
Before agents can be added to the platform, the Tenant App Id must be configured. Instructions on how to configure the agent app can be found here.
To route calls to agents through voice queues, they must be added to the platform. You can access the ROGER365.io UnifAI agent app at app.roger365.io.
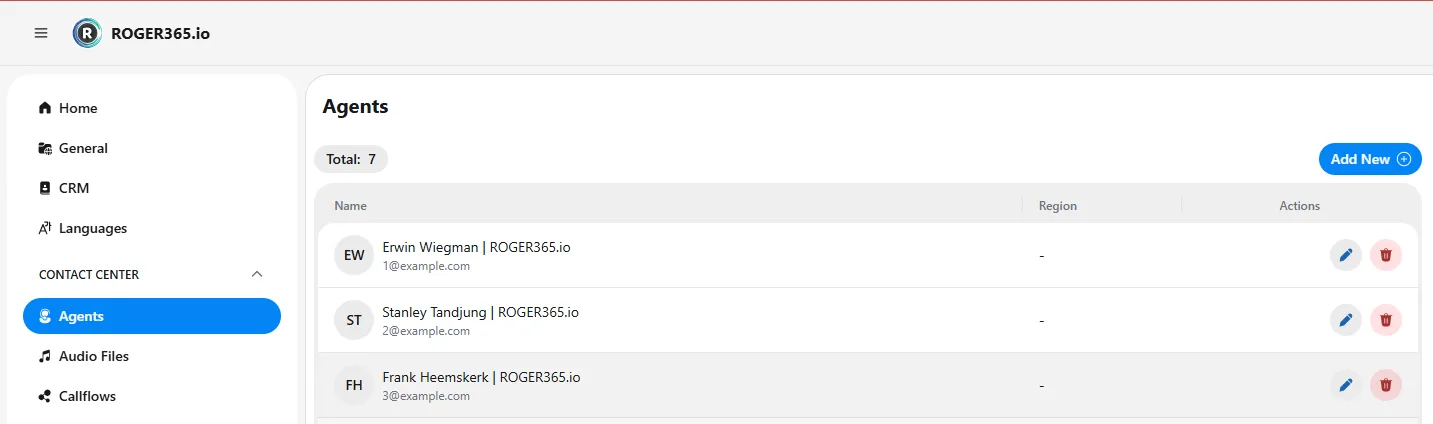
Click Add New to open the Add/Remove Agent screen, then sign into MS Graph to query Azure Entra ID for selecting agents.
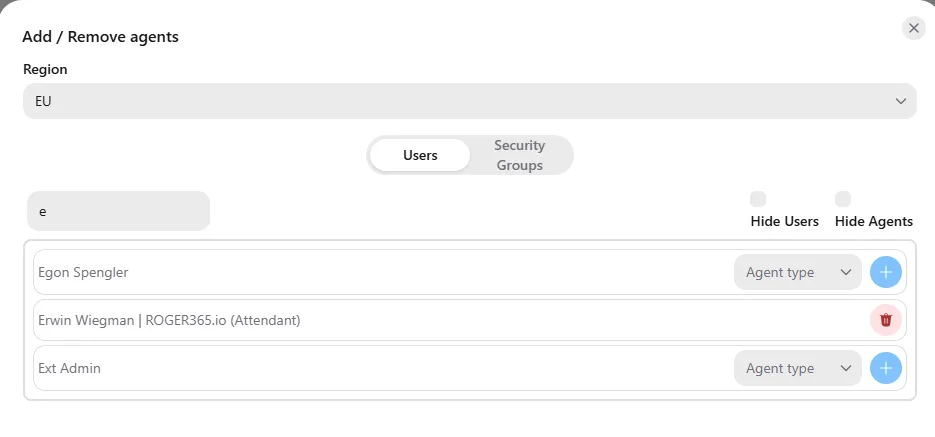
Configuring an Agent
- Select the region. At the top of the screen, use the Region dropdown to choose the region where the agent is hosted. This must match the region defined at the resource account level, as agents only receive calls from the region they log in to.
- Choose how to search. Use the Users tab to search for individual users, or the Security Groups tab to search by group. You can also use the Hide Users and Hide Agents toggles to filter the list.
- Find the agent. Type a name in the Search by name field to locate the user you want to add.
- Assign an agent type. In the row for that user, click the Agent type dropdown and select a role. The available roles—such as Attendant, Voice, or Omnichannel—depend on the licenses you have purchased. Roles shown in gray are unavailable under your current licenses.
- Add the agent. Click the blue plus (+) button at the end of the row to add the agent to the platform. To remove an agent who has already been added, click the red trash icon that appears in their row.
- Save your changes. When you have finished adding or removing agents, click Save in the bottom-right corner to apply your changes.
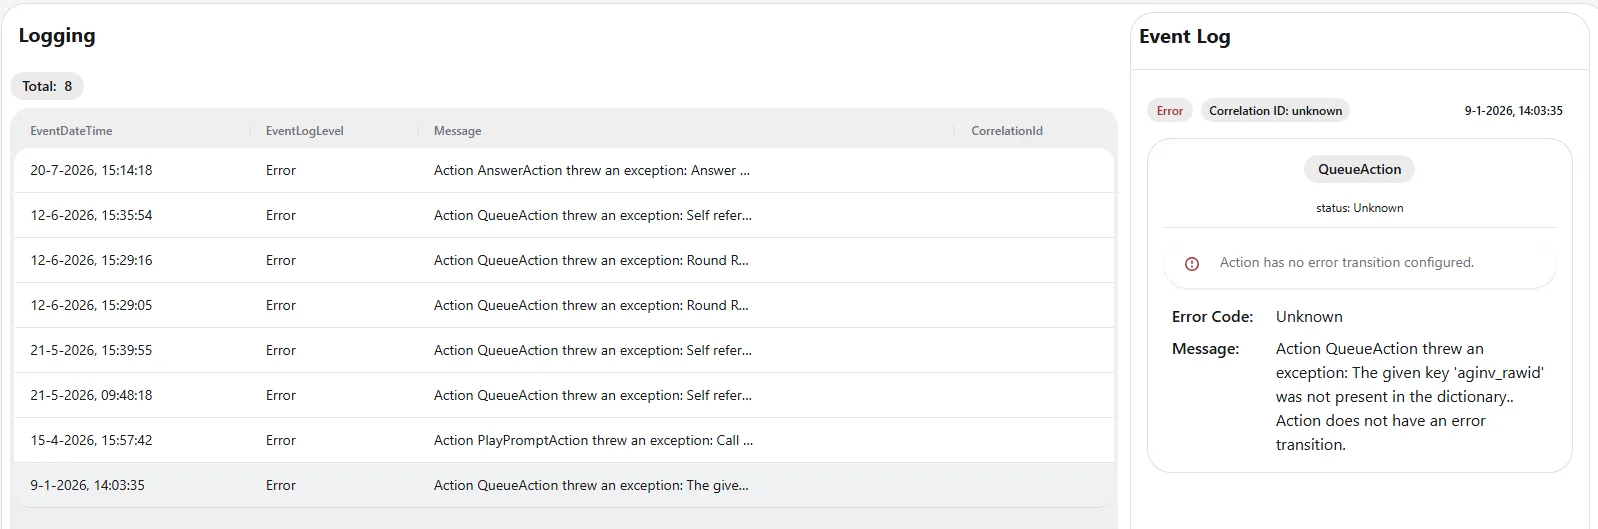
The Logging page provides a central overview of all warnings and errors that occur on the platform, allowing administrators to review issues and troubleshoot them. You can find this page under the Contact Center section in the left-hand menu.
Understanding the page
The page is divided into two areas: the log list on the left and the Event Log detail panel on the right.
Log list
The counter at the top shows the total number of log entries (in this example, 8). Each entry is listed in a table with the following columns:
- EventDateTime – The date and time the event occurred.
- EventLogLevel – The severity of the entry, such as Error or Warning.
- Message – A summary of the event. Longer messages are truncated; select the entry to view the full details.
- CorrelationId – The correlation ID used to link related events, which is helpful when tracing an issue across the platform.
Event Log detail panel
Click an entry in the log list to view its full details in the Event Log panel on the right. This panel shows:
- The log level (for example, Error) and the correlation ID, along with the date and time of the event.
- The action involved (for example, QueueAction) and its status.
- Any additional context, such as a note that the action has no error transition configured.
- Error Code – The error code associated with the event.
- Message – The full error message, describing what went wrong.
Using this information, administrators can identify the cause of each warning or error and take the appropriate action to resolve it.
The Audit Log page provides a record of all configuration changes made on the platform, showing what was changed, when, and by whom. This gives administrators full traceability of activity across the platform. You can find this page under the Contact Center section in the left-hand menu.
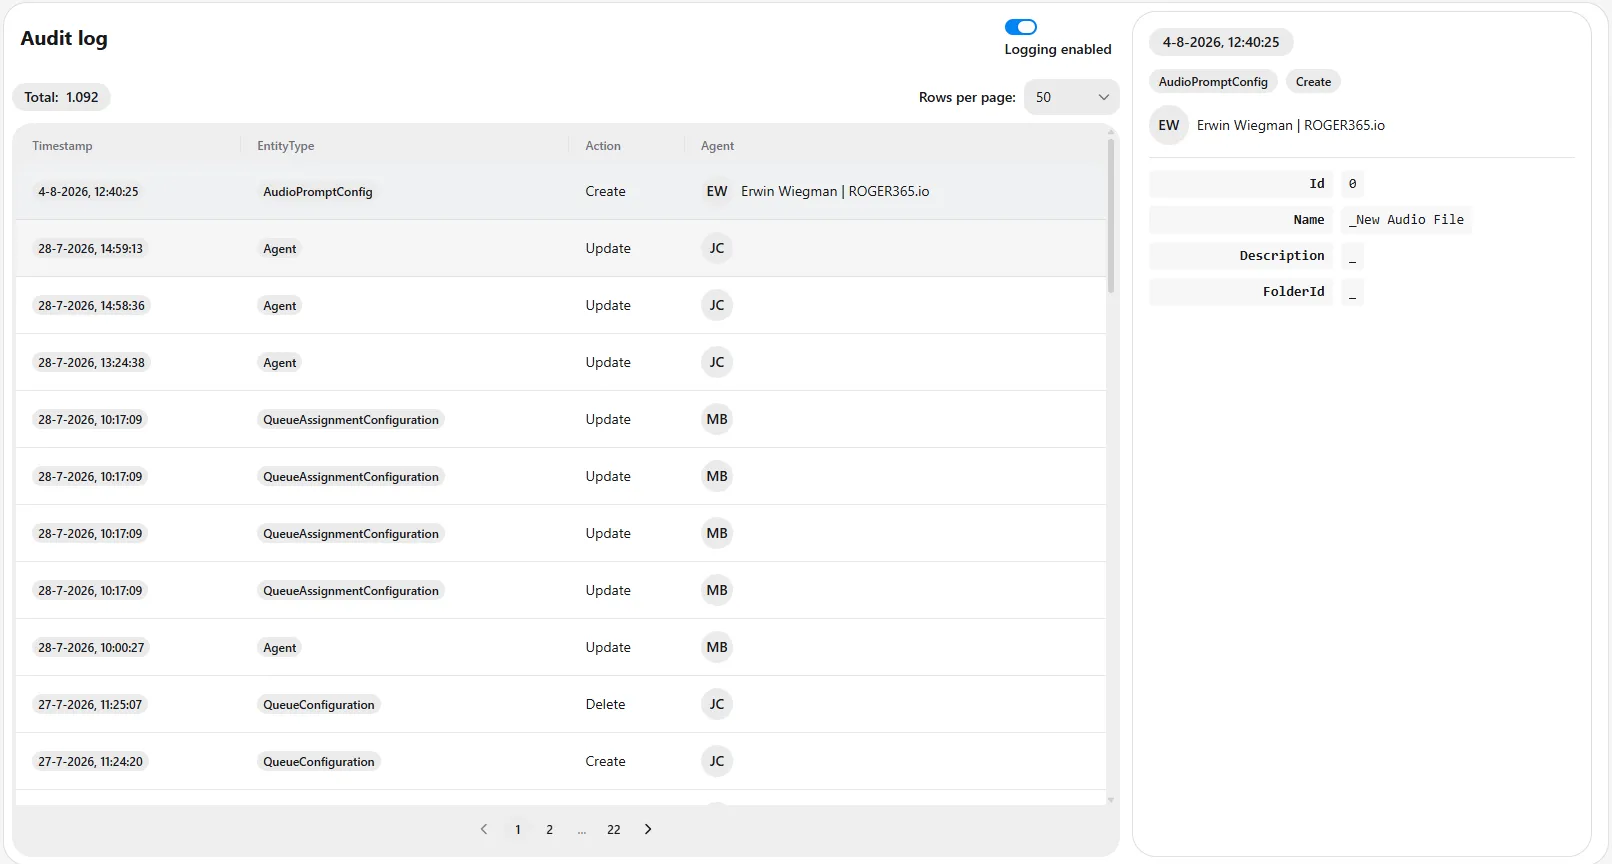
Understanding the page
The page is divided into two areas: the audit entry list on the left and the detail panel on the right.
Enabling logging
The Logging enabled toggle in the top-right corner controls whether audit logging is active. When enabled, all configuration changes are recorded in the audit log. Default the audit logging is turned off.
Audit entry list
The counter at the top shows the total number of audit entries (in this example, 1,092). You can adjust how many entries are shown at a time using the Rows per page dropdown. Each entry is listed in a table with the following columns:
- Timestamp – The date and time the change was made.
- EntityType – The type of item that was changed, such as AudioPromptConfig, Agent, QueueConfiguration, or QueueAssignmentConfiguration.
- Action – The type of change, such as Create, Update, or Delete.
- Agent – The user who made the change, shown with their initials and name.
Use the page navigation at the bottom to move through the entries across multiple pages.
Detail panel
Click an entry in the list to view its full details in the panel on the right. This panel shows:
- The timestamp of the change.
- The entity type and action (for example, AudioPromptConfig and Create).
- The user who made the change.
- The specific field values associated with the entry, such as Id, Name, Description, and FolderId.
Using this information, administrators can review the history of configuration changes and see exactly what was modified in each action.
The CRM page is where you manage the CRM replicators used on your platform. A CRM replicator connects to an external data source and synchronizes contact information into the platform, enabling CRM recognition—so incoming callers can be matched against your contacts and used as a phonebook for resolving calls. You can find this page under the Contact Center section in the left-hand menu.

Understanding the page
The counter at the top shows the total number of CRM replicators currently configured. Each replicator is listed in a table with the following columns:
- Name – The name of the CRM replicator (for example, "R365 Entra CRM").
- Type – The type of replicator, indicating the data source it connects to (for example, "Graph").
- Last Run – The status and timestamp of the most recent synchronization. A "Succeeded" status confirms the last run completed successfully.
- Next Run – The date and time the next synchronization is scheduled to take place.
- Contacts – Click View Contacts to see the contacts that have been synchronized by this replicator.
- Actions – The controls for managing each replicator.
Working with CRM replicators
To add a new CRM replicator, click the Add New button in the top-right corner.
In the Actions column, you can manage each replicator using the following controls:
- Run – Click the blue play button to trigger a synchronization manually, rather than waiting for the next scheduled run.
- Edit – Click the blue pencil icon to edit the replicator's configuration.
- Delete – Click the red trash icon to remove the replicator.
Creating a Replicator
The Create Replicator dialog lets you set up a new CRM replicator to synchronize contacts into the platform. Click Add New on the CRM page to open this dialog, then complete the fields below. Fields marked with a red asterisk are mandatory.
General details
- Name (required) – Enter a name for the replicator. This is how it will be identified in the CRM list.
- Description – Optionally, enter a brief description of the replicator to help identify its purpose.
Connection configuration
This section defines how the replicator connects to the data source.
- Type – Select the type of data source to connect to (for example, MicrosoftEntra).
- Tenant ID (required) – Enter the tenant ID of the data source.
- Client ID (App ID) (required) – Enter the client ID (application ID) of the app registration used to connect.
- Client Secret (required) – Enter the client secret associated with the app registration. Click the eye icon to reveal or hide the value.
Replication configuration
This section defines when and how often the synchronization runs.
- Start Time – Set the date and time for the first synchronization to run.
- Frequency – Select how often the synchronization repeats (for example, Day).
- Interval – Set the interval between runs, based on the selected frequency. Use the plus and minus buttons to adjust the value (for example, an interval of 1 with a frequency of Day means the sync runs once per day).
- Contact Url – Enter the URL used to retrieve contacts from the data source.
- Country Code – Select the country code to apply when formatting contact phone numbers.
Action Buttons
In the Action Buttons section, you can define custom actions for the replicator. Click Add new to add an action button.
Saving
When you have completed the fields, click Save in the bottom-right corner to create the replicator.
Default replicators
The default replicators show basic CRM information, which you cannot change. The data is pulled from the different solutions into the ROGER365.io platform. If your CRM product is not listed or you need more customization, use the custom CRM replicator.
Custom replicator
To enable a custom CRM connector, you have to develop your own software. We have an API available to which you can send the data. If you don’t have the expertise, we can get you in contact with one of our partner to help you.
Add Custom CRM Replicator
To create a replicator to which you can send your data, follow these steps:
- Go to the ROGER365 portal
- Select [CRM] in the left navigation bar
- Click [+ Add New]
- Enter a [Name] and [ Description]
- Select [Custom] as Type
- Choose your Country Code.
- Click [Save]
Create Authentication key for CRM replicator
To create an authentication key, which is needed to authenticate for the custom replicator, follow these steps:
- Go to the ROGER365 portal
- Select [API Keys] in the left navigation bar
- Click [+ Add New]
- Enter a [Description] and select the scope [Replicator] for the API key
- Click [Save]
- Copy the API key. This key is shown only once, so be sure to store it somewhere safe.
- Click [Save]
POST JSON Schema
The "SourceId" is required, must be unique, and must remain the same for a contact. On the first and last batch, a query parameter must be added to the URL. For all other batches, this should not be done.
First batch
For sending the first batch, the isFirstBatch query parameter must be attached to the URL.
POST /v1.0/api/CustomReplicator/Synchronization/{id}?isFirstBatch=true HTTP/1.1
Host: api.roger365.io
Auth-Key: {authkey}
Content-Type: application/json
Last batch
For sending the first batch, the isLastBatch query parameter must be attached to the URL.
POST /v1.0/api/CustomReplicator/Synchronization/{id}?isLastBatch=true HTTP/1.1
Host: api.roger365.io
Auth-Key: {authkey}
Content-Type: application/json
HTTP body
[
  {
    "SourceId": " ",
    "FirstName": " ",
    "LastName": " ",
    "DisplayName": " ",
    "Email": " ",
    "SipAddress": " ",
    "Street": " ",
    "Zip": " ",
    "City": " ",
    "Country": " ",
    "Company": " ",
    "PhoneNumber0": " ",
    "PhoneNumber1": " ",
    "PhoneNumber2": " ",
    "PhoneNumber3": " ",
    "PhoneNumber4": " ",
    "PhoneNumber5": " ",
    "Custom0": " ",
    "Custom1": " ",
    "Custom2": " ",
    "MobileData0": " ",
    "MobileData1": " ",
    "MobileData2": " ",
    "Type": " ",
    "ContactUrl": " ",
    "ContactId": " ",
    "CompanyId": " ",
    "ActionLink0": " ",
    "ActionLink1": " ",
    "ActionLink2": " ",
    "ActionLink3": " "
  }
]
E.164 Number formatting
It is advisable to format numbers using the E.164 recommendation. An international E.164 number is designed to include all the information necessary to successfully route a call or SMS message to an individual subscriber on a nation's public telephone network.
Here’s how the E.164 numbering plan works:
• A telephone number can have a maximum of 15 digits
• The first part of the telephone number is the country code (one to three digits)
• The second part is the national destination code (NDC)
• The last part is the subscriber number (SN)
• The NDC and SN together are collectively called the national (significant) number
To use the previous example:
Country code: +44
National destination code: 7911
Subscriber number: 123456
In total: +447911123456
Two important things to note: First of all, in the international E.164 notation a leading ‘0’ is removed. The UK mobile phone number ‘07911 123456’ in international format is ‘+44 7911 123456’, so without the first zero. Secondly in the E.164 notation all spaces, dashes [‘-‘] and parentheses [ ‘(‘ and ‘)’] are removed, besides the leading ‘+’ all characters should be numeric.
The Languages page is where you manage the languages available on your platform. These are the languages you can assign to audio prompts and resource accounts, allowing the correct audio to be played based on the caller's language. You can find this page in the left-hand menu.
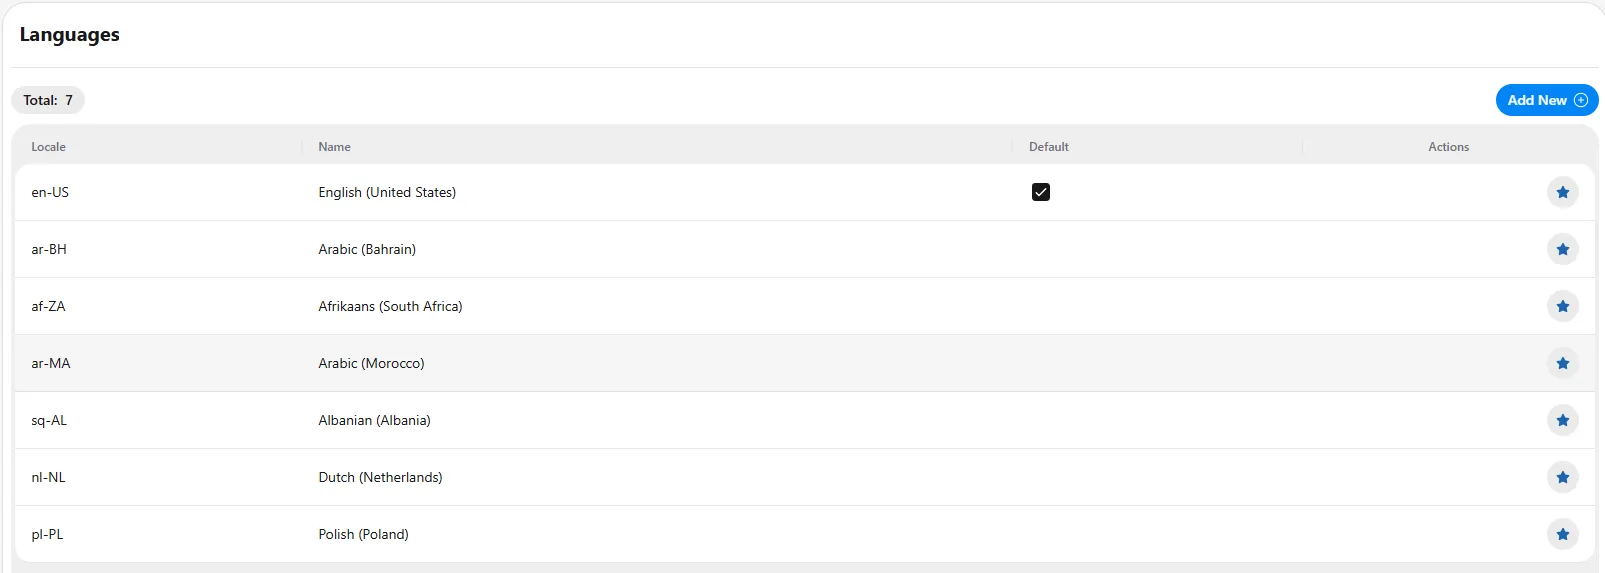
Understanding the page
The counter at the top shows the total number of languages currently configured. Each language is listed in a table with the following columns:
- Locale – The locale code for the language (for example, en-US, nl-NL).
- Name – The full name of the language and region (for example, English (United States), Dutch (Netherlands)).
- Default – Indicates the default language for the platform. A checkmark marks the language currently set as the default.
- Actions – The controls for managing each language.
Working with languages
To add a new language, click the Add New button in the top-right corner.
To set a language as the default, click the star icon in the Actions column for that row. The default language is used as the standard language across the platform where no other language is specified.
Adding a New Language
The Add new language dialog lets you add a language to the platform. Click Add New on the Languages page to open this dialog, then complete the fields below.
- Language – Click the Language dropdown and select the language you want to add. The list shows all available languages, each with its region (for example, English (United States), Dutch (Netherlands)). Languages shown in gray are already configured on the platform and cannot be selected again.
- Set as Default – Optionally, enable the Set as Default toggle to make this language the platform's default language. The default language is used as the standard language across the platform where no other language is specified.
When you have made your selection, click Save in the bottom-right corner to add the language.
To configure the portal and use the agent app, an app registration must be created in the customer's tenant. We have provided a PowerShell script for this, or you can follow the manual creation steps.
Option 1: Automated PowerShell Script (preferred)
Execute this PowerShell script (as Global Admin): Download Script
When the script has executed successfully, you must manually grant admin consent. Follow the instructions in the script.
Option 2: Manual Creation
- Login to the Azure Portal via https://portal.azure.com
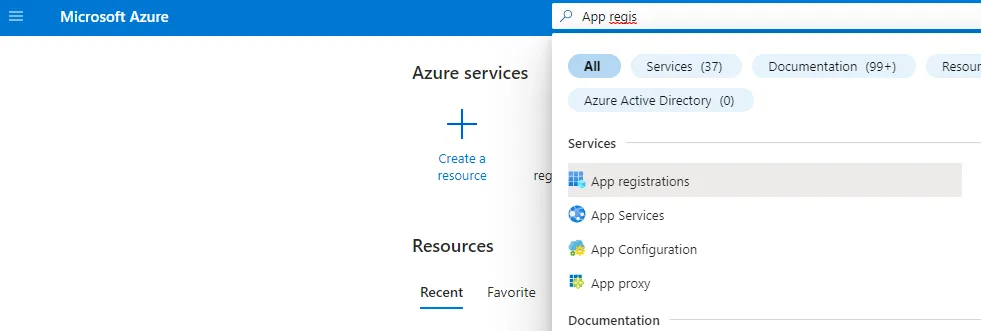
- In the search bar on top, search for ‘App Registration’. Then click the found result ‘App registrations’
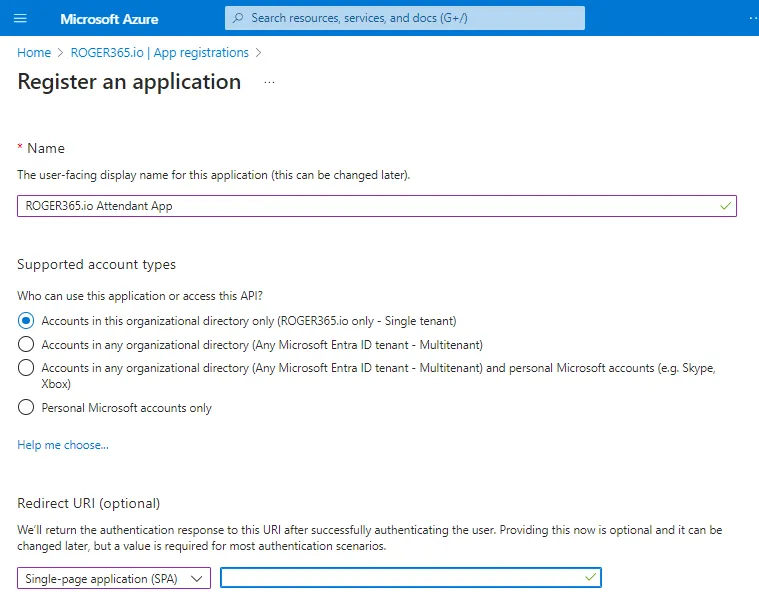
Enter a name
ROGER365.io UnifAI Attendant AppChoose
Accounts in this organizational directory only (ROGER365.io only – Single Tenant)Redirect URL - Choose Single-page application (SPA) and provide following URLs
https://app.roger365.io
https://app.roger365.io/acs/agent
https://app.roger365.io/acs/auth-end
https://portal.roger365.io
https://portal.roger365.io/acs/auth-end
-> Now click the “REGISTER” button
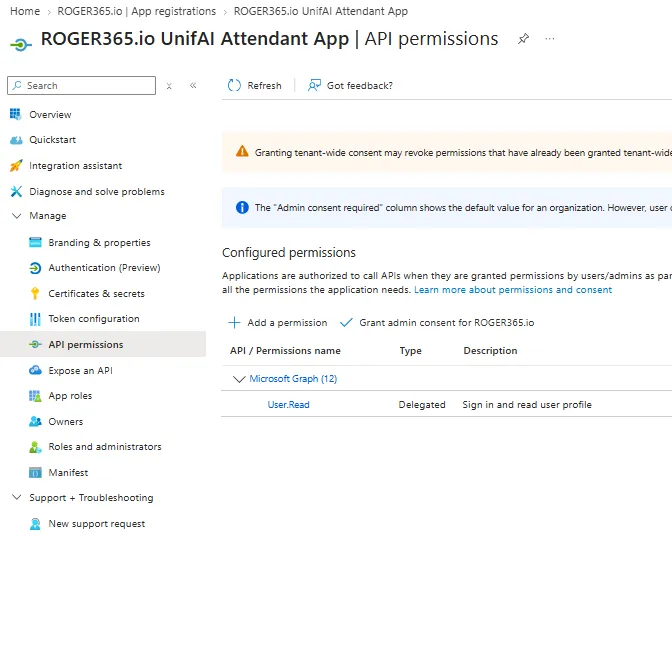
- Then click “+ Add a permission”
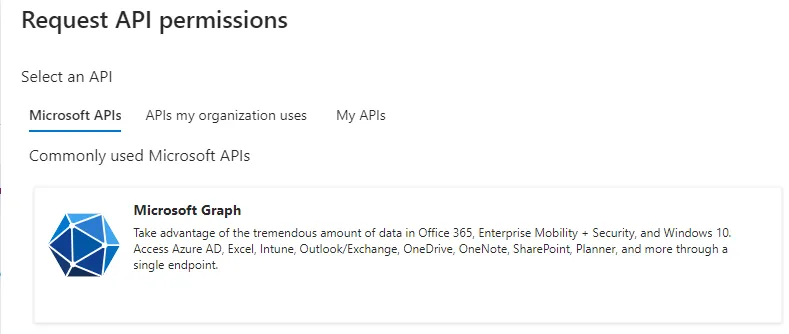
- Choose “Microsoft Graph”
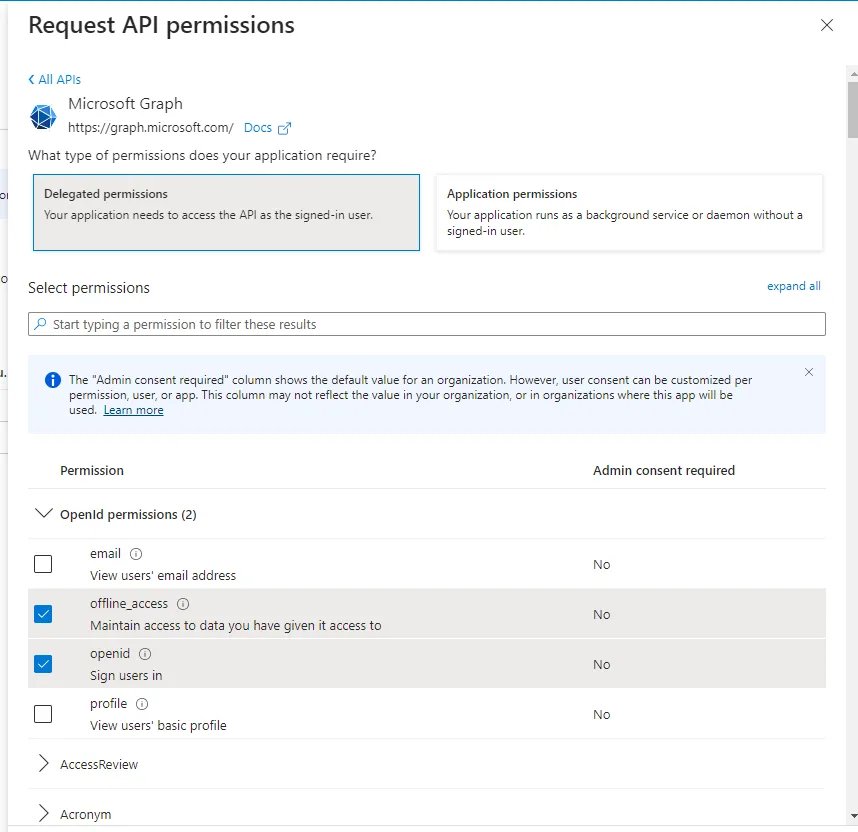
- Choose Delegated Permissions and enable the following permissions:
- OpenId Permissions
offline_access
openid
profile - Calendars
Calendars.Read - Contacts
Contacts.Read - Group
Group.Read.All - People
People.Read - Presence
Presence.Read.All - TeamsResourceAccount
TeamsResourceAccount.Read.All - Users
User.Read
User.Read.All
User.ReadBasic.All
- OpenId Permissions
Click the “Add Permission” button
Grant Admin Consent and Configure Appid
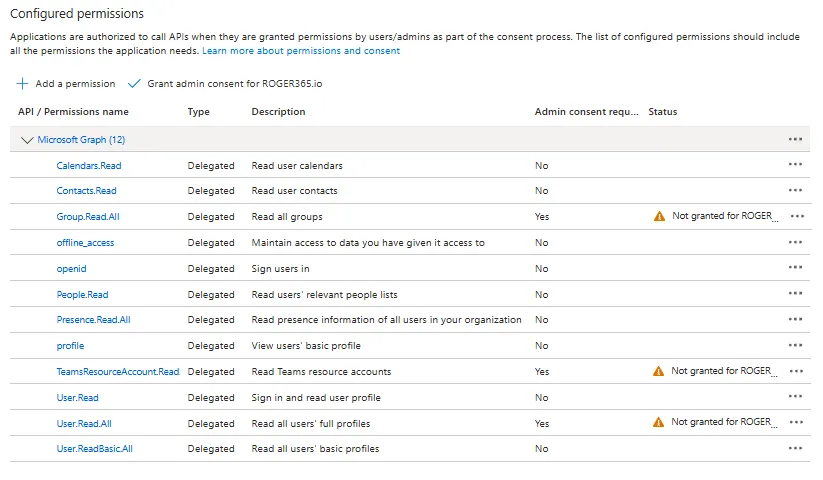
- Click “Grant admin consent for ROGER365.io” and confirm with ‘Yes”
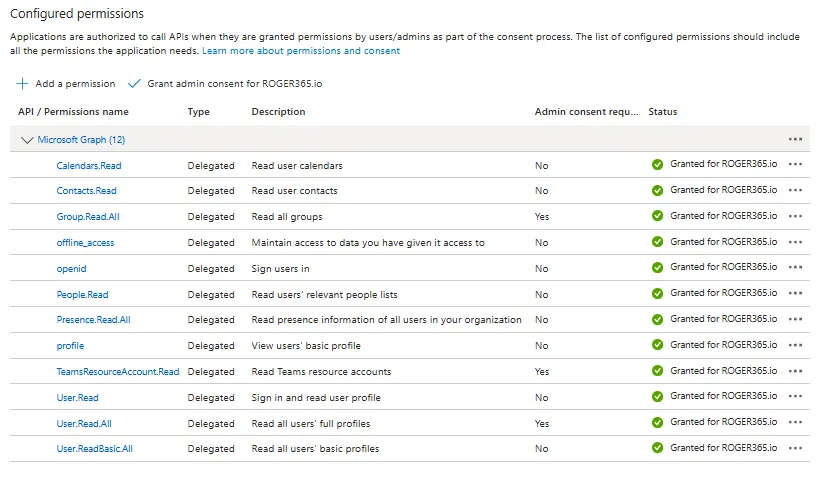
Now, all permissions should be granted
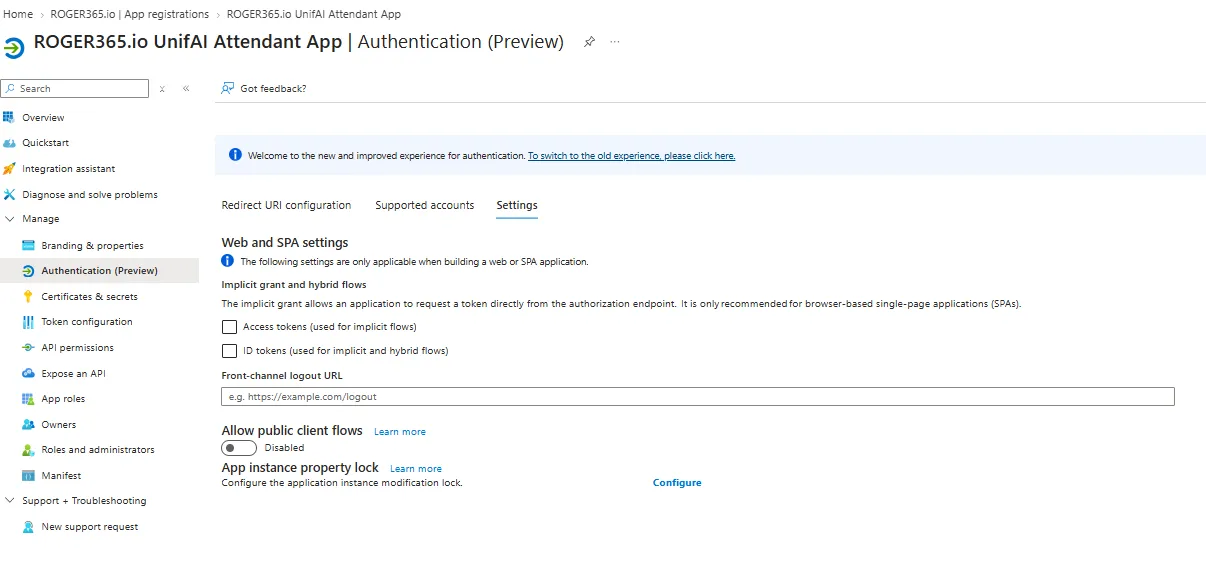
Select ‘Authentication’ on the left navigation menu and choose option settings
- Make sure that Access tokens and ID Tokens are not selected
Then press the SAVE button.
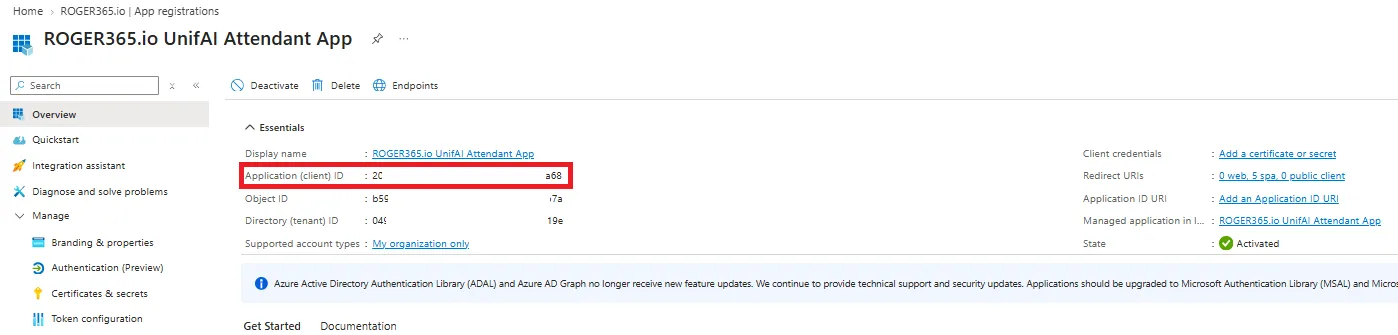
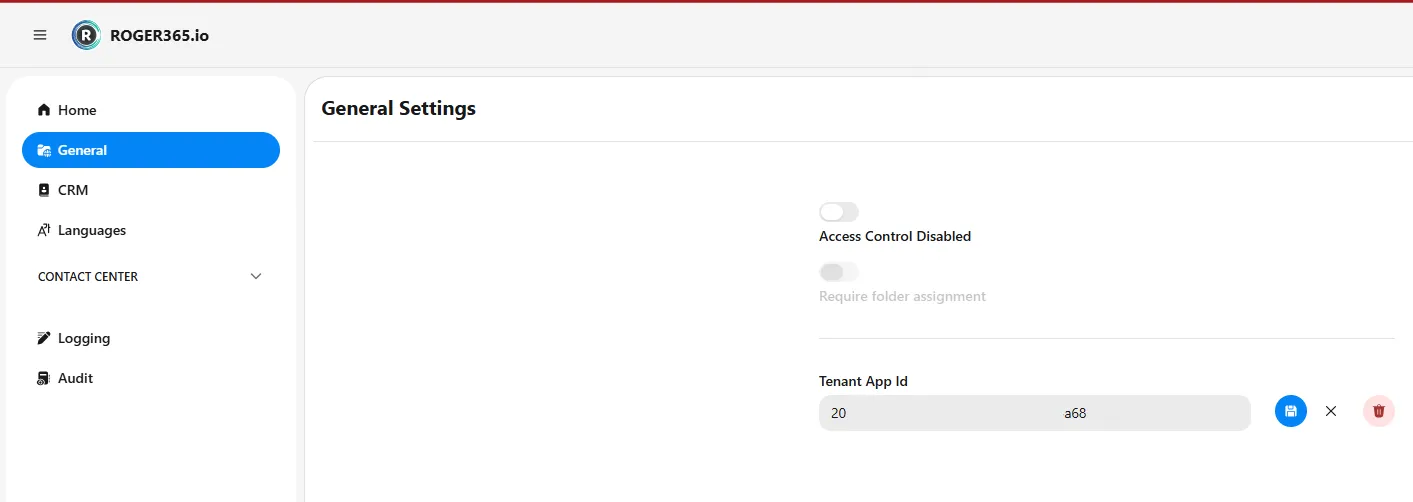
Finally, copy the Application (client) ID and paste it into the Tenant App Id field in the ROGER365.io admin portal.
The Administrator Portal and agent application requires Google Chrome and/or Microsoft Edge, to ensure a reliable and consistent user experience.
The ROGER365.io Contact Center solution is optimized for a screen resolution of 1920×1080 at 100% scale.
Configuring the platform in 10 simple steps
- Get the enrollment link by email by filling out this form to enroll your Microsoft 365 tenant to the ROGER365.io platform.
- Configure the security access for the admin portal. More information can be found on this page.
- Configure the Tenant App. More information can be found on this page.
- Configure the languages to be used in your configuration. More information can be found on this page.
- Configure your resource account to connect to the ROGER365.io platform. More information can be found on this page.
- Configure the agents that will be working with the ROGER365.io platform. More information can be found on this page.
- Configure your queues and assign agents to them. More information can be found on this page.
- Configure your Audio Files. More information can be found on this page.
- Configure your call flow using the form-based call flow. More information can be found on this page.
- Attach your created callflow to your resource account.
You can access the ROGER365.io UnifAI admin portal at portal.roger365.io and the agent app at app.roger365.io.
ROGER365.io
Knowledge Base


ROGER365.io
Knowledge Base

Latest Release Note
UnifAI Attendant is officially released
- [Agent App] AI call summaries
- [Agent App] Live call transcription with speaker diarization
- [Agent App] CRM contact recognition — before you even answer
- [Agent App] Park, Hold & five transfer methods — Announced, Monitored, Blind, Safe, Voicemail
- [Agent App] Pass call context on transfer — Teams target sees it
- [Agent App] Customizable, personal workspace
- [Agent App] Contact search across internal & CRM directories, plus Favorites
- [Agent App] Advanced search & query filters
- [Agent App] Reorderable Favorites in list or grid
- [Agent App] Call Parking with visual alerts
- [Agent App] Auto-saving call notes
- [Agent App] Audio quality & browser readiness checker
- [Agent App] Calendar overview for Teams contacts
- [Admin Portal] Portal dashboard with usage & license overview
- [Admin Portal] CRM replicator support for major CRMs — Salesforce, Dynamics 365, ServiceNow, Exact Online, TOPdesk, Zoho, Entra ID
- [Admin Portal] Form-based Callflow designer
- [Admin Portal] Schedule-based routing
- [Admin Portal] Granular access control
- [Admin Portal] Fast Teams resource account setup
- [Admin Portal] Multi-language audio prompts
- [Admin Portal] Audit & tenant logging
What's new
Your ideas shape the future of ROGER365.io!
Got a feature in mind, an improvement, or a use case template that would make your work easier? Share it with us!