


Search
Reject
Transfer
Merge
Play Audio Prompt
DTMF
Disconnect
The basics
Shift Synchronization
Power Frame
Create App Registration for Attendant Console
Callback request
Force terminate
Supervisor Assist
Redirect
Virtual wait
Conference call
Outbound DTMF
Cancel consultative transfer
Call Park
Features
Smart Chatbot
Microsoft Power Automate
Phonebook
Sentiment Analytics
TouchPoint
Agent
Reporting
Supervisor
Agent
Obtaining a WhatsApp number
What to do next?
Signup & Enrollment
Summary Export
ReplicatorConfig
ReplicatorJobStatus
TouchPoints
Chatbot Languages
Chatbot Knowledgebases
Tenant Information
Subscription
Conversation Packs
Conversations
Messages
Toastar Users
Toastar Conversations
Teams
WhatsAppConsent
API TouchPoint
Campaign API
Transcript
FeedbackExport
Outbound Call Campaign
Webhooks
Agent EventLog
Agent workEntry
Call Stream Change
Execution Results
Request
Queues
Calls
Agent Export
CallParticipants
API Documentation
ToastarForTeams
Callback Requests
Conversation API
Classification API
General Prerequisites
Contact Center
Setup Access & Security
Schedules
Resource Accounts
Queues
Callflows
Audio Files
Agents
Logging
Audit
CRM
Languages
Create Tenant App
Getting started
Subscriptions
Call Flows
AI Flow
Copilot Touchpoint
Insights & Analytics
Wallboard
Permissions
Logging
CRM Calling Integration (Toastar)
Custom CRM Connector
Default CRM Connectors
CRM Replicator
Email Configuration
Schedules
Agent Assist
Setup Access & Security
Malicious File Blocking
Wallboard
Reporting
Messages
Examples
Graphical Designer
Using the library
Email Touchpoint
API TouchPoint
Facebook TouchPoint
SMS TouchPoint
WhatsApp for Business TouchPoint
Webchat TouchPoint
Microsoft Teams
Queues
AI Flow (Beta)
Classification
Skill Based Routing
Reason Codes
Audio Prompts
Agent Profiles
Agents
Call Park
Resource Accounts
Graphical Designer
Form Based callflow
Using the library
Queues
General
Agent page functionalities
Social Messaging
Contact Center
Support & Assistance
Compliance by design
Social Messaging
Contact Center
Getting Started
General
No results
Try a different search query
Queues

Next to delivering incoming chat messages into a Microsoft Teams channel, you can also route them into a queue. The chat then will be placed into a visual queue in the native ROGER365.io app for Teams.
- This functionality is only available in the Enterprise subscription.
- Before configuring a queue, make sure you have configured the basic integration. In other words: messages must already be delivered into a Microsoft Teams channel.
- Make sure you have enabled the option ‘Save transcripts’ on the inbound TouchPoint (Webchat, Whatsapp etc.)
Each Voice or Social Queue consumes one license from the Queue license pool. Creating a Social Queue also counts toward the total license limit.
Configuration
- Add a queue by clicking [+ Add Social Queue] on the right top of the screen
- Enter a name for the queue, for example ‘SalesSupport’
- Click Save
Then reopen the queue by clicking the blue edit icon, next to the new created queue:
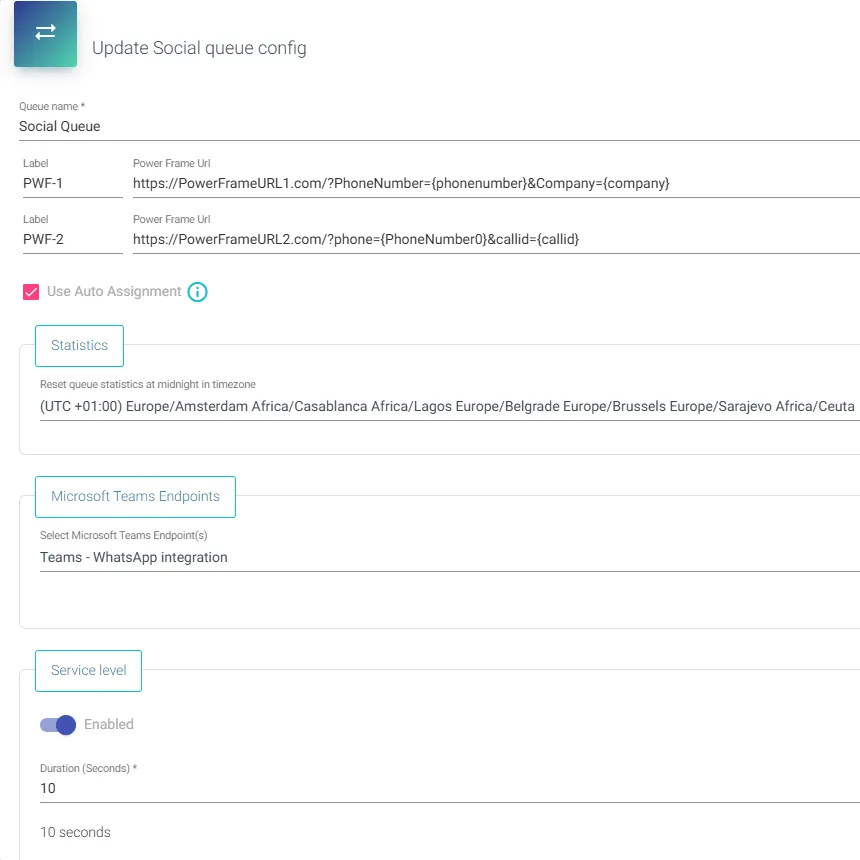
- PowerFrame URLs: You can configure a Power Frame URLs. These URLs are triggered on the Agent App when a new chat is offered to an agent, according to set Label you will be able to distinguish which Powerframe is currently used. You can include variables from the CRM Connector. For example: https://app.yourapp.com/index.html?contactid={SourceId} or https://app.yourapp.com/index.html?contactid={PhoneNumber0}
- Note: If you are using Microsoft PowerApps, then embedding an application is not supported by Microsoft (https://docs.microsoft.com/en-us/powerapps/maker/canvas-apps/limits-and-config#embedding-limits-for-canvas-apps). The workaround would be to open the ROGER365.io application in Teams in your browser via this url: https://teams.microsoft.com/
- Use Auto Assignment: When enabled, the system automatically assigns incoming messages based on agent order to agents signed into the Social Queue with a status other than Off Work. This feature assigns social conversations to agents using a round-robin routing method.
- Note: For the better experience, it is advised to enable “Notify assignment changes” option on the Teams TouchPoint level. This option will notify about social conversation assigned to the agent.
- Statistics: Select the timezone to determine midnight to reset the statistics on top of the Agent App.
- Microsoft Teams Endpoints: These are the EndPoints (channels) from where incoming chat conversations are shown in the queue. You can select multiple Teams Endpoints for example if you have configured a separate channel for WhatsApp and Webchat. By selecting both Endpoints all conversations will visually be placed in 1 queue.
- The Shift Sync feature integrates the Microsoft Teams Shifts application with Formal Agents of a Social Queue. For more information, see the Shift Synchronization documentation.
- Turn on the “Enabled” switch.
- Select the Team you own in Microsoft Teams.
- Select the previously created Scheduling Group in the Microsoft Teams Shifts application
- Save the queue configuration and click "Sync Now" to apply the changes.
- You can enable the Service Level feature for your queue, which measures the efficiency and responsiveness to incoming conversations within a specified service level threshold.
- Set the maximum number of seconds within which a service should be provided to a conversation in the Social Queue.
- Set the Threshold Percentage, which is a performance indicator showing the ratio of conversations handled within the specified time frame to the total number of conversations processed during that period.
- If the Threshold Percentage score exceeds the set value, it will be displayed as a green icon on the Supervisor page. If it falls below the set value, it will appear as a red icon.
- Configuration of a Teams Endpoints: You can configure the priority per endpoint. For example you can assign a Webchat channel with priotity 1 and WhatsApp with priority 2. Then webchat conversation will be placed above WhatsApp conversations. Per Endpoint you can also assign an icon which will become visible in the Agent UI.
- Agents: The agents who a added as a member in Microsoft Teams to the channel are shown here. If “Use Auto Assignment” feature is enabled, you can rearrange agent order by dragging agents within the list when the cursor changes to ✥.
- Check the box if you want this agent to be a formal agent:
- Formal: an agent is able to login and logout of a queue
- Informal: an agent is always logged in this queue, and is not able to logout
- Note: Signing out from the queue will hide every conversation from ROGER365.io app for Teams.
- Check the box if you want this agent to be a formal agent:
- Supervisors: Click + Add Supervisor to insert supervisors for this queue (remind that if you have enabled role-based access, a supervisor also must have the correct Azure role. Find the documentation for this here).
- The option ‘AgentUpdate Allowed’ give the right to change the status of an agent and Log them in or out a queue.