


Queues

General queue settings
For every group or department you can configure a queue. Based on the settings of the queue incoming calls will be routed to the assigned agents.
- Add a queue by clicking [+ Add Call Queue] on the right top of the screen
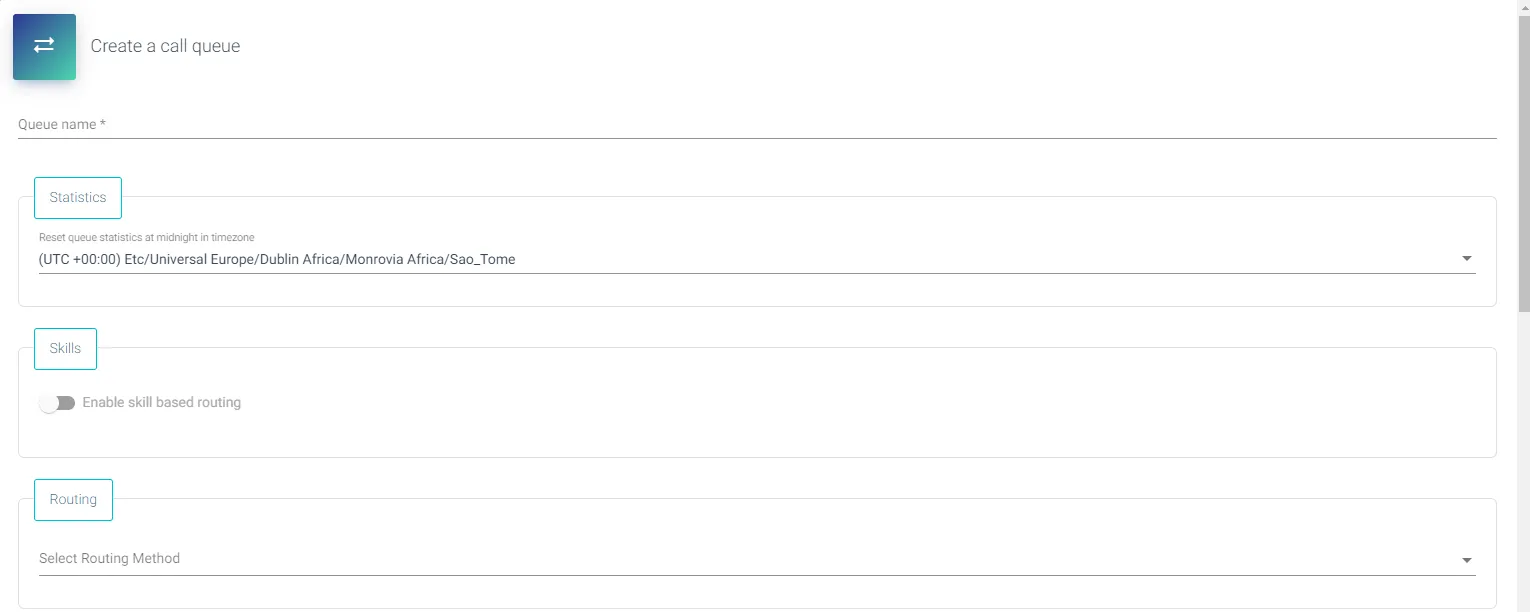
- Enter a name for the queue, for example ‘SalesSupport’
- Statistics: Select the timezone to determine midnight to reset the statistics on top of the Agent App.
- If you would like to use skill based routing you can enable this here, and select the required skills for calls in this queue
- Select the routing method:
- Longest Idle: routes each call to the agent who has been idle the longest time. The agent idle time starts counting from 0 after every status change in the ROGER365.io agent app (not the Teams presence)
- Serial: rings all call agents one by one in the order specified in the Agents list. If an agent dismisses or does not pick up a call, the call will ring the next agent and will try all agents until it is picked up.
- Round Robin: balances the routing of incoming calls so that each call agent gets the same number of calls from the queue.
- Parallel: rings all agents in the queue at the same time. The first call agent to pick up the call gets the call. Invites to a call happens in batches of 10 agents at the time.
- Starting from the Business subscription you can configure a Power Frame URLs. These URLs are triggered on the Agent App when a new call is offered to an agent, according to set Label you will be able to distinguish which Powerframe is currently used.
You can include variables from the CRM Connector. For example: https://app.yourapp.com/index.html?contactid={SourceId}.- You also also include the incoming phonenumber (and without CRM Replicator) by inserting the variable in this format: https://app.yourapp.com/index.html?phone={phonenumber}
- Or you can add the callid using this format: https://app.yourapp.com/index.html?callid={callId}
- Note: If you are using Microsoft PowerApps, then embedding an application is not supported by Microsoft (https://docs.microsoft.com/en-us/powerapps/maker/canvas-apps/limits-and-config#embedding-limits-for-canvas-apps). The alternative would be to open Microsoft Teams application directly in your browser via this url: https://teams.microsoft.com
- if you want to provide agents a wrap-up timer after ending a call you can enable this setting and enter the amount of seconds before the next call will be offered
- You can enable Queue Service Level feature for your Queue, which measures the efficiency and responsiveness to incoming customer requests within a specific service level threshold. It is possible to enable Queue Service Level option for every type of calls, or to exclude Virtual Calls (Virtual Wait action and Outbound Call Campaign).
- Set maximum number of seconds within which a service should be granted to a request in the Queue.
- Set Threshold Percentage, which is a performance indicator that reflects the ratio of requests handled within the specified time frame to the total number of requests processed during that period (formula for calcuating Service Level % can be found at Reporting page).
- Intelligent Formal Activation feature is responsible for automatically activating additional formal agents based on the rules. It is a powerful feature in cases of overloaded Queues with not enough available agents.
- Set “Threshold (Queue position)” which determines when the Intelligent Formal Activation should be activated.
- When the Threshold is met according to a logic (callsQueued > 2 & agentsReady == 0), a currently logged out from the Queue agent will be signed in again, helping to reduce the pressure on the Queue.
- The Shift Sync feature integrates the Microsoft Teams Shifts application with Contact Center Formal Agents. For more information, see the Shift Synchronization documentation.
- Turn on the “Enabled” switch.
- Select the Team you own in Microsoft Teams.
- Select the previously created Scheduling Group in the Microsoft Teams Shifts application.
- Save the queue configuration and click “Sync Now” to apply the changes.
- You can set Priority value for your Queue, it allows to priotize calls between different Queues.
- 0 is the highest priority you can setup.
- Click [+ Add Agents] to inserts agents to participate in this queue
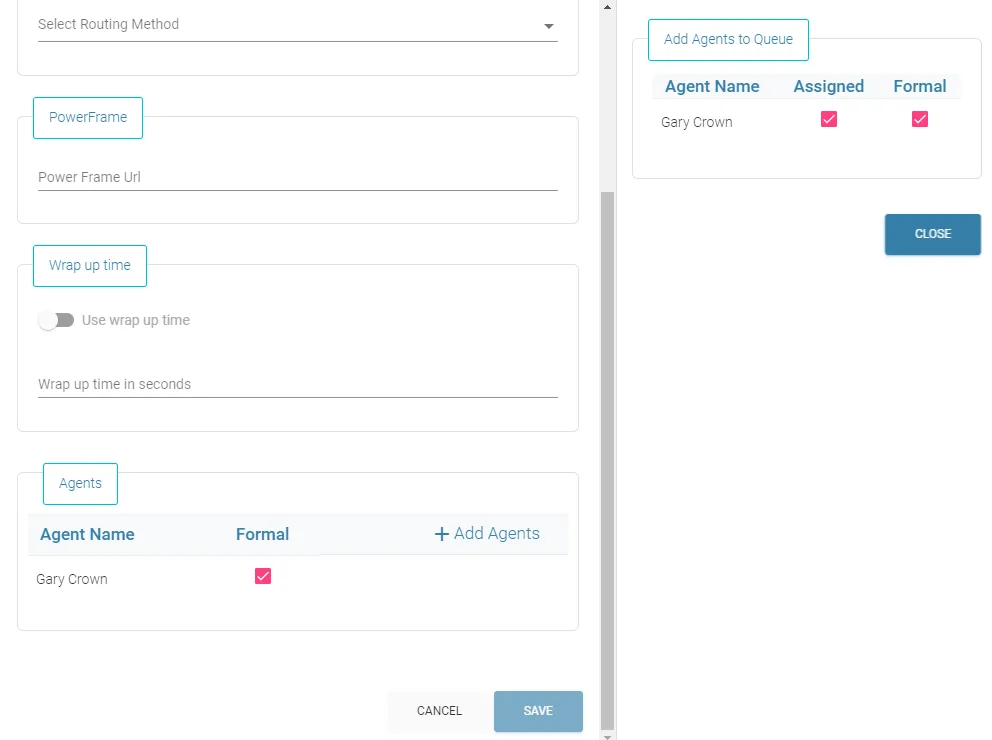
- If you don’t see any agents on the right pane, you first have to enable agents. How you can do this is shown here.
- To add agents to this queue, check the ‘assigned’ box
- Check the box if you want this agent to be a formal agent:
- Formal: an agent is able to login and logout of a queue
- Informal: an agent is always logged in this queue, and is not able to logout
- Click Save
A queue supports a maximum of 50 assigned agents by default. Should additional capacity be required, this limit can be extended through supplementary add-ons.
Alternatively, a portal administrator may configure Agents, Supervisors or Report Viewers to the Queue via enabled earlier User Synchronization feature – more details at this documentation page. Described below method works only with the Entra ID users which are added to ROGER365.io platform (meaning they’re visible at Agents admin page).
- Click [+ Sync Agents] to automatically configure existing agents to this Queue
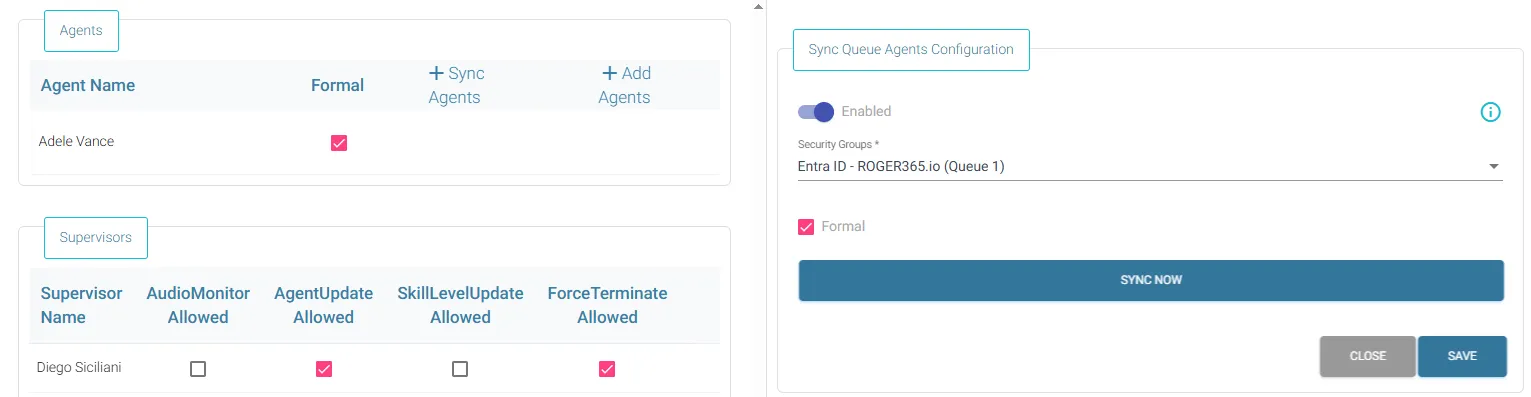
- Turn on the “Enabled” switch
- Select Entra ID Security Group containing users which are agents of ROGER365.io platform
- Note: Selected Security Group must be part of Enterprise Application “ROGER365.io” with correct role assigned!
- Check the “Formal” box if you want agents to be a formal agents:
- Formal: an agent is able to login and logout of a queue
- Informal: an agent is always logged in this queue, and is not able to logout
- Press “Save” button to save Sync Queue Agents form,
- Click [+ Sync Agents] button again,
- Click on “Sync Now” button to automatically add agents to this Queue.
- Do not forget to save Queue settings at the end of configuration process!
Supervisors
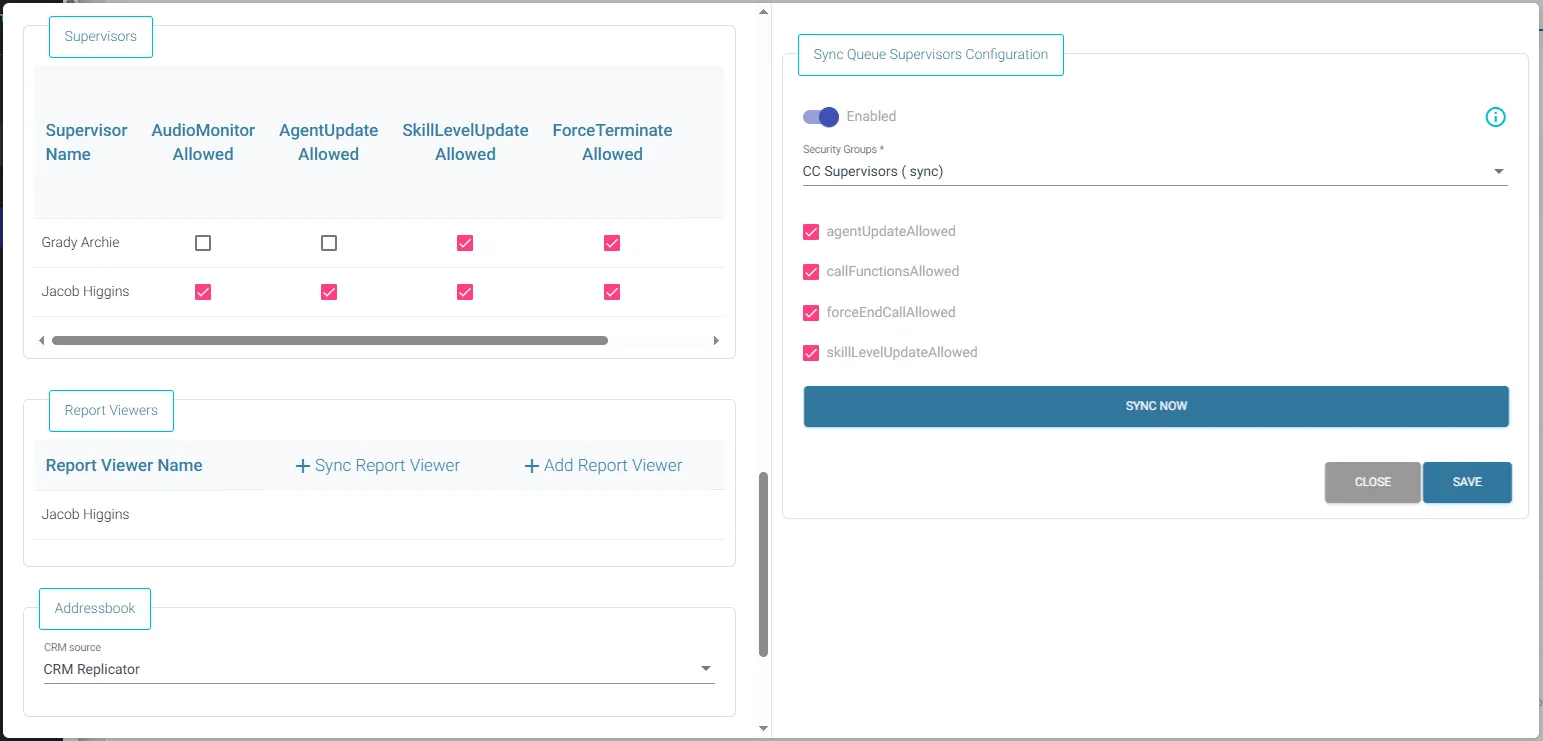
Click + Add Supervisor to insert supervisors for this queue (remind that if you have enabled role-based access, a supervisor also must have the correct Azure role. Find the documentation for this here)
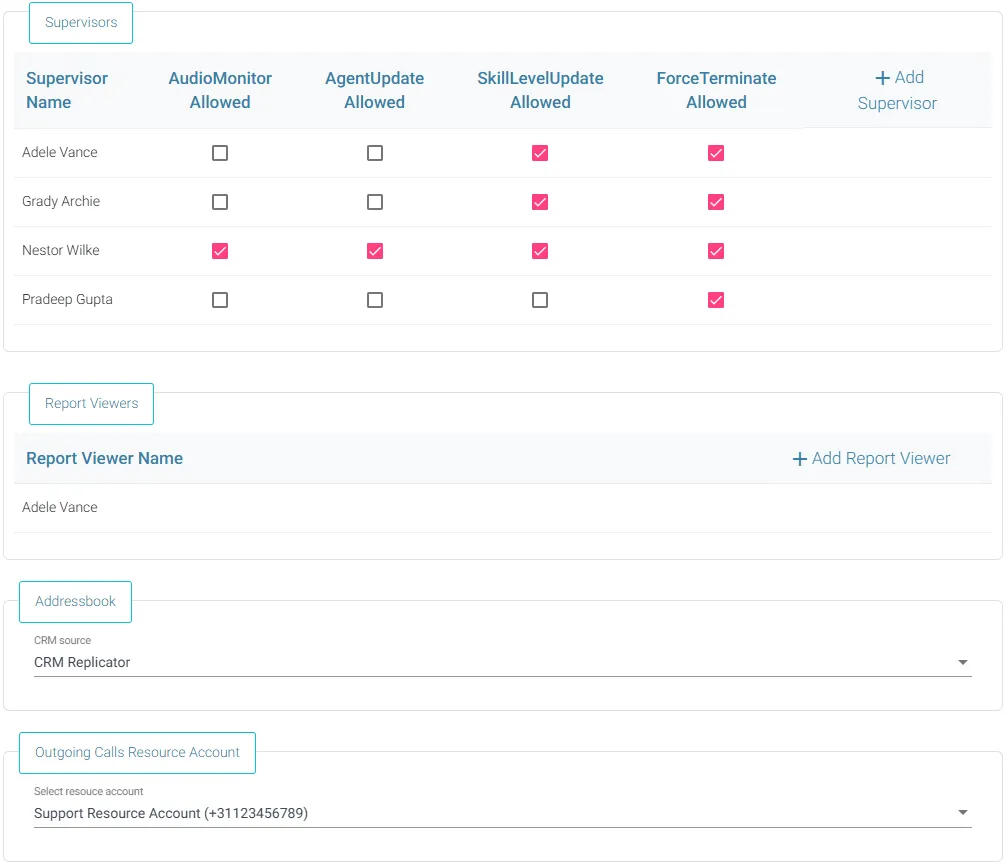
After you’ve added the supervisor you can enable ‘AudioMonitor Allowed’ which gives the supervisor the right to Monitor, Join or Whisper a live call. The option ‘AgentUpdate Allowed’ give the right to change the status of an agent and Log them in or out a queue.
You can enable 'SkillLevelUpdate Allowed' option, which grants the supervisor the ability to change the skill level of agents assigned to this Queue, as well as add or remove skills. In the Supervisor page of the ROGER365.io Contact Center application, supervisors with this permission can update the skill level of an agent by clicking the '…' icon on the far right side of the agent's record in the Agents section.
The option ‘ForceTerminate Allowed’ give the right to force terminate a call at the Supervisor page of the ROGER365.io Contact Center application when necessary. Each force terminating a call by Supervisor is logged into “Logging” page of ROGER365 admin portal. You can find more details regarding usage on The basics documentation page.
- Click [+ Sync Agents] to automatically configure existing agents as Supervisors of this Queue
Report Viewers
Click + Add Report Viewer to insert agents who will have an ability to see queue’s reports (reminder that if you have enabled role-based access, a reporting users also must have the correct Azure role. Find the documentation for this here).
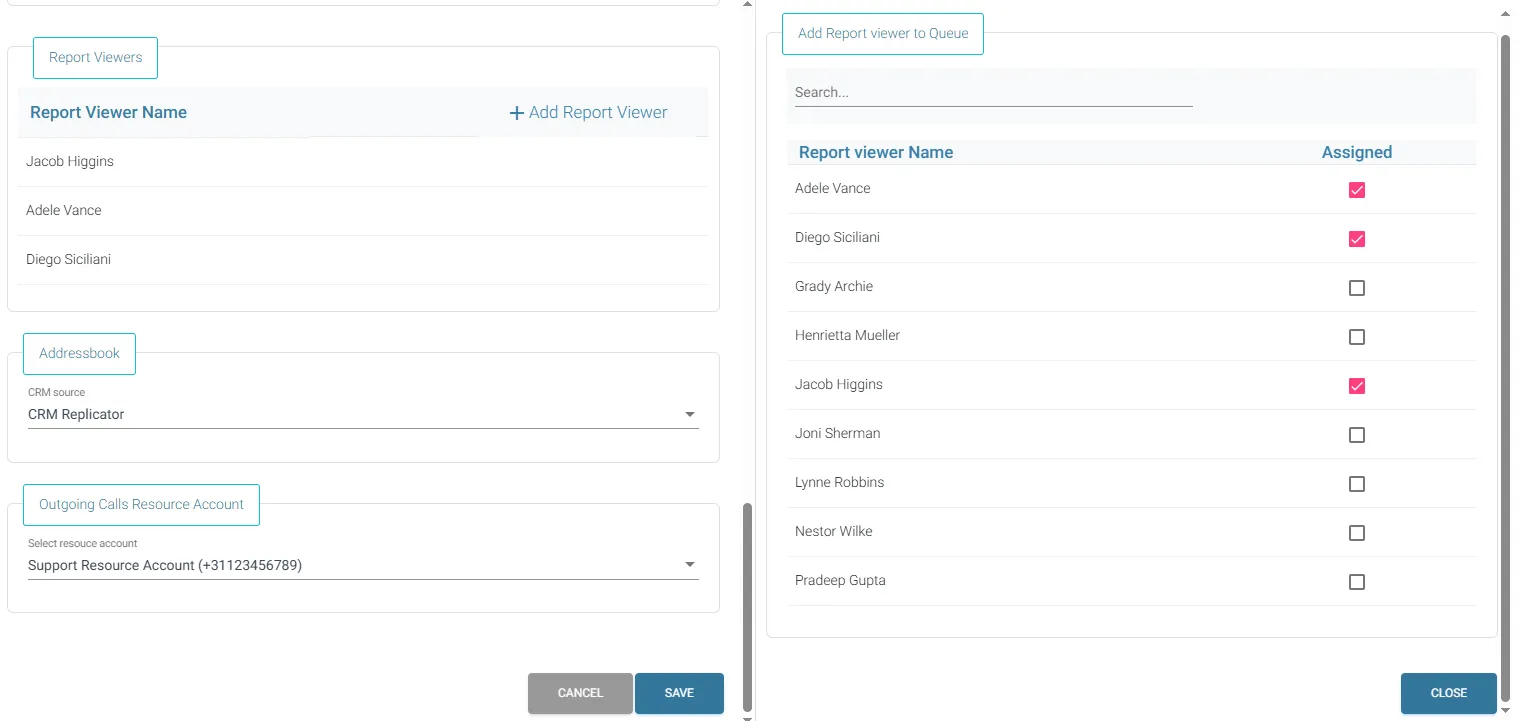
Assigning an agent as a Queue’s Report Viewer gives them access to the Reporting tab in the Contact Center application, scoped to this queue. Queue-based reports (such as Queue Summary, Queue Detail) will only show this queue’s data, while Agent-based and Caller-based reports may also include related activity from other queues, since those reports are organized around the agent or caller rather than a single queue.
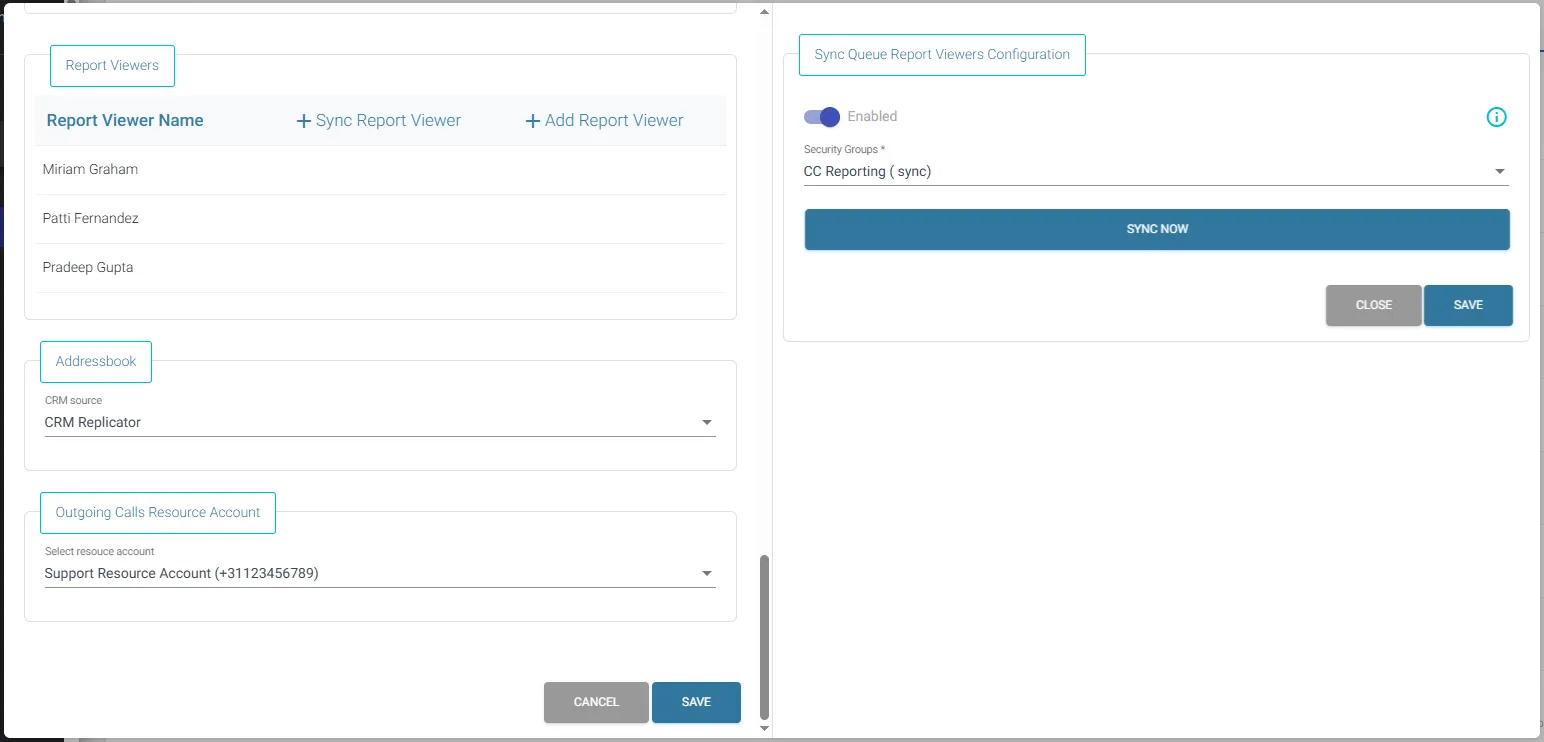
- Click [+ Sync Agents] to automatically configure existing agents as Report Viewers of this Queue
Addressbook
Here you can configure in which CRM Replicator can be searched by the agent
Outgoing Calls Resource Account
Select the resource account phone number which is used as caller identification when placing an outgoing call.
Important: Make sure you have configured and assigned a Teams Voice Policy to the resource account, else it won’t we able to dialout externally.