


General

Note: For getting presence info we rely on the Graph API from Microsoft. Experiences are that the Presence API is not very stable and can cause issues especially with connections to an on-premise Exchange environment, therefor we cannot full support this feature. SLA of presence updates can be checked on this Microsoft Graph documentation site.
The Contact Center solution of ROGER365.io is designed to work on 1920×1080 resolution with a scale of 100%.
The Contact Center solution of ROGER365.io communicates directly with your own Microsoft Teams environment (tenant). In order to work together, you must authorize ROGER365.io.
- Start with login into the ROGER365.io admin portal and select [Contact Center] and then [General] in the left navigation bar.
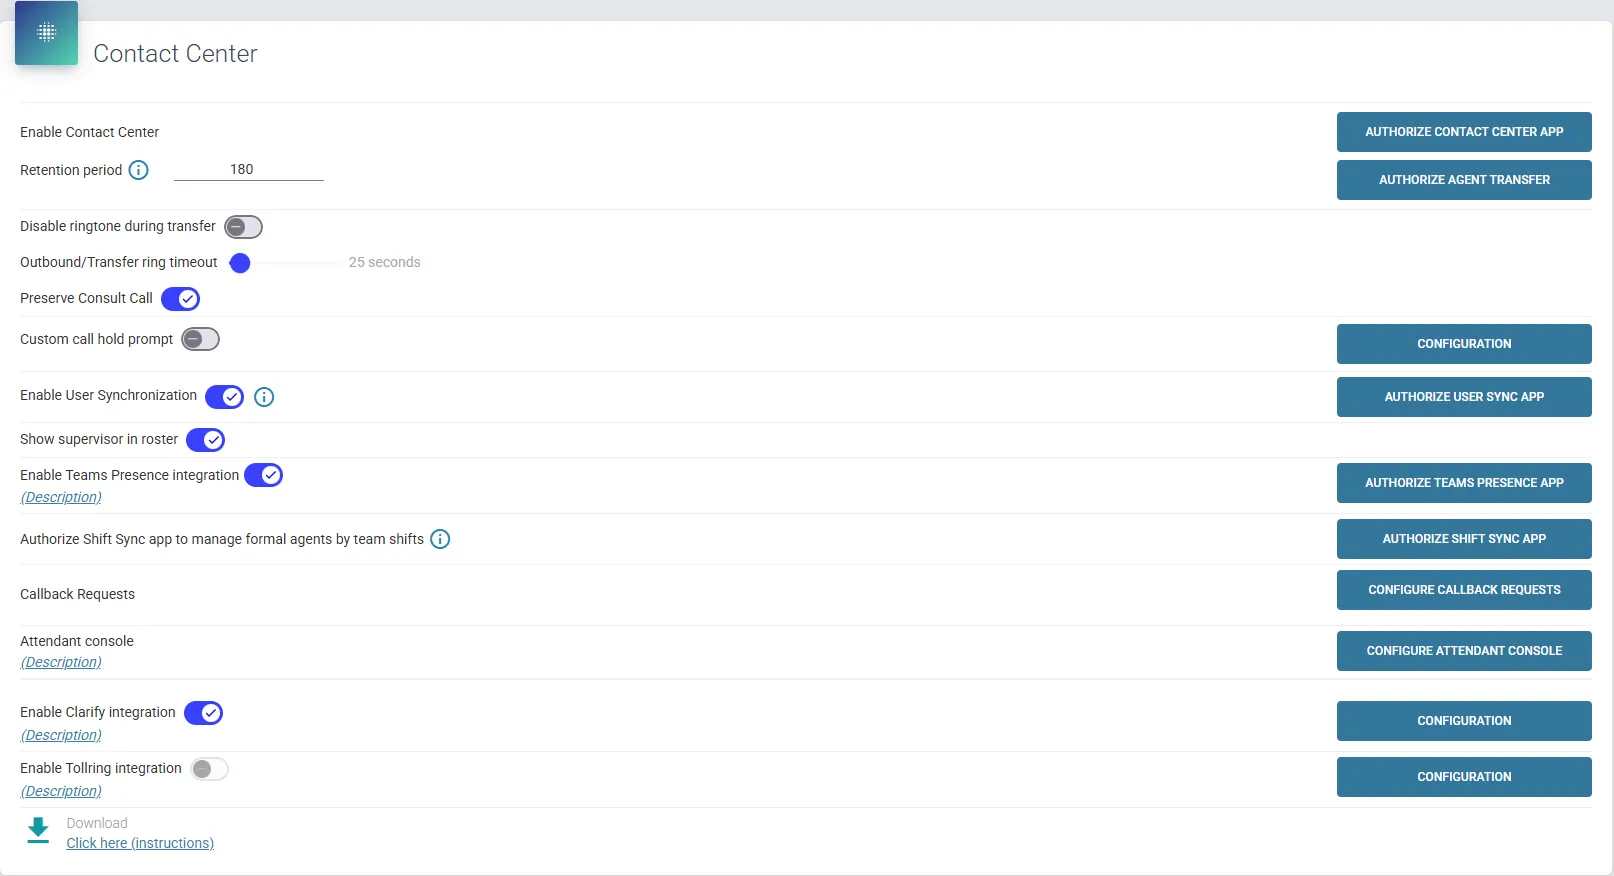
- Click the button named: ‘Authorize Contact Center App’ and Accept the Permission.
- Click the button named: ‘Authorize Agent Transfer’ and Accept the Permission.
- Click the button named: ‘Authorize Teams Presence App’ and Accept the Permission.
You can configure based on situation the Retention period for all Contact Center data. Default Retention period is 180 days, you can set it between 1 and 365 days.
“Outbound/Transfer ring timeout” determines the duration a call will ring at the external (PSTN) recipient before being terminated. It applies only to new outbound calls and transfers to external recipients, depending on the specifics of the call. It also applies to the Make Call Virtual callflow action.
- (Note: This option doesn't apply to transfers while already part of a group call, to internal users, or when adding a participant to an existing call.)
The “Preserve Consult Call” option is responsible for preserving a call when, during a consultation with another contact (via the Consultative Transfer option), the caller decides to hang up.
“Custom call hold prompt” option gives you the opportunity to change the onHold music, it also allows businesses to reinforce branding. Press “Configuration” button to upload custom audio file, then select it from dropdown list.
“Enable User Synchronization (Beta)” allows to automatically synchronize users from Security Group in Microsoft Entra ID to ROGER365.io. This feature can be extremely useful for big organizations where user management is time consuming. Synchronization of the Entra ID security groups to ROGER365.io platform is done every midnight (according to tenant’s region), meaning when the platform will detect change in membership of selected security group it will update Agents list accordingly.
To enable this option, a portal admin (with required permissions in Entra ID environment) must first press “Authorize User Sync App” button and accept permissions request. After this step, an Entra ID Enterprise Application named “ROGER365.io User synchronization” will be created, and admin consent must be granted via the Permissions tab.
- Note: Users which have to be synchronized from Entra ID environment to ROGER365.io platform must be a members of Entra ID Security Group created earlier. The group of users must be added to Enterprise Application “ROGER365.io” with correct role – check this documentation page for the role reference. Each insert, update or removal is written into Logging admin page. Any manually added Agents that arent a member of the selected User Sync Groups will be deleted after you press sync now, make sure that any manual added Agents are also included in the User Sync Entra groups.
“Show supervisor in roster” determines whether Supervisor will become visible participant upon start of supervising specific call (Monitor/Whisper). When enabled, connected to the call Supervisor will appear as record in the Agent app for agent handling the call. Disabled option means default state (Supervisor is not visible as a participant of the call).
- Note: The Supervisor leaving a call will not clear the record from the Agent screen. In case the Supervisor leaves a call and joins again using a different method, the record will be updated with the selected supervising option.
“Authorize Shift Sync app to manage formal agents by team shifts (Beta)” – allows configuration of a feature that connects Microsoft Teams Shifts with Contact Center Voice Queues. This integration is used to set and manage agents’ working times based on their assigned shifts. More information at Shift Synchronization documentation page.
You can also configure how you want CallBack Requests from the Agent App to be handled (Email, Mailto Link or Webhook). Check this documentation page for more details.
When using the Attendant Console, you have to manually configure an App registration in the Microsoft Azure Portal. Then insert the Appid of this created App when clicking the ‘Configure Attendant Console’ button.
Now you have successfully authorized the ROGER365.io Contact Center App
ROGER365.io Contact Center App for Microsoft Teams
From your Teams client, browse to the Teams App store and download our Contact Center | ROGER365.io app. Install the app on every Teams client in your organisation.
OAK Clarify Voice Recording Integration
With this integration, recorded calls can be played back directly from the Reporting tab in the ROGER365.io native Teams App, and used as an Audio Provider in the powerful AI Flow feature. By clicking the configuration button, you can insert the correct information:
- Sub domain: Enter the subdomain in the URL you use to access ClarifyGo. Enter only the domain, without ‘clarifygo.com’
- Client ID: Provided by Oak Innovation
- Client Secret: Provided by Oak Innovation
- username: A user configured within your ClarifyGo tenant with the ability to search and play calls.
- password: the password for the associated user”
Please contact Oak Innovation on +44 1202 607000 / servicedesk@oakinnovate.com to request your Client ID and Client Secret.
Tollring Compliance Recording Integration
With this integration, recorded calls can be played back directly from the Reporting tab in the ROGER365.io native Teams App, and used as an Audio Provider in the powerful AI Flow feature. Click the configuration button to enter the required information:
- Description: Enter a description for the Tollring configuration.
- Api URL: Enter the API URL pointing to the correct cluster.
- For example – https://api.rx.eu.analytics-365.com
- Note: The ‘eu’ part of the URL indicates the cluster where the Tollring environment was created. This may vary depending on your enrollment cluster.
- For example – https://api.rx.eu.analytics-365.com
- App URL: Enter the App URL pointing to the correct cluster.
- For example – https://app.rx.eu.analytics-365.com
- Note: The ‘eu’ part of the URL indicates the cluster where the Tollring environment was created. This may vary depending on your enrollment cluster.
- For example – https://app.rx.eu.analytics-365.com
- Token: Enter the Authentication Token from the Analytics365 portal.
Obtaining Tollring Authentication Token in the Analytics365 Portal
Navigate to Settings → API Access page:
Click on the ‘+New Token’ button and complete the following:
- Enter a name for the token.
- Set an expiry date – the maximum is 1 year.
- Select a Permission Group – Playback Supervisor.
- Allocate the playback network Via People – select Via Organization.
Focus Compliance Recording Integration
With this integration, recorded calls can be played back directly from the Reporting tab in the ROGER365.io native Teams App, and used as an Audio Provider in the powerful AI Flow feature. Click the configuration button to enter the required information:
- Region: Select the region of the Focus environment (assigned during enrollment of Focus)
- Client Id: Provide the Client ID of the Focus REST API user (created earlier in Focus portal)
- Username: Enter the username of the Focus REST API user (created earlier in Focus portal)
- Api key: Enter the password (API Key) of the Focus REST API user (created earlier in Focus portal)
Creating Focus REST API user
Navigate to Account settings -> Integrations page and locate Manage users button:
- Select Super User role and press +Add User button,
- Copy generated username, password (API Key) and Client ID to a safe place.
Known Limitations
This section provides an overview of the known limitations of certain functionalities. ROGER365.io relies heavily on Microsoft Teams and the Microsoft Graph API, which sometimes introduces limitations to required functionalities. Below you'll find a list of the current known limitations:
Transferring calls (Search box & Attendant Console)
- It’s not supported by Microsoft to transfer a call to another resource account. A workaround is to transfer to the external PSTN number and make sure is routed externally.
- It’s not possible to transfer a call to the PSTN number of an internal Teams User which is answered by the Teams Mobile App. Workaround: transfer the call to the ‘Teams’ option in the ROGER365.io app instead of selecting the E.164 phonenumber.
- An outbound call to PSTN cannot be blind transferred to another PSTN number.
- Transfers from a meeting call are not supported by Microsoft.
Other
- There may be scenarios where calls fail to connect properly if the user has call recording enabled.
- It isn’t possible to cancel invite to an outbound call made to the Teams user because Microsoft Teams does not send the event which ROGER365.io can act on it. The only way is either waiting for the timeout of the call invite or for the called Teams user to reject the invite.
- The Microsoft’s Presence API is more unstable for on-premise Exchange environments than regular cloud environments. ROGER365.io does not have influence over the failures coming from Presence API.