


Search
Reject
Setup - Contact Center
Graphical Designer
Reject
Read more
Transfer
Setup - Contact Center
Graphical Designer
Transfer
Read more
Merge
Setup - Contact Center
Graphical Designer
Merge
Read more
Play Audio Prompt
Setup - Contact Center
Graphical Designer
Play Audio Prompt
Read more
DTMF
Setup - Contact Center
Graphical Designer
DTMF
Read more
Disconnect
Setup - Contact Center
Graphical Designer
Disconnect
Read more
The basics
Setup - Contact Center
Graphical Designer
The basics
Read more
Shift Synchronization
Setup - Contact Center
Queues
Shift Synchronization
Read more
Power Frame
Setup - Contact Center
Queues
Power Frame
Read more
Create App Registration for Attendant Console
Setup - Contact Center
General
Create App Registration for Attendant Console
Read more
Callback request
Setup - Contact Center
General
Callback request
Read more
Force terminate
How to use
Agent page functionalities
Force terminate
Read more
Supervisor Assist
How to use
Agent page functionalities
Supervisor Assist
Read more
Redirect
How to use
Agent page functionalities
Redirect
Read more
Virtual wait
How to use
Agent page functionalities
Virtual wait
Read more
Conference call
How to use
Agent page functionalities
Conference call
Read more
Outbound DTMF
How to use
Agent page functionalities
Outbound DTMF
Read more
Cancel consultative transfer
How to use
Agent page functionalities
Cancel consultative transfer
Read more
Call Park
How to use
Agent page functionalities
Call Park
Read more
Features
How to use
Social Messaging
Features
Read more
Smart Chatbot
How to use
Social Messaging
Smart Chatbot
Read more
Microsoft Power Automate
How to use
Social Messaging
Microsoft Power Automate
Read more
Phonebook
How to use
Social Messaging
Phonebook
Read more
Sentiment Analytics
How to use
Social Messaging
Sentiment Analytics
Read more
TouchPoint
How to use
Social Messaging
TouchPoint
Read more
Agent
How to use
Social Messaging
Agent
Read more
Reporting
How to use
Contact Center
Reporting
Read more
Supervisor
How to use
Contact Center
Supervisor
Read more
Agent
How to use
Contact Center
Agent
Read more
Obtaining a WhatsApp number
Getting Started
Support & Assistance
Obtaining a WhatsApp number
Read more
What to do next?
Getting Started
Getting Started
What to do next?
Read more
Signup & Enrollment
Getting Started
Getting Started
Signup & Enrollment
Read more
Summary Export
API
Social Messaging
Summary Export
Read more
ReplicatorConfig
API
Social Messaging
ReplicatorConfig
Read more
ReplicatorJobStatus
API
Social Messaging
ReplicatorJobStatus
Read more
TouchPoints
API
Social Messaging
TouchPoints
Read more
Chatbot Languages
API
Social Messaging
Chatbot Languages
Read more
Chatbot Knowledgebases
API
Social Messaging
Chatbot Knowledgebases
Read more
Tenant Information
API
Social Messaging
Tenant Information
Read more
Subscription
API
Social Messaging
Subscription
Read more
Conversation Packs
API
Social Messaging
Conversation Packs
Read more
Conversations
API
Social Messaging
Conversations
Read more
Messages
API
Social Messaging
Messages
Read more
Toastar Users
API
Social Messaging
Toastar Users
Read more
Toastar Conversations
API
Social Messaging
Toastar Conversations
Read more
Teams
API
Social Messaging
Teams
Read more
WhatsAppConsent
API
Social Messaging
WhatsAppConsent
Read more
API TouchPoint
API
Social Messaging
API TouchPoint
Read more
Campaign API
API
Social Messaging
Campaign API
Read more
Transcript
API
Social Messaging
Transcript
Read more
FeedbackExport
API
Contact Center
FeedbackExport
Read more
Outbound Call Campaign
API
Contact Center
Outbound Call Campaign
Read more
Webhooks
API
Contact Center
Webhooks
Read more
Agent EventLog
API
Contact Center
Agent EventLog
Read more
Agent workEntry
API
Contact Center
Agent workEntry
Read more
Call Stream Change
API
Contact Center
Call Stream Change
Read more
Execution Results
API
Contact Center
Execution Results
Read more
Request
API
Contact Center
Request
Read more
Queues
API
Contact Center
Queues
Read more
Calls
API
Contact Center
Calls
Read more
Agent Export
API
Contact Center
Agent Export
Read more
CallParticipants
API
Contact Center
CallParticipants
Read more
API Documentation
API
Contact Center
API Documentation
Read more
ToastarForTeams
API
General
ToastarForTeams
Read more
Callback Requests
API
General
Callback Requests
Read more
Conversation API
API
General
Conversation API
Read more
Classification API
API
General
Classification API
Read more
General Prerequisites
Getting Started
Getting Started
General Prerequisites
Read more
Contact Center
How to use
Contact Center
Read more
Setup Access & Security
Setup - General
Setup Access & Security
Read more
Schedules
Setup - Contact Center
Schedules
Read more
Resource Accounts
Setup - Contact Center
Resource Accounts
Read more
Queues
Setup - Contact Center
Queues
Read more
Callflows
Setup - Contact Center
Callflows
Read more
Audio Files
Setup - Contact Center
Audio Files
Read more
Agents
Setup - Contact Center
Agents
Read more
Logging
How to use
Logging
Read more
Audit
Setup - General
Audit
Read more
CRM
Setup - General
CRM
Read more
Languages
Setup - General
Languages
Read more
Create Tenant App
Setup - General
Create Tenant App
Read more
Getting started
Getting started
Getting started
Read more
Subscriptions
How to use
Subscriptions
Read more
Call Flows
Setup - Contact Center
Call Flows
Read more
AI Flow
API
AI Flow
Read more
Copilot Touchpoint
Setup - Social Messaging
Copilot Touchpoint
Read more
Insights & Analytics
Setup - General
Insights & Analytics
Read more
Wallboard
Setup - General
Wallboard
Read more
Permissions
Setup - General
Permissions
Read more
Logging
Setup - General
Logging
Read more
CRM Calling Integration (Toastar)
Setup - General
CRM Calling Integration (Toastar)
Read more
Custom CRM Connector
Setup - General
Custom CRM Connector
Read more
Default CRM Connectors
Setup - General
Default CRM Connectors
Read more
CRM Replicator
Setup - General
CRM Replicator
Read more
Email Configuration
Setup - General
Email Configuration
Read more
Schedules
Setup - General
Schedules
Read more
Agent Assist
Setup - General
Agent Assist
Read more
Setup Access & Security
Setup - General
Setup Access & Security
Read more
Malicious File Blocking
Setup - Social Messaging
Malicious File Blocking
Read more
Wallboard
Setup - Social Messaging
Wallboard
Read more
Reporting
Setup - Social Messaging
Reporting
Read more
Messages
Setup - Social Messaging
Messages
Read more
Examples
Setup - Social Messaging
Examples
Read more
Graphical Designer
Setup - Social Messaging
Graphical Designer
Read more
Using the library
Setup - Social Messaging
Using the library
Read more
Email Touchpoint
Setup - Social Messaging
Email Touchpoint
Read more
API TouchPoint
Setup - Social Messaging
API TouchPoint
Read more
Facebook TouchPoint
Setup - Social Messaging
Facebook TouchPoint
Read more
SMS TouchPoint
Setup - Social Messaging
SMS TouchPoint
Read more
WhatsApp for Business TouchPoint
Setup - Social Messaging
WhatsApp for Business TouchPoint
Read more
Webchat TouchPoint
Setup - Social Messaging
Webchat TouchPoint
Read more
Microsoft Teams
Setup - Social Messaging
Microsoft Teams
Read more
Queues
Setup - Social Messaging
Queues
Read more
AI Flow (Beta)
Setup - Contact Center
AI Flow (Beta)
Read more
Classification
Setup - Contact Center
Classification
Read more
Skill Based Routing
Setup - Contact Center
Skill Based Routing
Read more
Reason Codes
Setup - Contact Center
Reason Codes
Read more
Audio Prompts
Setup - Contact Center
Audio Prompts
Read more
Agent Profiles
Setup - Contact Center
Agent Profiles
Read more
Agents
Setup - Contact Center
Agents
Read more
Call Park
Setup - General
Call Park
Read more
Resource Accounts
Setup - Contact Center
Resource Accounts
Read more
Graphical Designer
Setup - Contact Center
Graphical Designer
Read more
Form Based callflow
Setup - Contact Center
Form Based callflow
Read more
Using the library
Setup - Contact Center
Using the library
Read more
Queues
Setup - Contact Center
Queues
Read more
General
Setup - Contact Center
General
Read more
Agent page functionalities
How to use
Agent page functionalities
Read more
Social Messaging
How to use
Social Messaging
Read more
Contact Center
How to use
Contact Center
Read more
Support & Assistance
Getting Started
Support & Assistance
Read more
Compliance by design
Getting Started
Compliance by design
Read more
Social Messaging
API
Social Messaging
Read more
Contact Center
API
Contact Center
Read more
Getting Started
Getting Started
Getting Started
Read more
General
API
General
Read more
No results
Try a different search query
Menu
What are you looking for?
Thank you! Your submission has been received!
Oops! Something went wrong while submitting the form.
Setup - Social Messaging
Copilot Touchpoint

Copilot Touchpoint

The Copilot TouchPoint is only available in the Enterprise subscription.

Disclaimers:

  • The ROGER365.io does not supply the Copilot Agent configuration and is not responsible for unexpected results or being flagged as a violator of Terms of Use.
  • Please be aware of the cost-aspect for utilizing your Copilot Agent configuration used in this integration – Pricing.

This integration connects the Copilot agent (created in Copilot Studio) with the ROGER365.io platform, allowing you to have Webchat or WhatsApp conversations with the Copilot agent – with an option to escalate a conversation to a human agent. Depending on its configuration, the Copilot agent can provide powerful and flexible assistance across a wide range of scenarios, adapting its capabilities to meet your specific needs.

Copilot Studio portal

Authentication

After the Copilot Agent is created, navigate to its settings.

Open the “Security” section followed by “Authentication”:
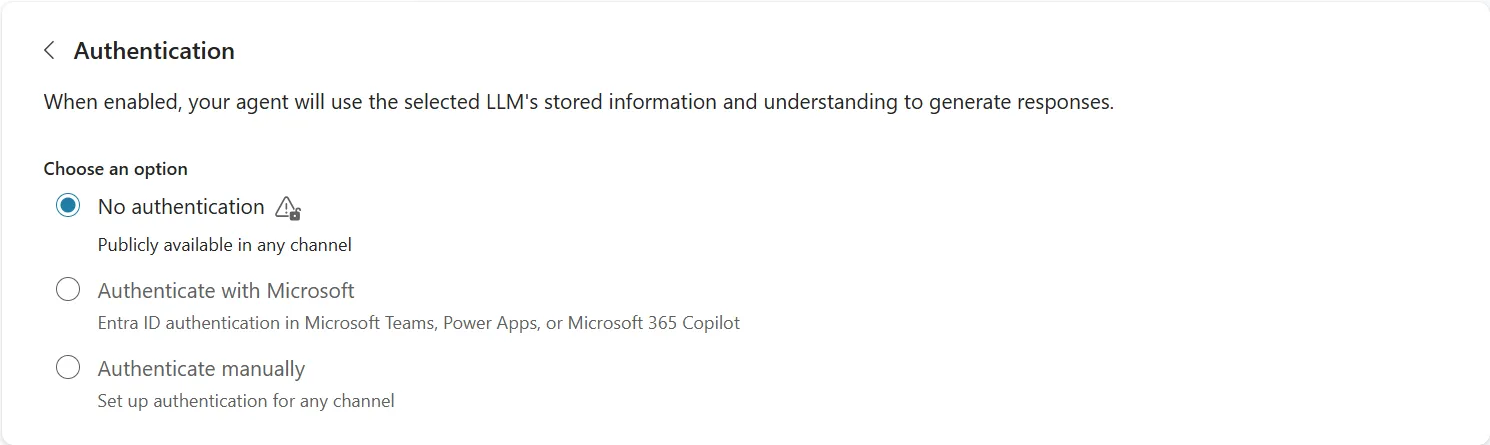
Set the authentication option to ‘No Authentication‘.

This is the only Microsoft-supported configuration that does not require end users to sign in before interacting with the agent; the alternative options, ‘Authenticate with Microsoft’ and ‘Authenticate manually’, are both built around a user sign-in flow. As the Copilot-integrated chatbox may be embedded on any website within the network, requiring individual sign-in is not practical for this use case.

“No Authentication” doesn’t mean the agent is unsecured. With ‘Require secured access’ enabled (see the Obtaining a Secret section below), clients must authenticate using a Direct Line secret (token) before reaching the agent – blocking unauthorized access even without individual user sign-in.

Administrators should also scope the agent to expose only topics and data appropriate for this access level.

Obtaining a secret (Microsoft Copilot Studio reference)

In the same “Security” section of the Copilot Agent settings, navigate to “Web channel security”:
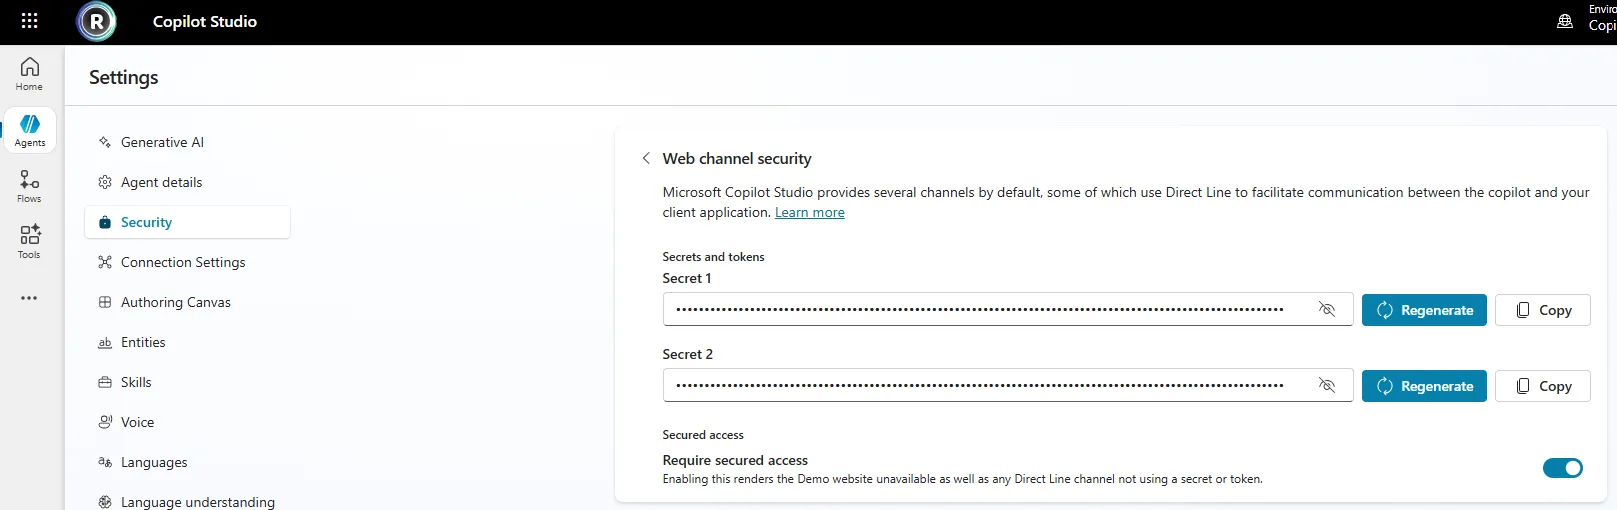
On this page, copy “Secret 1” to a safe place – this Secret will be used during the creation of the Copilot TouchPoint in the ROGER365.io admin portal.

For maximum security of the Copilot Agent configuration, it is advised to enable the “Require secured access” option (if already enabled, leave it as it is).

System Topics

By default, the Copilot Agent configuration includes a set of built-in System topics. The integration relies on the “Escalate” and “End of Conversation” System topics. Based on Copilot’s response in these topics, the messageflow on the ROGER365.io side will act accordingly.

Example of “Escalate” System topic

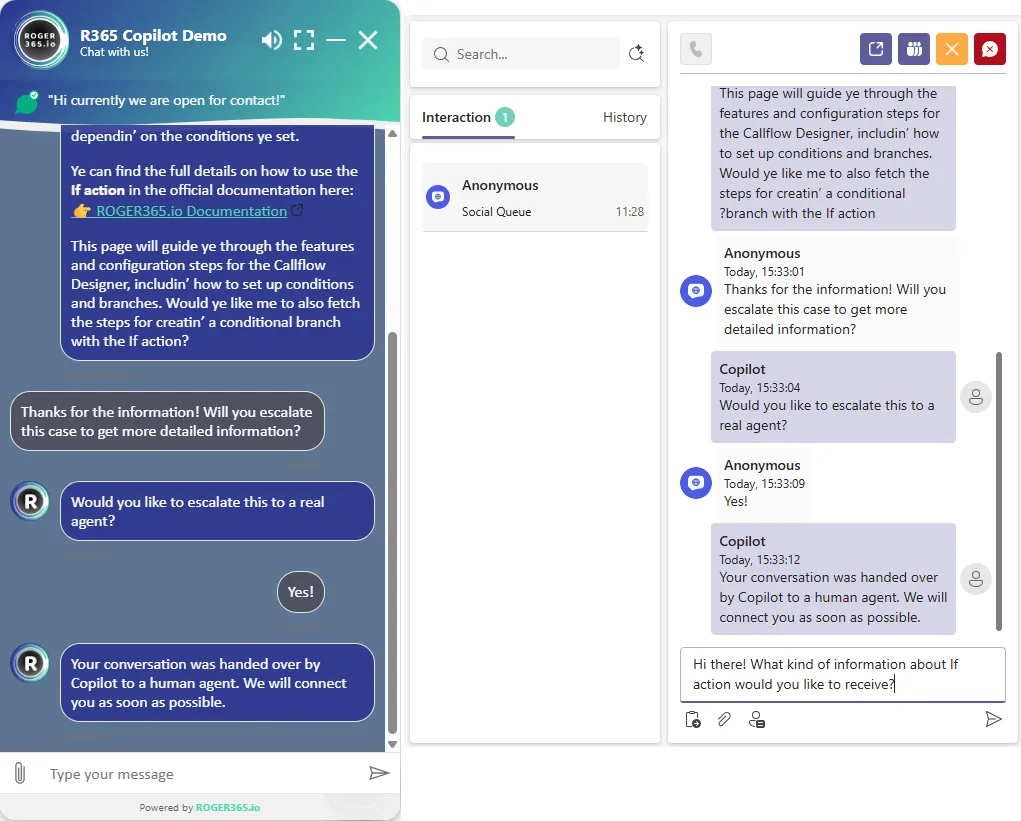
During a conversation with the Copilot Agent, a user may request to be transferred to a human agent for further support. The “Escalate” system topic handles this by asking the user for confirmation. Once confirmed, Copilot sends a predefined message that triggers the handoff to a live agent on the ROGER365.io side.
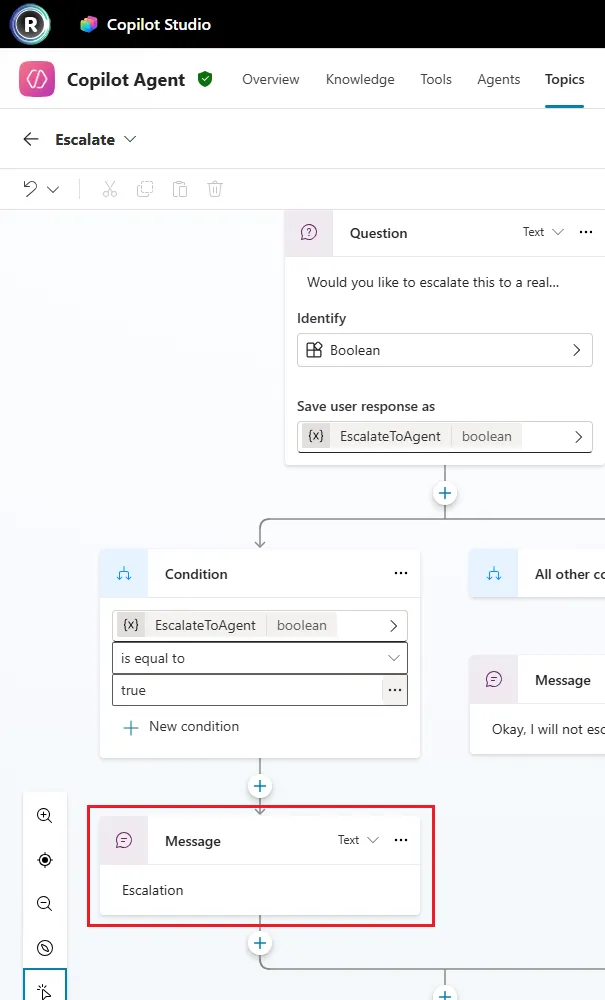
This message can be altered according to specific requirements.

Important: The configured escalation text must be saved to a clipboard, as it will be referenced during the creation of the messageflow from library – see Using the library documentation.

Example of “End of Conversation” System topic

The “End of Conversation” system topic manages the closing stage of an interaction with the Copilot Agent. Before ending, Copilot asks the user if any further assistance is needed, and upon confirmation to close, sends a farewell message that triggers the closure of the conversation on the ROGER365.io side.
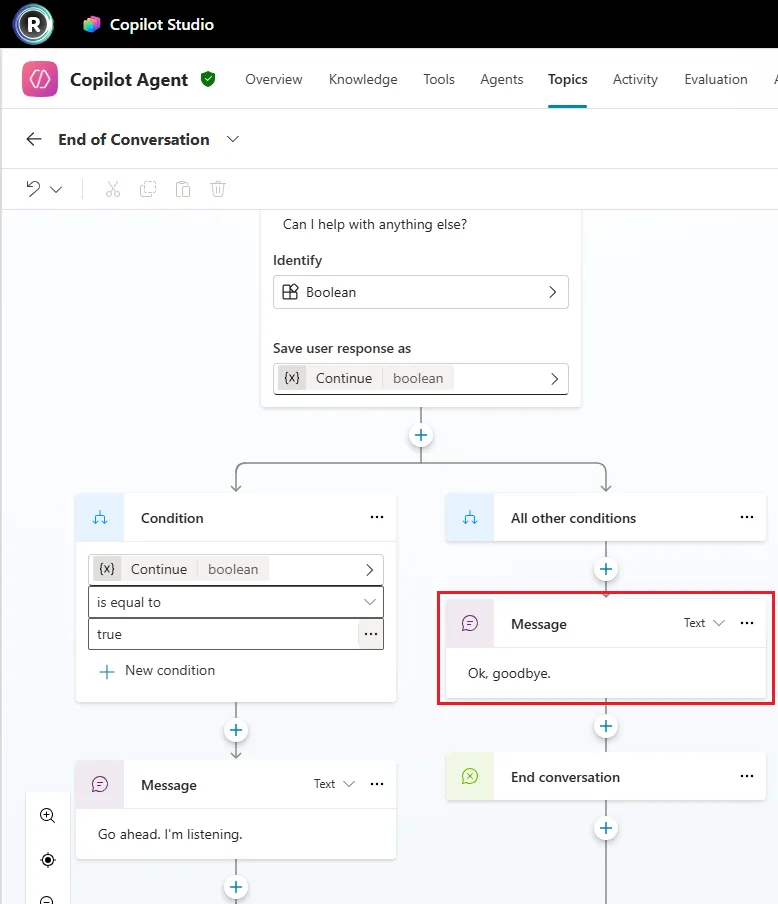
This message can be altered according to specific requirements.

Important: The configured closing text must be saved to a clipboard, as it will be referenced during the creation of the messageflow from library – see Using the library documentation.

Adding Copilot as TouchPoint

  1. Go to [Social Messaging] ➝ [Copilot Touchpoints],
  2. On the right top click [+ Add Copilot Touchpoint].
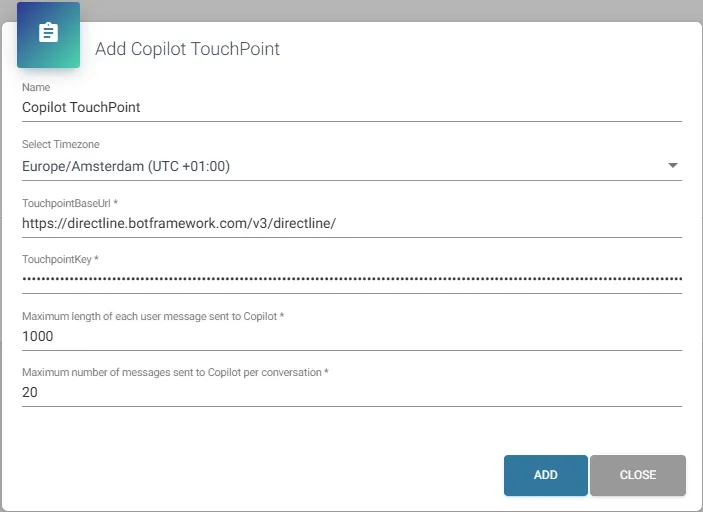
Field Description
Name Enter name for the Copilot TouchPoint configuration
Timezone Select from list appropriate for your region timezone
TouchPointBasedUrl (fixed) This is the standard, Microsoft-provided address used to connect our platform to Microsoft Copilot. It must remain as-is, there’s no alternative or configurable value here – API reference & Key concepts
TouchpointKey Secret used for authentication taken from the Copilot Studio’s “Web channel security” page of “Security” section – Obtain the secrets
Maximum length of each user message sent to Copilot Enter maximum length of user message that will be sent to the Copilot agent. Default value is 1000 characters.
Useful option to optimize performance or control cost aspect of the integration!
Note: From the interface perspective (Webchat/WhatsApp) users may be able to send messages that exceed the maximum allowed length. However, based on the configured limit (for example, 1000 characters), only the first 1000 characters will be passed to Copilot, and the rest will be discarded.
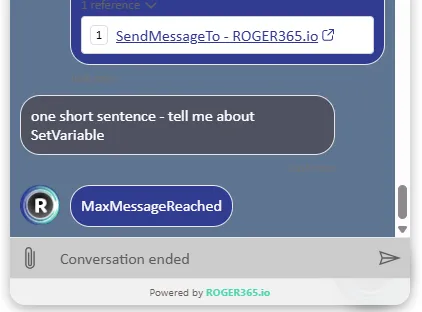
Maximum number of messages sent to Copilot per conversation Enter maximum number of sent user messages during single conversation to the Copilot agent.
Useful option to optimize performance or control cost aspect of the integration!

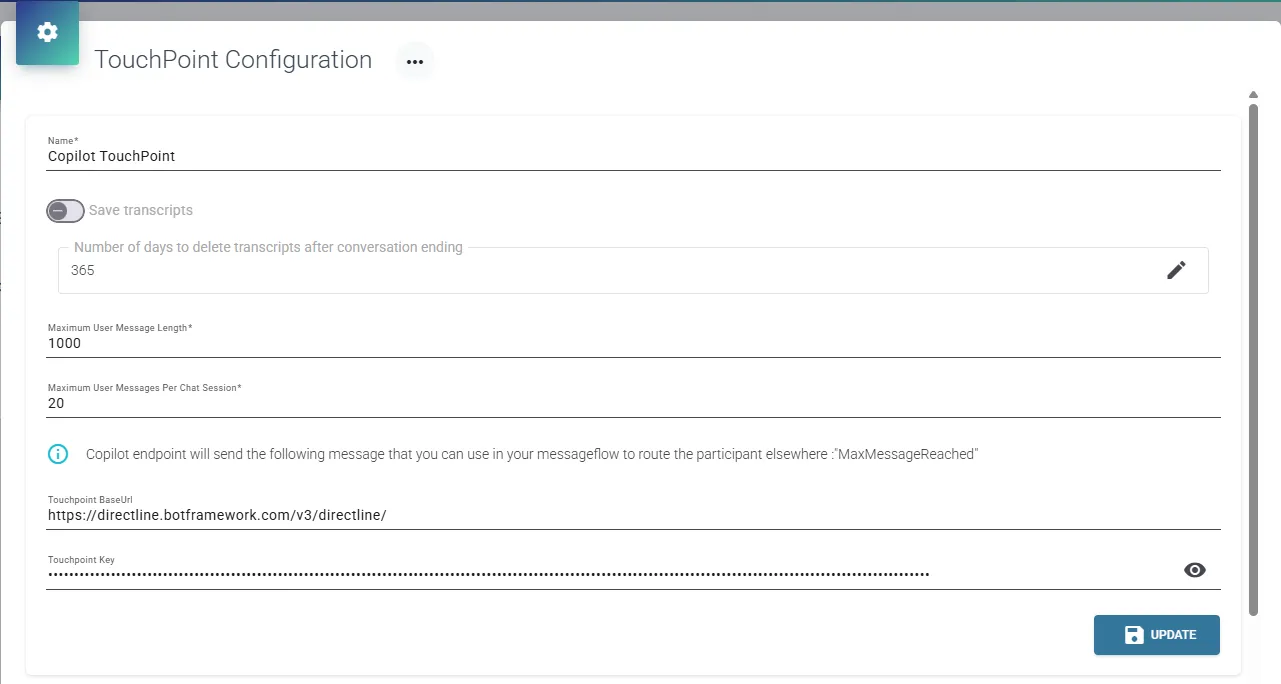
When reviewing the settings of a created Copilot TouchPoint (accessed via the “Edit” button), information is displayed about the Copilot endpoint sending a “MaxMessageReached” message. This message is tied to the maximum user messages option and can be used in the messageflow configuration for routing purposes.

Example of how it works

Webchat conversation – escalating to a human agent
Webchat conversation — closing the conversation at the user’s request
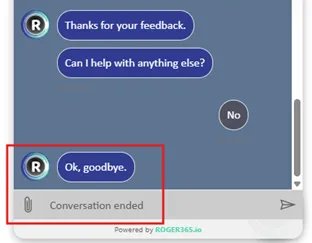
Webchat conversation – closing the conversation after reaching the maximum sent messages
On this page