


Search
Reject
Transfer
Merge
Play Audio Prompt
DTMF
Disconnect
The basics
Shift Synchronization
Power Frame
Create App Registration for Attendant Console
Callback request
Force terminate
Supervisor Assist
Redirect
Virtual wait
Conference call
Outbound DTMF
Cancel consultative transfer
Call Park
Features
Smart Chatbot
Microsoft Power Automate
Phonebook
Sentiment Analytics
TouchPoint
Agent
Reporting
Supervisor
Agent
Obtaining a WhatsApp number
What to do next?
Signup & Enrollment
Summary Export
ReplicatorConfig
ReplicatorJobStatus
TouchPoints
Chatbot Languages
Chatbot Knowledgebases
Tenant Information
Subscription
Conversation Packs
Conversations
Messages
Toastar Users
Toastar Conversations
Teams
WhatsAppConsent
API TouchPoint
Campaign API
Transcript
FeedbackExport
Outbound Call Campaign
Webhooks
Agent EventLog
Agent workEntry
Call Stream Change
Execution Results
Request
Queues
Calls
Agent Export
CallParticipants
API Documentation
ToastarForTeams
Callback Requests
Conversation API
Classification API
General Prerequisites
Contact Center
Setup Access & Security
Schedules
Resource Accounts
Queues
Callflows
Audio Files
Agents
Logging
Audit
CRM
Languages
Create Tenant App
Getting started
Subscriptions
Call Flows
AI Flow
Copilot Touchpoint
Insights & Analytics
Wallboard
Permissions
Logging
CRM Calling Integration (Toastar)
Custom CRM Connector
Default CRM Connectors
CRM Replicator
Email Configuration
Schedules
Agent Assist
Setup Access & Security
Malicious File Blocking
Wallboard
Reporting
Messages
Examples
Graphical Designer
Using the library
Email Touchpoint
API TouchPoint
Facebook TouchPoint
SMS TouchPoint
WhatsApp for Business TouchPoint
Webchat TouchPoint
Microsoft Teams
Queues
AI Flow (Beta)
Classification
Skill Based Routing
Reason Codes
Audio Prompts
Agent Profiles
Agents
Call Park
Resource Accounts
Graphical Designer
Form Based callflow
Using the library
Queues
General
Agent page functionalities
Social Messaging
Contact Center
Support & Assistance
Compliance by design
Social Messaging
Contact Center
Getting Started
General
No results
Try a different search query
Resource Accounts

Before proceeding make sure that your account has Global Administrator role in Microsoft 365 tenant. Make sure that your SBC setup allows forwarding from Teams to Teams (only Direct Routing).
In Microsoft Teams, a resource account is required for each call queue. Resource accounts may also be assigned service telephone numbers. This is how you create a resource account and assign a phone number allowing callers from outside Teams to reach the ROGER365.io queue.
If you haven’t installed the Teams PowerShell module on you PC, you can find the relevant information here: https://docs.microsoft.com/en-us/microsoftteams/teams-powershell-install
We advise to use Teams PowerShell module – version 5.9.0, or above.
1. Create new Resource Account in Teams PowerShell module
- Start a PowerShell session from your pc
- Log in the MicrosoftTeams powershell module with this command
Connect-MicrosoftTeams
- Using the Microsoft Teams PowerShell module, create a new resource account. Update the UserPrincipalName and DisplayName values to align with your environment's naming conventions
New-CsOnlineApplicationInstance -UserPrincipalName "user@domain.com" -ApplicationId 'c8db29b6-8184-44fa-a6a1-086b8ae0435e' -DisplayName "DisplayNameOfAccount"
2. Assign “Microsoft Teams Phone Resource Account” license
- Navigate to Office365 Admin portal via: https://admin.microsoft.com
- Select [Users] / [Active users] and select your created resource account from the previous step
- Assign the resource account a “Microsoft Teams Phone Resource Account”. If this license is unavailable, go to [Billing] / [Purchase Services] where you can add this (free) license
3. Assign a number to the Resource Account
If the Set-CsPhoneNumberAssignment command returns the error 'The application endpoint was not found in Active Directory,' this generally means Azure AD has not yet fully synced. Wait a few minutes and try again.
Direct routing
- If not yet connected start a PowerShell session from your PC like done in step 1
- Configure the resource account with a phone number, phone type, and reverse number lookup using the following command. Insert the username of the previously created resource account, along with the correct phone number, into the command.
Set-CsPhoneNumberAssignment -Identity "user@domain.com" -PhoneNumber +1222333444 -PhoneNumberType DirectRouting -ReverseNumberLookup 'SkipInternalVoip'Update Contact Information of Resource Account identity in Entra ID (only for Direct Routing)
- Navigate to your Entra ID tenant and locate Resource Account’s DisplayName provided in step 1.
- On the Contact Information tab, enter the phone number used in the PowerShell command in the 'Business phone' field.
Operator Connect
- If not yet connected start a PowerShell session from your PC like done in step 1
- Configure the resource account with a phone number and phone type, using the following command. Insert the username of the previously created resource account, along with the correct phone number, into the command.
Set-CsPhoneNumberAssignment -Identity "user@domain.com" -PhoneNumber +1222333444 -PhoneNumberType OperatorConnect
Calling plan
- If not yet connected start a PowerShell session from your PC like done in step 1
- Configure the resource account with a phone number and phone type, using the following command. Insert the username of the previously created resource account, along with the correct phone number, into the command.
Set-CsPhoneNumberAssignment -Identity "user@domain.com" -PhoneNumber +1222333444 -PhoneNumberType CallingPlan
4. Retrieve ObjectID of a Resource Account
- In PowerShell run the following command. Insert the username of the previously created resource account
$Instance = Get-CsOnlineApplicationInstance -Identity "user@domain.com"- Run the command to get the ObjectId of the resource account. Save the ObjectID, it will be used later.
$Instance.ObjectID- To use the disconnect button in the Teams Agent app, you have to run the following command. (Use this exact line, do not change the id)
Set-CsApplicationMeetingConfiguration -AllowRemoveParticipantAppIds @{Add="c8db29b6-8184-44fa-a6a1-086b8ae0435e"}
5. Configure the Resource Account in the ROGER365.io admin portal
- Go to the ROGER365.io admin portal via: https://admin.roger365.io
- Select [Contact Center] / [Resource Accounts]
- Click [+ add Resource Account]
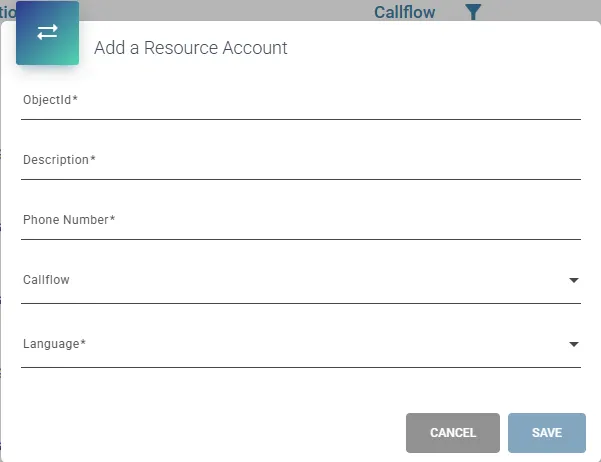
- Enter the ObjectId which you obtained from step 4.
- Enter a description,
- Enter the connected Phone Number,
- If you already configured a callflow, select it here. Else press save and assign the callflow after you’ve created one.
- Select the default language for this Resource Account from the list. The selected language is applied to every call and determines which Audio Prompt file is played. To change the language during a call at runtime, use the Set Language action.