Audio Prompts

Audio prompts are messages which you can play to users while they are in the queue. You have the option to generate audio prompt with our Text-To-Speech option, or upload yo wav files manually. Be aware that the WAV files must be in the correct format: riff-16khz-16bit-mono-pcm and the maximum size is 5mb. At the bottom of this page, you see how you can convert your files into the correct format.
- To check if you file is in the correct format, you can use this tool: https://mediaarea.net/nl/MediaInfo/Download
- On this website, you can find some royalty free music, don’t forget to convert them into the correct format: https://www.bensound.com/royalty-free-music/
- For Music-on-hold you could upload your own file, or use this file which generates a waiting-tone so you callers will know they are still connected and in the queue.
Add languages
First, in the Languages tab, add the correct languages which you would like to support. To add a language:
- Click ‘+ Add Language’
- Click ‘Select Languages’
- Enable the languages which you would like to use
- Click Add
Set default Text-to-Speech settings (optional)
You can set default Text-to-Speech settings per added language. Every new TTS prompt in that language will then use them automatically, removing the need to configure each prompt individually.
- In the Languages tab, click the gear icon next to the language
- Choose the default Voice and Speech style (including speed and pitch)
- Optionally type sample text and click Preview to test
- Click Save
New Text-to-Speech prompts will now inherit these defaults. For existing prompts, you can enable the ‘Use preset values of speech language’ option to apply the defaults to them as well.
Add audio prompts
After you have added the correct languages you can add the audio prompts:
- Click ‘+ Add Audio Prompt’
- Enter a name and (optional) description
- Then click the save icon on the right
- Next to the languages, click the ‘+’ button
- Choose the option for Text-To-Speech or Upload a wav file
Text to Speech
- Enter the text in the correct language you would like to pronounce.
- Select the language to use to pronounce the text
- Select the voice which you would like to use
- For some languages it’s possible to select a certain type, if not available select ‘General’
- You can adjust the Speech Speed or Pitch
- Click preview to hear the final result
- Click Save
If default Text to Speech settings have been configured for the selected language, only the Text field needs to be filled in. The remaining values will be applied automatically from the preset, and can still be adjusted per prompt if needed.
You can use SSML to customize the Text-To-Speech file. In the TAB on the top of the screen you can add your own SSML code. For more info about SSML check this page.
Upload audio file
- Optional: If the WAV file is hosted on a server, you can insert a URL
- Click the ‘Select audio file button’
- Find the correct wav file from the file explorer
- Click the SAVE button
To quickly replay the file, click the three-dots icon left of the language and select ‘Play’. To stop the replay, click the three dots again and select ‘Stop’.
You can review the “Usages” column to see which callflow(s) contain a particular audio prompt. Click on the callflow name(s) to open a box with redirection option to the specific callflow.
Converting the file in correct format
The best way to convert your audio files to the correct format is to use the free audio tool Audacity: https://www.audacityteam.org/download/windows/.
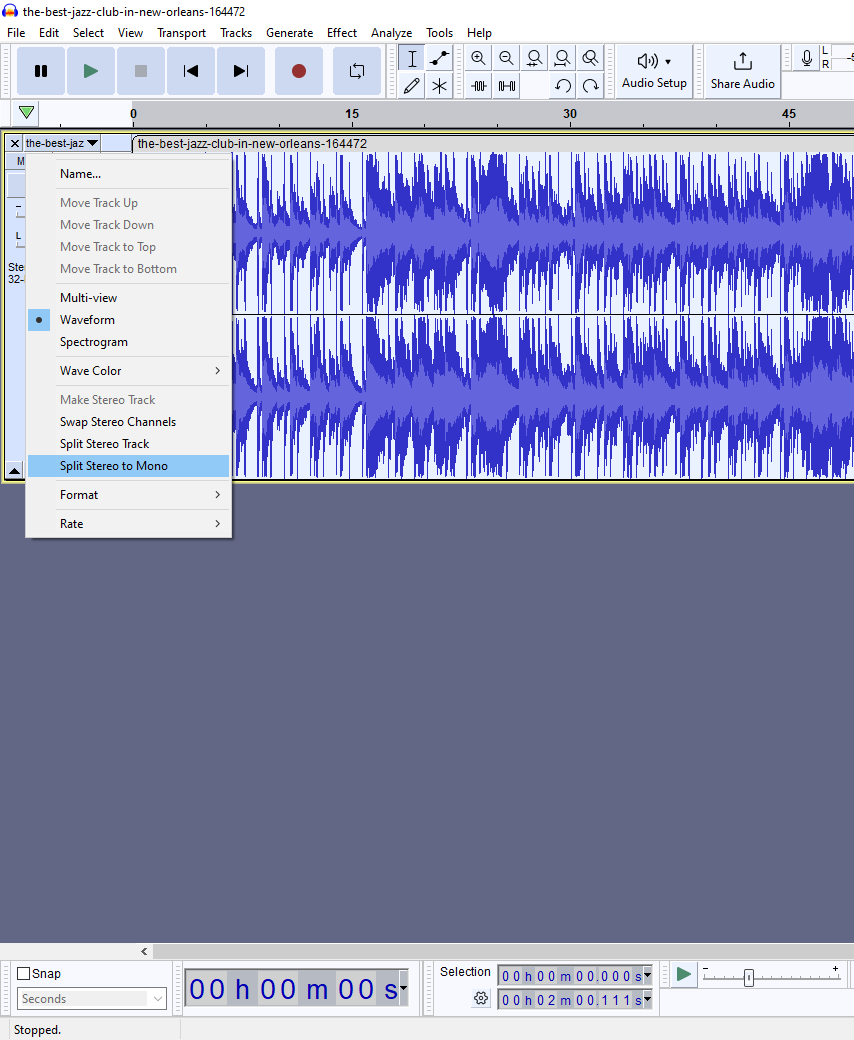
After you have opened the file, and you see two tracks (stereo), click “Select” button at the bottom of the audio file to highlight whole file, then right click on Track Control Panel, and select “Split Stereo to Mono” option.
Your audio file now should be separated into two exactly the same independent mono tracks – delete one of them.
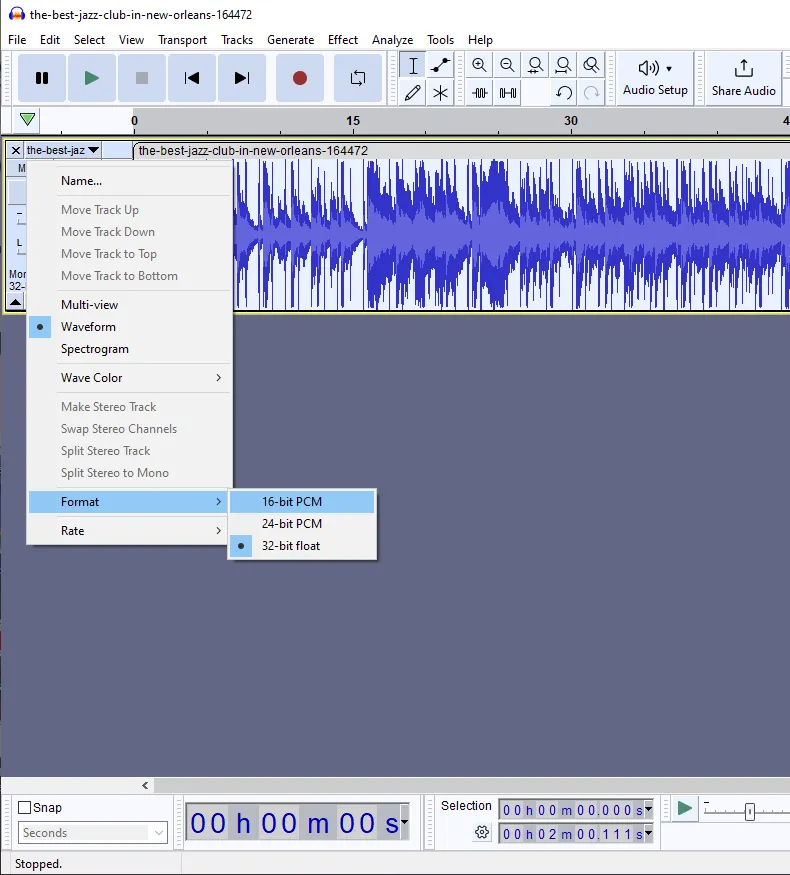
Change the format of audio. Right-click on the Track Control Panel again, but this time, select “Format” -> “16-bit PCM“:
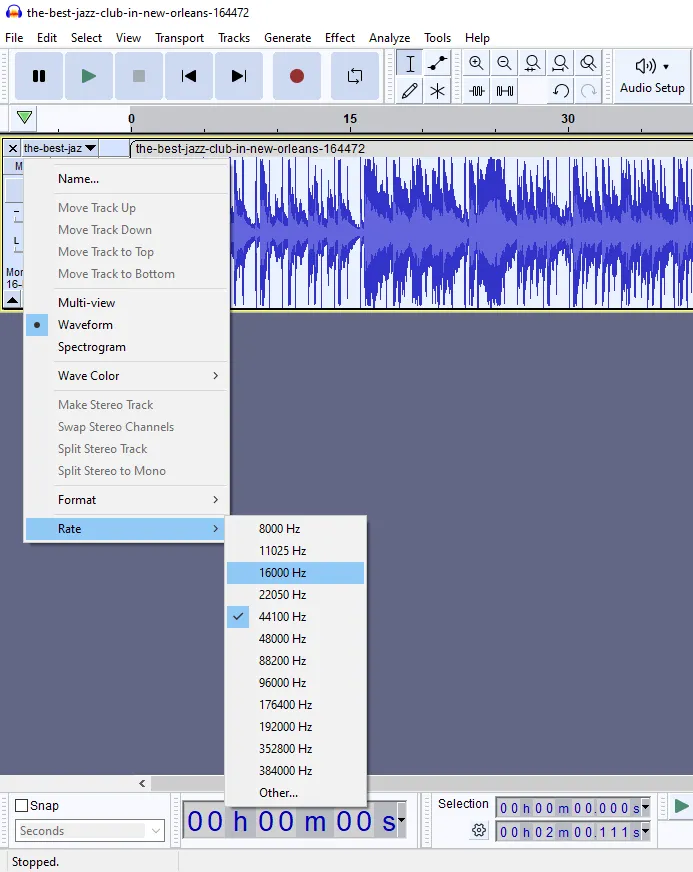
Adjust the sample rate by changing value of “Rate” -> “16000 Hz“:
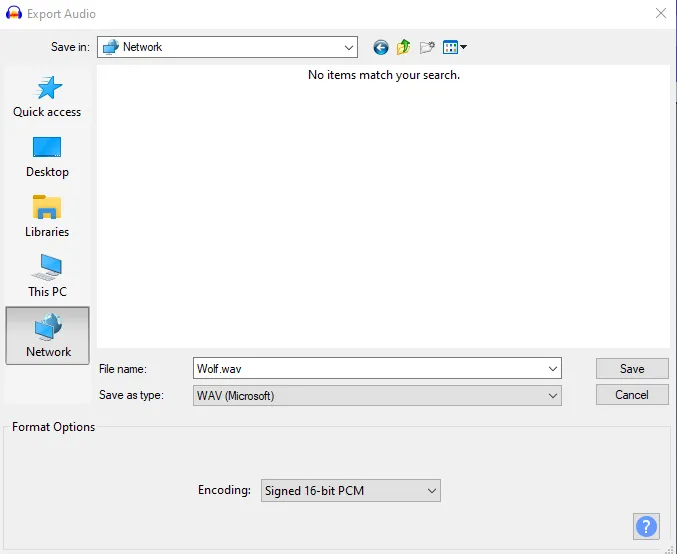
Finally, export your prepared audio file.
Select “File” -> “Export”, save the file as “WAV (Microsoft)“, and set the encoding to “Signed 16-bit PCM“: