Search
Reject
Setup - Contact Center
Graphical Designer
Reject
Read more
Transfer
Setup - Contact Center
Graphical Designer
Transfer
Read more
Merge
Setup - Contact Center
Graphical Designer
Merge
Read more
Play Audio Prompt
Setup - Contact Center
Graphical Designer
Play Audio Prompt
Read more
DTMF
Setup - Contact Center
Graphical Designer
DTMF
Read more
Disconnect
Setup - Contact Center
Graphical Designer
Disconnect
Read more
The basics
Setup - Contact Center
Graphical Designer
The basics
Read more
Shift Synchronization
Setup - Contact Center
Queues
Shift Synchronization
Read more
Power Frame
Setup - Contact Center
Queues
Power Frame
Read more
Create App Registration for Attendant Console
Setup - Contact Center
General
Create App Registration for Attendant Console
Read more
Callback request
Setup - Contact Center
General
Callback request
Read more
Force terminate
How to use
Agent page functionalities
Force terminate
Read more
Supervisor Assist
How to use
Agent page functionalities
Supervisor Assist
Read more
Redirect
How to use
Agent page functionalities
Redirect
Read more
Virtual wait
How to use
Agent page functionalities
Virtual wait
Read more
Conference call
How to use
Agent page functionalities
Conference call
Read more
Outbound DTMF
How to use
Agent page functionalities
Outbound DTMF
Read more
Cancel consultative transfer
How to use
Agent page functionalities
Cancel consultative transfer
Read more
Call Park
How to use
Agent page functionalities
Call Park
Read more
Features
How to use
Social Messaging
Features
Read more
Smart Chatbot
How to use
Social Messaging
Smart Chatbot
Read more
Microsoft Power Automate
How to use
Social Messaging
Microsoft Power Automate
Read more
Phonebook
How to use
Social Messaging
Phonebook
Read more
Sentiment Analytics
How to use
Social Messaging
Sentiment Analytics
Read more
TouchPoint
How to use
Social Messaging
TouchPoint
Read more
Agent
How to use
Social Messaging
Agent
Read more
Reporting
How to use
Contact Center
Reporting
Read more
Supervisor
How to use
Contact Center
Supervisor
Read more
Agent
How to use
Contact Center
Agent
Read more
Obtaining a WhatsApp number
Getting Started
Support & Assistance
Obtaining a WhatsApp number
Read more
What to do next?
Getting Started
Getting Started
What to do next?
Read more
Signup & Enrollment
Getting Started
Getting Started
Signup & Enrollment
Read more
Summary Export
API
Social Messaging
Summary Export
Read more
ReplicatorConfig
API
Social Messaging
ReplicatorConfig
Read more
ReplicatorJobStatus
API
Social Messaging
ReplicatorJobStatus
Read more
TouchPoints
API
Social Messaging
TouchPoints
Read more
Chatbot Languages
API
Social Messaging
Chatbot Languages
Read more
Chatbot Knowledgebases
API
Social Messaging
Chatbot Knowledgebases
Read more
Tenant Information
API
Social Messaging
Tenant Information
Read more
Subscription
API
Social Messaging
Subscription
Read more
Conversation Packs
API
Social Messaging
Conversation Packs
Read more
Conversations
API
Social Messaging
Conversations
Read more
Messages
API
Social Messaging
Messages
Read more
Toastar Users
API
Social Messaging
Toastar Users
Read more
Toastar Conversations
API
Social Messaging
Toastar Conversations
Read more
Teams
API
Social Messaging
Teams
Read more
WhatsAppConsent
API
Social Messaging
WhatsAppConsent
Read more
API TouchPoint
API
Social Messaging
API TouchPoint
Read more
Campaign API
API
Social Messaging
Campaign API
Read more
Transcript
API
Social Messaging
Transcript
Read more
FeedbackExport
API
Contact Center
FeedbackExport
Read more
Outbound Call Campaign
API
Contact Center
Outbound Call Campaign
Read more
Webhooks
API
Contact Center
Webhooks
Read more
Agent EventLog
API
Contact Center
Agent EventLog
Read more
Agent workEntry
API
Contact Center
Agent workEntry
Read more
Call Stream Change
API
Contact Center
Call Stream Change
Read more
Execution Results
API
Contact Center
Execution Results
Read more
Request
API
Contact Center
Request
Read more
Queues
API
Contact Center
Queues
Read more
Calls
API
Contact Center
Calls
Read more
Agent Export
API
Contact Center
Agent Export
Read more
CallParticipants
API
Contact Center
CallParticipants
Read more
API Documentation
API
Contact Center
API Documentation
Read more
ToastarForTeams
API
General
ToastarForTeams
Read more
Callback Requests
API
General
Callback Requests
Read more
Conversation API
API
General
Conversation API
Read more
Classification API
API
General
Classification API
Read more
General Prerequisites
Getting Started
Getting Started
General Prerequisites
Read more
Contact Center
How to use
Contact Center
Read more
Setup Access & Security
Setup - General
Setup Access & Security
Read more
Schedules
Setup - Contact Center
Schedules
Read more
Resource Accounts
Setup - Contact Center
Resource Accounts
Read more
Queues
Setup - Contact Center
Queues
Read more
Callflows
Setup - Contact Center
Callflows
Read more
Audio Files
Setup - Contact Center
Audio Files
Read more
Agents
Setup - Contact Center
Agents
Read more
Logging
How to use
Logging
Read more
Audit
Setup - General
Audit
Read more
CRM
Setup - General
CRM
Read more
Languages
Setup - General
Languages
Read more
Create Tenant App
Setup - General
Create Tenant App
Read more
Getting started
Getting started
Getting started
Read more
Subscriptions
How to use
Subscriptions
Read more
Call Flows
Setup - Contact Center
Call Flows
Read more
AI Flow
API
AI Flow
Read more
Copilot Touchpoint
Setup - Social Messaging
Copilot Touchpoint
Read more
Insights & Analytics
Setup - General
Insights & Analytics
Read more
Wallboard
Setup - General
Wallboard
Read more
Permissions
Setup - General
Permissions
Read more
Logging
Setup - General
Logging
Read more
CRM Calling Integration (Toastar)
Setup - General
CRM Calling Integration (Toastar)
Read more
Custom CRM Connector
Setup - General
Custom CRM Connector
Read more
Default CRM Connectors
Setup - General
Default CRM Connectors
Read more
CRM Replicator
Setup - General
CRM Replicator
Read more
Email Configuration
Setup - General
Email Configuration
Read more
Schedules
Setup - General
Schedules
Read more
Agent Assist
Setup - General
Agent Assist
Read more
Setup Access & Security
Setup - General
Setup Access & Security
Read more
Malicious File Blocking
Setup - Social Messaging
Malicious File Blocking
Read more
Wallboard
Setup - Social Messaging
Wallboard
Read more
Reporting
Setup - Social Messaging
Reporting
Read more
Messages
Setup - Social Messaging
Messages
Read more
Examples
Setup - Social Messaging
Examples
Read more
Graphical Designer
Setup - Social Messaging
Graphical Designer
Read more
Using the library
Setup - Social Messaging
Using the library
Read more
Email Touchpoint
Setup - Social Messaging
Email Touchpoint
Read more
API TouchPoint
Setup - Social Messaging
API TouchPoint
Read more
Facebook TouchPoint
Setup - Social Messaging
Facebook TouchPoint
Read more
SMS TouchPoint
Setup - Social Messaging
SMS TouchPoint
Read more
WhatsApp for Business TouchPoint
Setup - Social Messaging
WhatsApp for Business TouchPoint
Read more
Webchat TouchPoint
Setup - Social Messaging
Webchat TouchPoint
Read more
Microsoft Teams
Setup - Social Messaging
Microsoft Teams
Read more
Queues
Setup - Social Messaging
Queues
Read more
AI Flow (Beta)
Setup - Contact Center
AI Flow (Beta)
Read more
Classification
Setup - Contact Center
Classification
Read more
Skill Based Routing
Setup - Contact Center
Skill Based Routing
Read more
Reason Codes
Setup - Contact Center
Reason Codes
Read more
Audio Prompts
Setup - Contact Center
Audio Prompts
Read more
Agent Profiles
Setup - Contact Center
Agent Profiles
Read more
Agents
Setup - Contact Center
Agents
Read more
Call Park
Setup - General
Call Park
Read more
Resource Accounts
Setup - Contact Center
Resource Accounts
Read more
Graphical Designer
Setup - Contact Center
Graphical Designer
Read more
Form Based callflow
Setup - Contact Center
Form Based callflow
Read more
Using the library
Setup - Contact Center
Using the library
Read more
Queues
Setup - Contact Center
Queues
Read more
General
Setup - Contact Center
General
Read more
Agent page functionalities
How to use
Agent page functionalities
Read more
Social Messaging
How to use
Social Messaging
Read more
Contact Center
How to use
Contact Center
Read more
Support & Assistance
Getting Started
Support & Assistance
Read more
Compliance by design
Getting Started
Compliance by design
Read more
Social Messaging
API
Social Messaging
Read more
Contact Center
API
Contact Center
Read more
Getting Started
Getting Started
Getting Started
Read more
General
API
General
Read more
No results
Try a different search query
Menu
What are you looking for?
Thank you! Your submission has been received!
Oops! Something went wrong while submitting the form.
Setup - Contact Center
Agents

Agents

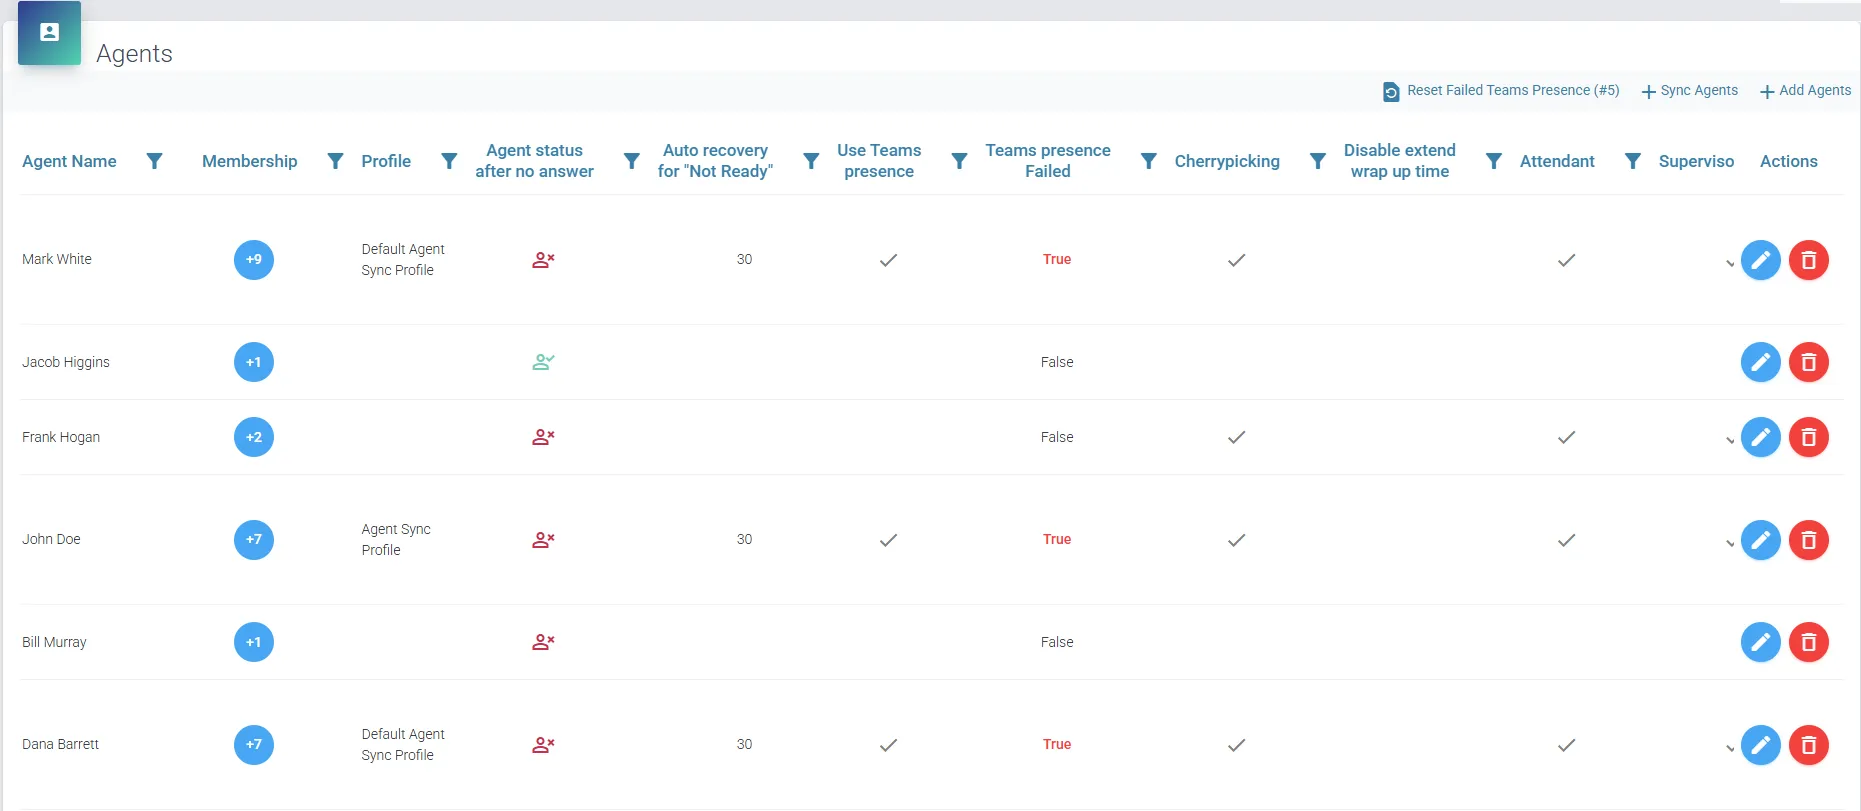
Here, you can select the individuals eligible to be assigned as agents and added to a queue.

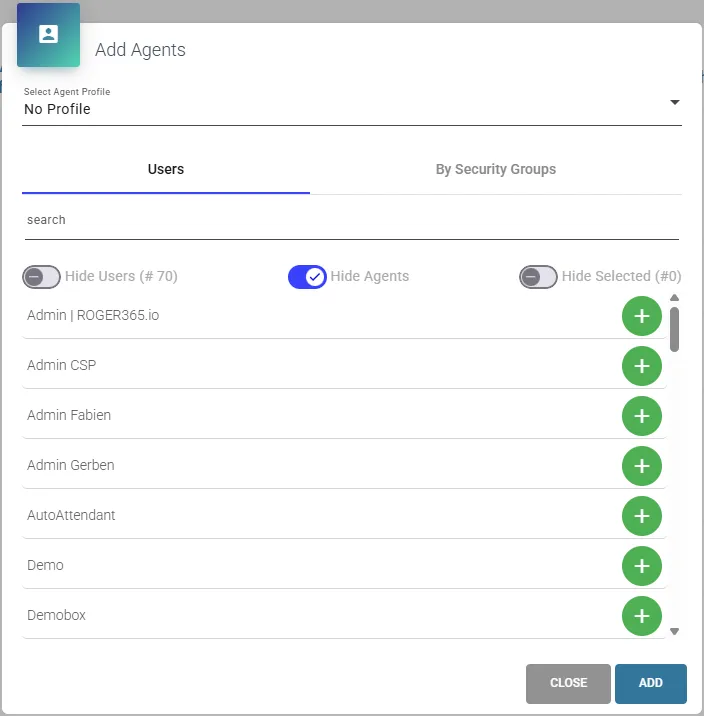
Click '+ Add Agents' to open the pop-up window for adding new agents to the solution. The 'Users' tab displays all users within the organization, including existing agents. For organizations with Security Groups defined in their tenant, the 'By Security Group' tab is recommended, particularly for larger organizations, as it displays the members of the selected group. Note that the first time you search for groups, a pop-up may appear requesting access permissions.

It is possible to assign an Agent Profile to non-agent users, converting them into ROGER agents. This can also be done later via the Agent Profiles admin page.
Once agents have been added to the solution, they will appear in the list. Use the 'Edit' button next to the corresponding Agent record to configure Agent Settings and Skills:

Membership
  • Blue count badge which upon pressing displays list of the Queues that the specific agent is assigned to.
Profile
  • Assigned Agent Profile to the specific Agent, an empty field indicates that no Agent Profile has been assigned.
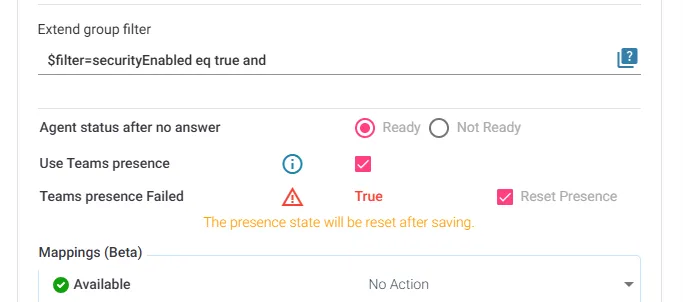
  • Agent status after no answer
    • Enable this setting if you want to change the state of the agent to “Not Ready” if the incoming phone call returns to the queue according Queue’s Ring Timeout setting.
      • When the setting is set to “Not Ready”, you can configure the Auto Recovery option. This allows you to set a number of seconds (30 seconds minimum) that must elapse before the agent’s status automatically changes from “Not Ready” to “Ready”. This option ensures that even if an agent misses a call and forgets to manually update their status, the call will still be properly handled.
Agent status after Decline
  • Enable this setting if you want the agent’s state to automatically change to either “Ready” or “Not Ready” when the agent rejects an incoming phone call from a queue.
  • Note: This option does not apply when an agent has cherrypicked an incoming call from a queue.
    • When the setting is set to “Not Ready”, you can configure the Auto Recovery option. This allows you to set a number of seconds (30 seconds minimum) that must elapse before the agent’s status automatically changes from “Not Ready” to “Ready”. This option ensures that even if an agent misses a call and forgets to manually update their status, the call will still be properly handled.
Use Teams presence
  • When you enable this setting, the agents’ status will change to ‘Busy’ when the Teams status is ‘In a Call’ or ‘Presenting’. Also when the Teams presence changes to ‘Offline’ the status of the agent changes to ‘Off-Work’. Mind that you also have to (one time) authorize the Presence App and enable the setting on the General page.
  • Note: Each time when the agent signs out from Teams Client, don’t forget to manually change “Off work” status to Ready else in CC after logging in.
  • Note: Enable Teams Presence only for active agents handling calls, not for all users in Entra ID. Presence changes from inactive users are also stored, which can impact performance. Use this feature selectively to avoid unnecessary load.
Mappings (Beta)
  • Mappings feature as part of the Teams Presence integration allows to map specific Microsoft Teams status of the user (such as Do not Disturb) to one of available from the list ROGER365 agent status. This feature is particularly useful to for instance map Busy status (which can come from Microsoft Outlook calendar event) to ‘Not Ready’ in Contact Center application of ROGER365.io.
  • Note: The Mappings (Beta) feature is ignored when the agent has an active wrap-up item.
Cherrypicking
  • Enabling this setting allows the agent to pick a specific call from the queue
Disable extend wrap up time
  • Prevents the agent to request more then the default wrap up time.
Attendant
Supervisor Assist
  • Activate Supervisor Assistant feature for this agent.
Agent Assist Tab Profile
  • Shows Agent Assist Profile name when assigned. This activates the Agent Assist feature for this agent. More details can be found at Agent Assist page.
AI Flow
  • Shows AI Flow name when assigned. This activates the AI Flow feature for this agent. More details can be found at AI Flow page.
Graph Query Filter
  • Shows confgured custom people picker query filter for specific agent. It is possible enable Advanced search feature by marking checkboxes “DisplayName”, “Department” and so on.
  • More details can be found at Agent Profiles page.
Skills
  • Here you can assign the created skills to the agent with their experience level. The level can range between 0 and 100, where 0 means no skill and 100 expert.
Languages
  • Assign one or more languages to an agent to make them eligible for Language Aware Routing. Use the + Add Language button to select a language and set a fluency score from 0 to 100. Agents without any language configured will not be invited when a Queue has Language Aware Routing enabled.

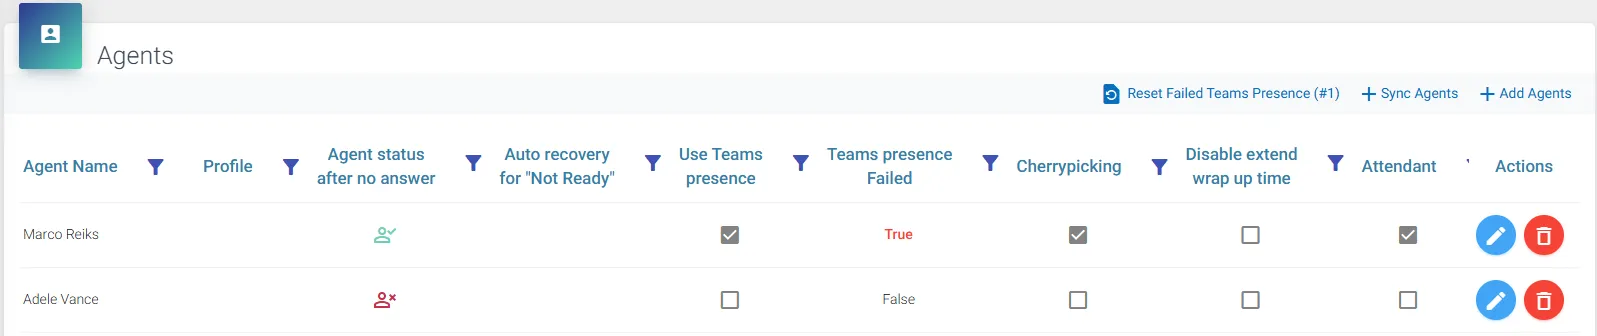
Since ROGER365.io platform cannot guarantee that the Microsoft’s Presence API will always work, the Agent page includes an option to reset failed Teams Presence integrations for affected agents.

You can use the “Reset Failed Teams Presence” button to reset the Teams Presence integration for all affected agents at once.

To reset the integration for a single agent, open the agent’s settings, enable the “Reset Presence” checkbox, and then save the agent’s configuration. This action will reset the Teams Presence integration for that specific agent.
Big organizations should benefit from configured earlier User Synchronization (Beta) feature allowing to add agents to the platform with pre-selected Agent Profile based on selected Entra ID Security Group – more details can be found at this documentation page.

Press “+ Sync Agents” to open pop-up allowing to select Security Group(s) for synchronization.
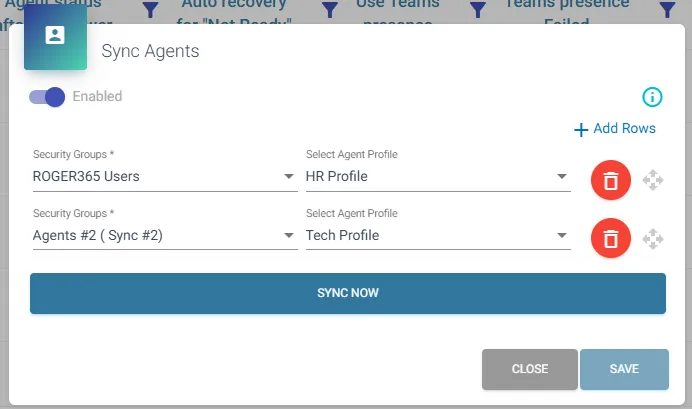
  • Turn on the “Enabled” switch
  • Select Entra ID Security Group(s) which will be used for synchronization with ROGER365.io platform
    • Note: Selected Security Group must be part of Enterprise Application “ROGER365.io” with correct role assigned!
  • Select created earlier Agent Profile to add agents with predefined settings,
  • Press “Save” button to save Sync Agents form,
    • Click [+ Sync Agents] button again,
    • Click on “Sync Now” button to start synchronization of the users into ROGER365.io platform.

On this page