


Search
Shift Synchronization
Setup - Social Messaging
Queues
Shift Synchronization
Text Link
Example PowerShell script
Setup - General
CRM
Example PowerShell script
Text Link
Statistics
How to use
Contact Center
Statistics
Text Link
Supervisor
How to use
Contact Center
Supervisor
Text Link
Agent
How to use
Contact Center
Agent
Text Link
SocialConversationParticipant Export
API
Social Messaging
SocialConversationParticipant Export
Text Link
SocialConversationInfo Export
API
Social Messaging
SocialConversationInfo Export
Text Link
SocialQueue Export
API
Social Messaging
SocialQueue Export
Text Link
Virtual Call Info
API
Contact Center
Virtual Call Info
Text Link
Quality Assurance
API
AI Flow
Quality Assurance
Text Link
Sentiment
API
AI Flow
Sentiment
Text Link
Summary
API
AI Flow
Summary
Text Link
Transcript
API
AI Flow
Transcript
Text Link
MCP Server Setup
API
General
MCP Server Setup
Text Link
Customer data
API
General
Customer data
Text Link
General
How to use
Contact Center
General
Text Link
Create App Registration for Email TouchPoint
Setup - Social Messaging
Email Touchpoint
Create App Registration for Email TouchPoint
Text Link
Module settings
Setup - General
Insights & Analytics
Module settings
Text Link
Examples
Setup - General
Permissions
Examples
Text Link
Setup Access
Setup - General
Permissions
Setup Access
Text Link
Configure Teams client to enable Toastar
Setup - General
CRM Calling Integration (Toastar)
Configure Teams client to enable Toastar
Text Link
Enable users
Setup - General
CRM Calling Integration (Toastar)
Enable users
Text Link
Webhook & Postback URL
Setup - General
CRM Calling Integration (Toastar)
Webhook & Postback URL
Text Link
Add TOASTAR App to Teams
Setup - General
CRM Calling Integration (Toastar)
Add TOASTAR App to Teams
Text Link
Create Teams Virtual User
Setup - General
CRM Calling Integration (Toastar)
Create Teams Virtual User
Text Link
Register Azure BOT Channel
Setup - General
CRM Calling Integration (Toastar)
Register Azure BOT Channel
Text Link
Example PowerShell script
Setup - General
Custom CRM Connector
Example PowerShell script
Text Link
Phonebook
Setup - General
CRM Replicator
Phonebook
Text Link
Webchat to Teams
Setup - Social Messaging
Examples
Webchat to Teams
Text Link
WhatsApp to Teams
Setup - Social Messaging
Examples
WhatsApp to Teams
Text Link
Recognize customer by email
Setup - Social Messaging
Examples
Recognize customer by email
Text Link
Use webchat form to recognize customer
Setup - Social Messaging
Examples
Use webchat form to recognize customer
Text Link
Start voice call (Beta)
Setup - Social Messaging
Graphical Designer
Start voice call (Beta)
Text Link
CRM
Setup - Social Messaging
Graphical Designer
CRM
Text Link
AddTranscript
Setup - Social Messaging
Graphical Designer
AddTranscript
Text Link
Translate
Setup - Social Messaging
Graphical Designer
Translate
Text Link
OpenAI
Setup - Social Messaging
Graphical Designer
OpenAI
Text Link
GetFormInput
Setup - Social Messaging
Graphical Designer
GetFormInput
Text Link
HttpAction
Setup - Social Messaging
Graphical Designer
HttpAction
Text Link
Go to
Setup - Social Messaging
Graphical Designer
Go to
Text Link
Convert Image
Setup - Social Messaging
Graphical Designer
Convert Image
Text Link
SetAction
Setup - Social Messaging
Graphical Designer
SetAction
Text Link
GetPageVisits
Setup - Social Messaging
Graphical Designer
GetPageVisits
Text Link
Sentiment
Setup - Social Messaging
Graphical Designer
Sentiment
Text Link
Powerhook
Setup - Social Messaging
Graphical Designer
Powerhook
Text Link
SendEmailAction
Setup - Social Messaging
Graphical Designer
SendEmailAction
Text Link
Chatbot
Setup - Social Messaging
Graphical Designer
Chatbot
Text Link
Get Transcript
Setup - Social Messaging
Graphical Designer
Get Transcript
Text Link
Set Participant
Setup - Social Messaging
Graphical Designer
Set Participant
Text Link
Schedule
Setup - Social Messaging
Graphical Designer
Schedule
Text Link
Merge
Setup - Social Messaging
Graphical Designer
Merge
Text Link
Choice
Setup - Social Messaging
Graphical Designer
Choice
Text Link
IF
Setup - Social Messaging
Graphical Designer
IF
Text Link
WaitInput
Setup - Social Messaging
Graphical Designer
WaitInput
Text Link
SendMessageTo
Setup - Social Messaging
Graphical Designer
SendMessageTo
Text Link
The basics
Setup - Social Messaging
Graphical Designer
The basics
Text Link
Webhooks for SMS Provider
Setup - Social Messaging
SMS TouchPoint
Webhooks for SMS Provider
Text Link
Sandbox cm.com
Setup - Social Messaging
WhatsApp for Business TouchPoint
Sandbox cm.com
Text Link
WhatsApp OUT
Setup - Social Messaging
WhatsApp for Business TouchPoint
WhatsApp OUT
Text Link
Adding templates
Setup - Social Messaging
WhatsApp for Business TouchPoint
Adding templates
Text Link
Webhooks for WhatsApp Providers
Setup - Social Messaging
WhatsApp for Business TouchPoint
Webhooks for WhatsApp Providers
Text Link
Customize Layout
Setup - Social Messaging
Webchat TouchPoint
Customize Layout
Text Link
Add status message
Setup - Social Messaging
Webchat TouchPoint
Add status message
Text Link
Webchat Parameters
Setup - Social Messaging
Webchat TouchPoint
Webchat Parameters
Text Link
Create adaptive card
Setup - Social Messaging
Microsoft Teams
Create adaptive card
Text Link
Connect Teams Channel
Setup - Social Messaging
Microsoft Teams
Connect Teams Channel
Text Link
Add ROGER365 app to Teams
Setup - Social Messaging
Microsoft Teams
Add ROGER365 app to Teams
Text Link
AI Endpoints
Setup - Contact Center
AI Flow (Beta)
AI Endpoints
Text Link
Classification Action Configurations
Setup - Contact Center
AI Flow (Beta)
Classification Action Configurations
Text Link
Quality Assurance Forms
Setup - Contact Center
AI Flow (Beta)
Quality Assurance Forms
Text Link
Audio Providers
Setup - Contact Center
AI Flow (Beta)
Audio Providers
Text Link
Flows
Setup - Contact Center
AI Flow (Beta)
Flows
Text Link
Last Conversation Data
Setup - Contact Center
Graphical Designer
Last Conversation Data
Text Link
Call to SMS (Beta)
Setup - Contact Center
Graphical Designer
Call to SMS (Beta)
Text Link
Store feedback
Setup - Contact Center
Graphical Designer
Store feedback
Text Link
Call to WhatsApp (Beta)
Setup - Contact Center
Graphical Designer
Call to WhatsApp (Beta)
Text Link
Cancel Virtual Call
Setup - Contact Center
Graphical Designer
Cancel Virtual Call
Text Link
Get Virtual Call Info
Setup - Contact Center
Graphical Designer
Get Virtual Call Info
Text Link
Make Call Virtual
Setup - Contact Center
Graphical Designer
Make Call Virtual
Text Link
OpenAI
Setup - Contact Center
Graphical Designer
OpenAI
Text Link
Last agent
Setup - Contact Center
Graphical Designer
Last agent
Text Link
Text to Speech
Setup - Contact Center
Graphical Designer
Text to Speech
Text Link
Speech to Text
Setup - Contact Center
Graphical Designer
Speech to Text
Text Link
VoiceRecording
Setup - Contact Center
Graphical Designer
VoiceRecording
Text Link
Switch
Setup - Contact Center
Graphical Designer
Switch
Text Link
Subflow
Setup - Contact Center
Graphical Designer
Subflow
Text Link
Set Variable
Setup - Contact Center
Graphical Designer
Set Variable
Text Link
Send Webhook
Setup - Contact Center
Graphical Designer
Send Webhook
Text Link
IF
Setup - Contact Center
Graphical Designer
IF
Text Link
HTTPAction
Setup - Contact Center
Graphical Designer
HTTPAction
Text Link
Wait Timer
Setup - Contact Center
Graphical Designer
Wait Timer
Text Link
CRM
Setup - Contact Center
Graphical Designer
CRM
Text Link
Cancel Task
Setup - Contact Center
Graphical Designer
Cancel Task
Text Link
Cancel all Tasks
Setup - Contact Center
Graphical Designer
Cancel all Tasks
Text Link
Queue
Setup - Contact Center
Graphical Designer
Queue
Text Link
Get Queue Info
Setup - Contact Center
Graphical Designer
Get Queue Info
Text Link
WaitForEnd
Setup - Contact Center
Graphical Designer
WaitForEnd
Text Link
Set language
Setup - Contact Center
Graphical Designer
Set language
Text Link
Safe Transfer
Setup - Contact Center
Graphical Designer
Safe Transfer
Text Link
Schedule
Setup - Contact Center
Graphical Designer
Schedule
Text Link
Contact Center
How to use
Contact Center
Text Link
Setup Access & Security
Setup - General
Setup Access & Security
Text Link
Schedules
Setup - Contact Center
Schedules
Text Link
Resource Accounts
Setup - Contact Center
Resource Accounts
Text Link
Queues
Setup - Contact Center
Queues
Text Link
Callflows
Setup - Contact Center
Callflows
Text Link
Audio Files
Setup - Contact Center
Audio Files
Text Link
Agents
Setup - Contact Center
Agents
Text Link
Logging
How to use
Logging
Text Link
Audit
Setup - General
Audit
Text Link
CRM
Setup - General
CRM
Text Link
Languages
Setup - General
Languages
Text Link
Create Tenant App
Setup - General
Create Tenant App
Text Link
Getting started
Getting started
Getting started
Text Link
Subscriptions
How to use
Subscriptions
Text Link
Call Flows
Setup - Contact Center
Call Flows
Text Link
AI Flow
API
AI Flow
Text Link
Copilot Touchpoint
Setup - Social Messaging
Copilot Touchpoint
Text Link
Insights & Analytics
Setup - General
Insights & Analytics
Text Link
Wallboard
Setup - General
Wallboard
Text Link
Permissions
Setup - General
Permissions
Text Link
Logging
Setup - General
Logging
Text Link
CRM Calling Integration (Toastar)
Setup - General
CRM Calling Integration (Toastar)
Text Link
Custom CRM Connector
Setup - General
Custom CRM Connector
Text Link
Default CRM Connectors
Setup - General
Default CRM Connectors
Text Link
CRM Replicator
Setup - General
CRM Replicator
Text Link
Email Configuration
Setup - General
Email Configuration
Text Link
Schedules
Setup - General
Schedules
Text Link
Agent Assist
Setup - General
Agent Assist
Text Link
Setup Access & Security
Setup - General
Setup Access & Security
Text Link
Malicious File Blocking
Setup - Social Messaging
Malicious File Blocking
Text Link
Wallboard
Setup - Social Messaging
Wallboard
Text Link
Reporting
Setup - Social Messaging
Reporting
Text Link
Messages
Setup - Social Messaging
Messages
Text Link
Examples
Setup - Social Messaging
Examples
Text Link
Graphical Designer
Setup - Social Messaging
Graphical Designer
Text Link
Using the library
Setup - Social Messaging
Using the library
Text Link
Email Touchpoint
Setup - Social Messaging
Email Touchpoint
Text Link
API TouchPoint
Setup - Social Messaging
API TouchPoint
Text Link
Facebook TouchPoint
Setup - Social Messaging
Facebook TouchPoint
Text Link
SMS TouchPoint
Setup - Social Messaging
SMS TouchPoint
Text Link
WhatsApp for Business TouchPoint
Setup - Social Messaging
WhatsApp for Business TouchPoint
Text Link
Webchat TouchPoint
Setup - Social Messaging
Webchat TouchPoint
Text Link
Microsoft Teams
Setup - Social Messaging
Microsoft Teams
Text Link
Queues
Setup - Social Messaging
Queues
Text Link
AI Flow (Beta)
Setup - Contact Center
AI Flow (Beta)
Text Link
Classification
Setup - Contact Center
Classification
Text Link
Skill Based Routing
Setup - Contact Center
Skill Based Routing
Text Link
Reason Codes
Setup - Contact Center
Reason Codes
Text Link
Audio Prompts
Setup - Contact Center
Audio Prompts
Text Link
Agent Profiles
Setup - Contact Center
Agent Profiles
Text Link
Agents
Setup - Contact Center
Agents
Text Link
Call Park
Setup - General
Call Park
Text Link
Resource Accounts
Setup - Contact Center
Resource Accounts
Text Link
Graphical Designer
Setup - Contact Center
Graphical Designer
Text Link
Form Based callflow
Setup - Contact Center
Form Based callflow
Text Link
Using the library
Setup - Contact Center
Using the library
Text Link
Queues
Setup - Contact Center
Queues
Text Link
General
Setup - Contact Center
General
Text Link
Agent page functionalities
How to use
Agent page functionalities
Text Link
Social Messaging
How to use
Social Messaging
Text Link
Contact Center
How to use
Contact Center
Text Link
Support & Assistance
Getting Started
Support & Assistance
Text Link
Compliance by design
Getting Started
Compliance by design
Text Link
Social Messaging
API
Social Messaging
Text Link
Contact Center
API
Contact Center
Text Link
Getting Started
Getting Started
Getting Started
Text Link
General
API
General
Text Link
No results
Try a different search query
Menu
What are you looking for?
Thank you! Your submission has been received!
Oops! Something went wrong while submitting the form.
How to use
Setup - General
Getting started
Setup - Contact Center
Resource Accounts

Resource Accounts

Before proceeding make sure that your account has Global Administrator role in Microsoft 365 tenant. Make sure that your SBC setup allows forwarding from Teams to Teams (only Direct Routing).

Prerequisites

In Microsoft Teams, a resource account is required for each call queue. Resource accounts may also be assigned service telephone numbers. This is how you create a resource account and assign a phone number allowing callers from outside Teams to reach the ROGER365.io queue.

If you haven’t installed the Teams PowerShell module on your PC, you can find the relevant information here: https://docs.microsoft.com/en-us/microsoftteams/teams-powershell-install

if you haven't installed the Graph PowerShell SDK on your PC, you can find the relevant information here: https://learn.microsoft.com/en-us/powershell/microsoftgraph/installation?view=graph-powershell-1.0

We advise to use Teams PowerShell module – version 7.8.0, or above

1. Check if Azure Communication Services is enabled for your tenant

The Azure Communication Services is default not available in every tenant. When this is not present, registering resource accounts to the ACS resource will fail. You can test if the service is already provisioned to the target tenant. This command requires at least the Application Administrator or Global Administrator role to create service principals. This has to be done once per tenant.

  • Start a PowerShell session from your pc
  • Log in the MgGraph powershell module with this command
Connect-MgGraph
  • Check if Azure communcation services is available for this tenant
Get-MgServicePrincipal -Filter "displayName eq 'Azure Communication Services'"
  • When Azure Communication Services is not in the tenant, it can be added with these commands
Connect-MgGraph -Scopes AppRoleAssignment.ReadWrite.All,Application.ReadWrite.All -NoWelcome
New-MgServicePrincipal -Appid '1fd5118e-2576-4263-8130-9503064c837a'

2. Create new Resource Account in Teams PowerShell module

  • Start a PowerShell session from your pc
  • Log in the MicrosoftTeams powershell module with this command
Connect-MicrosoftTeams
  • Using the Microsoft Teams PowerShell module, create a new resource account. Update the UserPrincipalName and DisplayName values to align with your environment's naming conventions
New-CsOnlineApplicationInstance -UserPrincipalName "user@domain.com" -ApplicationId 'c8db29b6-8184-44fa-a6a1-086b8ae0435e' -DisplayName "DisplayNameOfAccount"

3. Assign “Microsoft Teams Phone Resource Account” license

  • Navigate to Office365 Admin portal via: https://admin.microsoft.com
  • Select [Users] / [Active users] and select your created resource account from the previous step
  • Assign the resource account a “Microsoft Teams Phone Resource Account”. If this license is unavailable, go to [Billing] / [Purchase Services] where you can add this (free) license

4. Connect the resource account to the ROGER365.io ACS resources

To connect your resource account to the ACS resources, use the ACS resource ID from the table. Select the cluster closest to where the PSTN resource account number was provisioned.

Cluster ACS resource Id
AU 7907f08b-9119-42ad-ba2d-b09fd32eca94
EU f9eb127d-29c2-4ac5-93bc-337b3c3ce887
US c5d74181-c1d7-4422-995b-ff030b33d48a
  • Configure the resource account with the acs resourceId, using the following command. Insert the username of the previously created resource account, along with the acs resource id from the table, into the command.
Set-CsOnlineApplicationInstance -ApplicationId "c8db29b6-8184-44fa-a6a1-086b8ae0435e" -Identity "user@domain.com" -AcsResourceId "ACS resource Id of Cluster"

5. Assign a number to the Resource Account

If the Set-CsPhoneNumberAssignment command returns the error 'The application endpoint was not found in Active Directory,' this generally means Azure AD has not yet fully synced. Wait a few minutes and try again.

Direct routing

  • If not yet connected start a PowerShell session from your PC like done in step 1
  • Configure the resource account with a phone number, phone type, and reverse number lookup using the following command. Insert the username of the previously created resource account, along with the correct phone number, into the command.
Set-CsPhoneNumberAssignment -Identity "user@domain.com" -PhoneNumber +1222333444 -PhoneNumberType DirectRouting -ReverseNumberLookup 'SkipInternalVoip'

Update Contact Information of Resource Account identity in Entra ID (only for Direct Routing)

  • Navigate to your Entra ID tenant and locate Resource Account’s DisplayName provided in step 1.
  • On the Contact Information tab, enter the phone number used in the PowerShell command in the 'Business phone' field.

Operator Connect

  • If not yet connected start a PowerShell session from your PC like done in step 1
  • Configure the resource account with a phone number and phone type, using the following command. Insert the username of the previously created resource account, along with the correct phone number, into the command.
Set-CsPhoneNumberAssignment -Identity "user@domain.com" -PhoneNumber +1222333444 -PhoneNumberType OperatorConnect

Calling plan

  • If not yet connected start a PowerShell session from your PC like done in step 1
  • Configure the resource account with a phone number and phone type, using the following command. Insert the username of the previously created resource account, along with the correct phone number, into the command.
Set-CsPhoneNumberAssignment -Identity "user@domain.com" -PhoneNumber +1222333444 -PhoneNumberType CallingPlan

6. Synchronize changes to Microsoft Teams

To make all changes active, the resource account has to be synced to Microsoft Teams.

  • In PowerShell run the following command. Insert the username of the previously created resource account
$Instance = Get-CsOnlineApplicationInstance -Identity "user@domain.com"
  • Run the command to get the ObjectId of the resource account. Save the ObjectID, it will be used later.
$Instance.ObjectID
  • Run the command to synchronize the change to MicrosofTeams to make them active
Sync-CsOnlineApplicationInstance -ObjectID $Instance.ApplicationId -ApplicationId "c8db29b6-8184-44fa-a6a1-086b8ae0435e"

To check your configured resource account, use the following command.

 Get-CsOnlineApplicationInstance -Identity "user@domain.com" | fl

Resource Accounts page

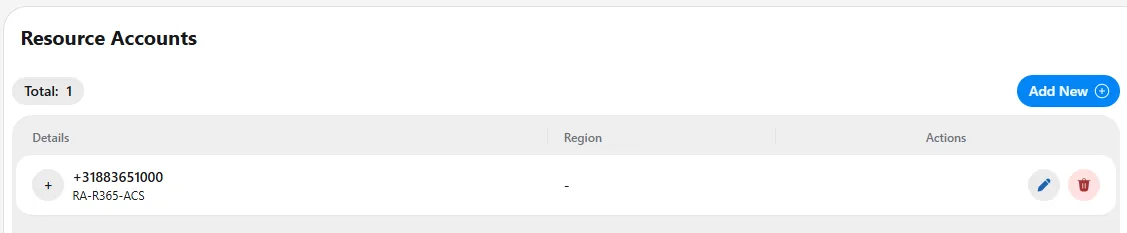
The Resource Accounts page is where you manage the Teams resource accounts used on your platform. A resource account is associated with a phone number and is used for routing calls, including outbound calling from queues. You can find this page under the Contact Center section in the left-hand menu.
Understanding the page

The counter at the top shows the total number of resource accounts currently configured (in this example, 1). Each resource account is listed in a table with the following columns:

  • Details – The phone number of the resource account (for example, +31883651000), along with its name shown beneath it (for example, RA-R365-ACS). Click the plus (+) icon on the left to expand the row and view more details.
  • Actions – The controls for managing each resource account.

Working with resource accounts

To add a new resource account, click the Add New button in the top-right corner.

To edit an existing resource account, click the blue pencil icon in the Actions column for that row. To delete a resource account, click the red trash icon in the same row.

7. Creating a Resource Account

The Create Resource Account dialog lets you add a new resource account to the platform. Click Add New on the Resource Accounts page to open this dialog, then complete the fields below.

  1. ACS Resource Account Object Id (required) – Select the ACS resource account object ID to associate with this resource account. This should be the same as the one set on the resource account in the Teams PowerShell module.
  2. Object Id (required) – Enter the object ID of the resource account which you saved earlier at step 6
  3. Description (required) – Enter a brief description of the resource account to help identify its purpose—for instance, the display name of the Teams resource account.
  4. Phone number (required) – Enter the phone number for the resource account in international format (for example, +31883651000). This field is mandatory, as indicated by the red asterisk.
  5. Default Language (required) – Select the default language for the resource account. This determines the default language used for playing audio prompts and for hinting the transcripts.

When you have completed the fields, click Save in the bottom-right corner to create the resource account.

On this page